background image

AD Plus2.0 User Manual

Page 5 of 66

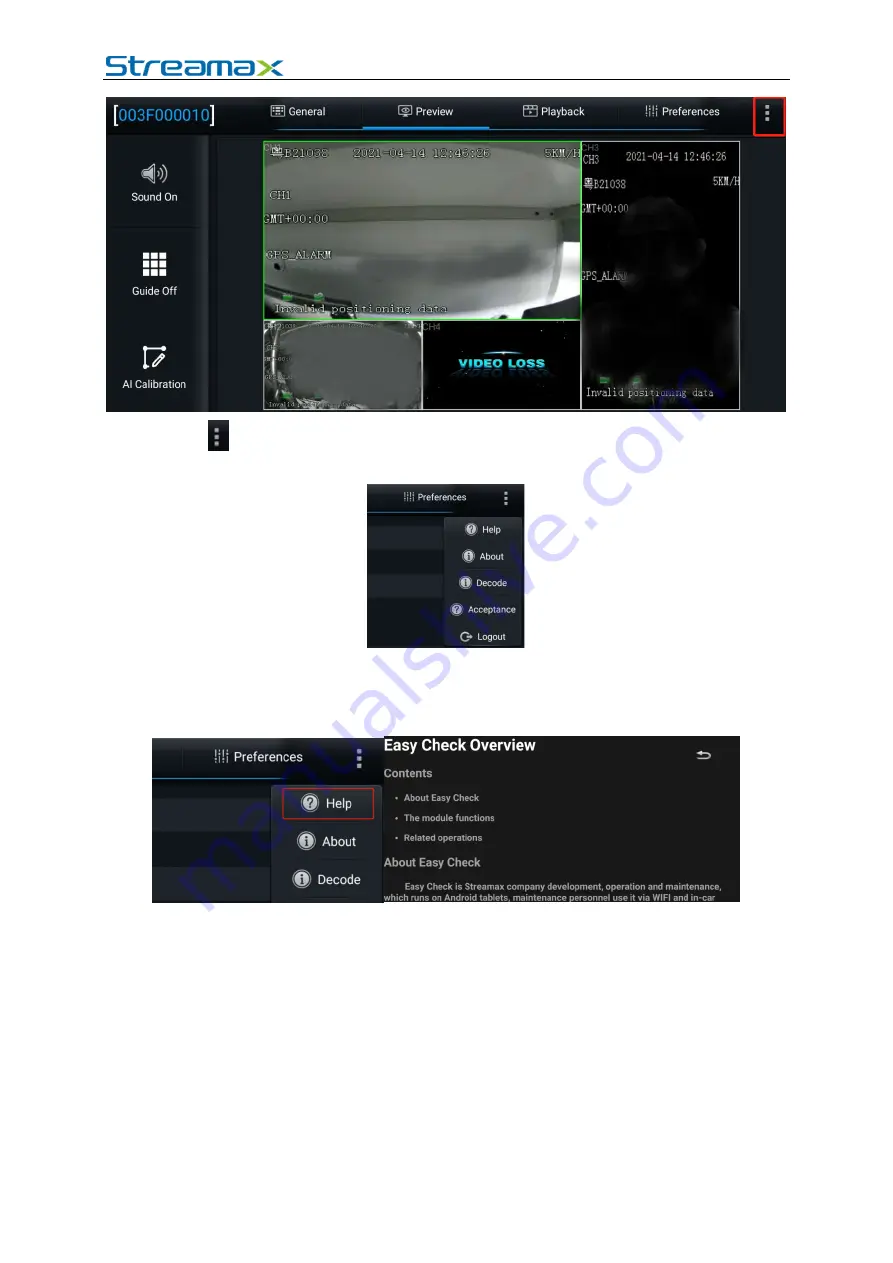
Tap

on the upper right corner. The menu including Help, About, and Logout is

displayed.

Tap

Logout

to log out of the connected device.

Tap

Help

to view the help document of the truck EasyCheck app, as shown in the

figure below.

Tap

About

to view the version information of the truck EasyCheck app on your

mobile phone.

Summary of Contents for AD Plus2.0

Page 1: ...Page 1 of 68 AD Plus2 0 User Manual ...

Page 2: ...AD Plus2 0 User Manual Page 1 of 66 Revision History Revision Date Version Revision Description Author 2022 04 08 V1 0 First issue Wang Xiaoyong ...

Page 3: ...2 5 2 Video Export 19 2 6 Basic Setup 21 2 6 1 Registration Information 21 2 6 2 Time Setup 21 2 6 3 ON OFF 23 2 6 4 User Setup 26 2 6 5 Network 27 2 6 6 Application 32 2 6 7 Voice Setup 33 2 6 8 Face Compare 33 2 7 Surveillance 34 2 7 1 Preview 34 2 7 2 Recording 34 2 7 3 IPC Setting 41 2 7 4 Camera Setting 42 2 8 Data Collection 42 2 8 1 General Setting 42 2 8 2 Capture Setting 48 2 9 Alarm Sett...

Page 4: ... App is recommended for easy carrying and quick settings 1 2 Function Overview The Streamax AD Plus2 0 is a cost effective intelligent device specially developed for remote video surveillance and driving safety surveillance of trucks It has the following functions and features 1 4 channel video 2 channel by default ADAS and DSC and extended 2 channel Integrating the ADAS camera DSC camera and MDVR...

Page 5: ...und is displayed During the first login the Wi Fi hotspot is named after the encrypted chip number of the AD Plus2 0 If the license plate number is changed the hotspot name is the new license plate number Search for a Wi Fi hotspot named after the encrypted AD Plus2 0 chip number or the license plate number you have entered The login screen is displayed On the login screen enter the corresponding ...

Page 6: ...nu including Help About and Logout is displayed Tap Logout to log out of the connected device Tap Help to view the help document of the truck EasyCheck app as shown in the figure below Tap About to view the version information of the truck EasyCheck app on your mobile phone ...

Page 7: ...f the device import export parameters logs and other files and upgrade the software Basic Info shows the server connection status IO level status and use OBD data G Sensor data ACC status pulse status and device status Device Module shows the status of the Wi Fi 3G 4G and positioning modules of the device ...

Page 8: ...lite navigation system GPS GLONASS or GALILEO that the satellite belongs to SNR indicates the signal to noise ratio which is a parameter reflecting the quality of satellite positioning signals Direction angle represents the satellite azimuth angle and Altitude angle represents the satellite altitude angle This screen is displayed only when the GPS raw data record command is opened For the specific...

Page 9: ...fo screen you can locally upgrade the version of the MDVR IPC R Watch communication module GPS or power box A USB adapter cable is required to connect to a USB flash drive or the EasyCheck App with the SD card for the upgrade To upgrade the required item tap In the displayed confirmation prompt box tap OK ...

Page 10: ...to the device via the EasyCheck app to perform the following operations 1 Export alarm logs user logs and black box files 2 Export alarm capture images of the selected time period 3 Import Export the Geo fence information 4 Import Export the AI configuration file 5 Restore default settings 6 Export print data within a specified time period 7 Reboot the device 8 Import and clear the encryption key ...

Page 11: ...SS will be displayed 2 4 2 AI Calibration ADAS automatic calibration is supported by AD Plus2 0 After the ADAS lens installation height left margin front end width and front end length are entered the equipment will be calibrated automatically For detailed setting screen refer to Section 2 9 5 Here the traditional method of ADAS algorithm calibration from the preview interface and the calibration ...

Page 12: ...idth and length of the front end in centimeter or inch referring to the example on the right for the size measurement with each parameter serial number corresponding to each legend serial number In addition this step is added with the setting of the lane departure alarm sensitivity and the installation personnel can select the appropriate sensitivity according to the vehicle model during installat...

Page 13: ...Tap Next Select the check box Tap the required source of speed from Satellite Pulse OBD and ATrack Select the required IO for the left right turn signal in Left Turn Right Turn respectively Tap the required signal source type from Source Voltage and Source Pulse Usually Source Pulse is selected Tap Next ...

Page 14: ...gnal cables are properly connected tap Complete The calibration of the ADAS camera is completed 2 4 2 2 DSC Calibration On the home screen tap Preview The Preview screen is displayed Tap AI Calibration on the lower left corner Tap DSC for calibration Tap channel 2 Tap Calibration ...

Page 15: ...d facing toward the front direction right hand drive indicates that the steering wheel is on the right of the cockpit when the driver is seated in the cockpit and facing toward the front direction Tap Save to save the operation The DSC calibration is complete Tap Exit to exit the DSC calibration 2 4 2 3 DMS Calibration Optional 1 Click Preview on the homepage to enter the Preview screen 2 Click AI...

Page 16: ...y questions please click each option in turn and refer to the legend and description on the right After selecting the corresponding installation method the software automatically associates the calibration method with the installation method not requiring any manual operation for installation on the left A pillar the right A pillar and the lateral side of the countertop the lateral side calibratio...

Page 17: ... the driver s face If the driver moves his head during the calibration the calibration will restart automatically Note For installation on the left A pillar the right A pillar and the lateral side of the countertop the human face and the camera must form a certain angle to complete the calibration For installation on the front side of the countertop the human face must be in front of the camera to...

Page 18: ...tion completed Click OK to complete the calibration and exit the calibration mode 2 5 Playback 2 5 1 Video Playback On the Playback screen you can search for the main stream video sub stream video in the main storage sub storage on a certain date ...

Page 19: ... videos recorded on that day Yellow Alarm videos recorded on that day and file automatically locked videos locked Tap the date of the video to be viewed in the calendar On the displayed screen select the channel of the video to be viewed You can re select the date and type of the video on this screen Then tap NEXT After the channel is selected you can drag the timeline to select the playback time ...

Page 20: ...for each channel indicates the video types in different time periods 2 If there are many video channels drag on the right part of the screen upward and downward to view the video of each channel 3 Check a channel or more and select the timeline s to playback or export the videos in the channel s at the selected time 2 5 2 Video Export You can also export the video of the selected time period Tap V...

Page 21: ...Plus2 0 User Manual Page 20 of 66 In the video export options you can choose to export the cropped video to an external USB disk or mobile phone so that O M personnel can quickly obtain and share the video ...

Page 22: ... the license plate number here the Wi Fi hotspot will be named after the license plate number when you connect the device hotspot using Veyes 2 6 2 Time Setup General allows you to set the format of the time display and the time zone in which it is located 1 Date Format can be set to YEAR MONTH DAY MONTH DAY YEAR or DAY MONTH YEAR It is reflected only in the live view and recording OSD 2 Time Form...

Page 23: ...ate and time manually 2 Satellite allows you to synchronize time with the GPS 3 NTP allows the system to use the WAN network time You can select the time of different WAN servers 4 Central Server allows the system to use the time of the reported platform If multiple platforms are reported you can select the time of different platforms 5 If multiple time synchronization methods are selected at the ...

Page 24: ...e DST function It is disabled by default 2 Offset can be set to One Hour or Two Hours 3 Mode can be set to Week or Date 4 Week allows you to set Start and End of the DST by setting the month Nth day of the week and hour minute second 5 Date allows you to set Start and End of the DST by setting the date and hour minute second 2 6 3 ON OFF ON OFF Tap Preferences Basic Setup Time Setup ON OFF as show...

Page 25: ...gured including never 30s 1 min 3 mins 5 mins and 10 mins Sleep Tap Preferences Basic Setup Time Setup Sleep as shown in the following figure 1 Sleep Mode can be set to Low power standby or Zero power standby Zero power standby In this sleep mode the system will not be waken up after the device is turned off in ignition or timing mode Low power standby In this sleep mode the system can be waken up...

Page 26: ... vehicle is turned off and goes online properly The time interval cannot be modified for the time being and the default is 5 minutes Wake Tap Preferences Basic Setup Time Setup Wake as shown in the following figure To select a wake method select the corresponding check box 1 IO Wake wakes up the MDVR by triggering the IO alarm 2 G Sensor Wake wakes up the MDVR by shaking the device in the X Y or Z...

Page 27: ... ACC is disabled and the vehicle movement distance is less than the configured threshold the device is shut down The threshold range is 3 to 20 m and the default value is 10 m 2 Wakeup Distance This parameter is currently not used 3 Wakeup Threshold determines whether to wake up the MDVR according to the acceleration received by the built in G Sensor of the power box when the ACC detects that the ...

Page 28: ...mal User only has the permission to query settings 2 6 5 Network Server Setup Tap Preferences Basic Setup Network Server Setup as shown in the following figure 1 Tap on the right part of the screen to add a server tap to delete a server on the screen but Server1 cannot be deleted 2 ON enables a server after being selected A maximum of three servers can be enabled simultaneously If it is deselected...

Page 29: ...cifies the IP address of the media server of the platform to which the device reports information 9 Media Server port specifies the corresponding device port through which the device reports information to the platform The registrar and media server have the same default IP address and port number 10 It supports 4G SIM cards which can provide mobile hotspots for mobile terminals such as mobile pho...

Page 30: ...mal the device will be disconnected from the server All remote services of the vehicle are stopped To avoid this situation you can change the IP address and port number of the device server by sending SMS messages Command keyword SMCM Command parameters Server Serial Number Enable N9M Register Server N9M Media Server N9M Register Server Port N9M Media Server Port Server Serial Number Enable N9M Re...

Page 31: ...t This port will be used for IE access WIFI Tap Preferences Basic Setup Network WIFI as shown in the following figure 1 Lock enables disables the modification of Wi Fi hotspot parameters After it is selected the relevant parameters of the Wi Fi hotspot will not be modified 2 Enable specifies the Wi Fi connection mode and can be set to AP Client or Disable AP In this mode the Wi Fi name is automati...

Page 32: ... 3 minutes the device will exit from the AP mode and the module will enter the sleep mode 3 WIFI Mode specifies Wi Fi frequency bands and can be set to 2 4G 5G or Adaptive 4 ESSID In AP mode the entered value is the hotspot name when the hotspot function of the device is turned on and the Wi Fi name when a mobile device connects the device no longer a serial number After the connection the EasyChe...

Reviews: