Theme Plus Issue 2.1 28/06/01
Page 8 of 12
Lighting the fire
The appliance Data Badge is positioned in front of the burner behind the fret and carries the
control knob positions (Fig. 8 or 9 depending on gas type). The full lighting procedure is as
follows:
1. Push control knob in as far as possible on gas control.
2. Turn knob anti-clockwise until a click is heard. The knob will stop at the ignition
position and a spark should be seen at the tip of the ignition probe. At the same time
the pilot flame should light. KEEP THE KNOB PRESSED IN FOR 10 SECONDS. If
the pilot should fail to light, turn the control knob clockwise to the 'off' position, wait 3
minutes and repeat the procedure.
3. When the pilot flame is alight the control knob should be allowed to spring out
slightly. Turn the knob fully anti-clockwise to the high position. The pilot flame
should then ignite the main fire.
4. The height of the flames can be adjusted by turning the control knob between the low
and high positions. Note that the knob 'latches' in position at either end of this
movement and must be pushed in slightly before it can be turned.
5. The appearance of the flames can be altered by means of the air adjustment lever
positioned to the right of the control knob (natural gas version only). Moving the lever
up will admit more air and produce a 'coke fire' effect. Moving it down will close off
some of the air and simulate a 'coal fire' with flickering flames.
6. To turn the fire off, depress the knob slightly and turn it to the pilot position.
7. To completely extinguish the fire depress the knob slightly and turn to the 'Off'
position.
Check for clearance of products of combustion
1. Light the fire.
2. Close all windows and doors.
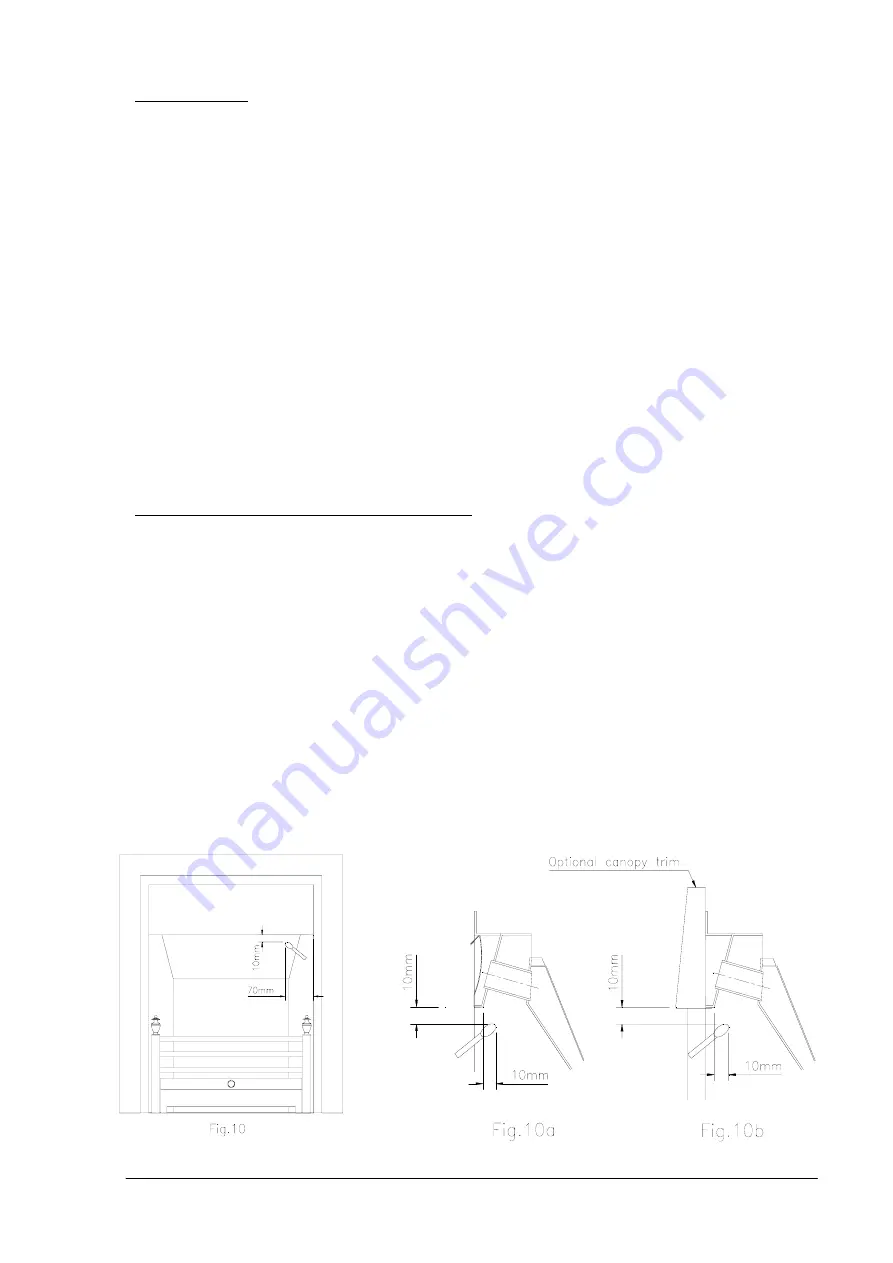
3. After approximately 5 minutes place a smoke match 70mm from the right hand side,
inside edge of the trim, 10mm below and 10mm within the opening of the fire as
shown in Fig. 10, 10a, & 10b. Ensure that the smoke is drawn into the fire aperture. If
spillage is detected, operate the fire for a further 10 minutes and repeat the test. If
spillage is still detected introduce ventilation into the room by opening a window or
door. If spillage is no longer detected then purpose made ventilation with a minimum
area of 100 sq.cm must be provided. If after introducing ventilation into the room
spillage is still detected, remove the restrictor plate if fitted (see Fig. 3) and retest for
spillage. If spillage is still detected the cause must be discovered and the fault
corrected. If the fault cannot be corrected, disconnect the gas supply to the appliance
and seek expert advice. Possible causes of spillage are chimney restrictions, or an
incorrect cowl or terminal.
4. If there is an extraction fan in a nearby room then the spillage test must be repeated
with the fan turned on and any interconnecting doors between the fire and the fan
location left open.


