background image

Theme Plus Issue 2.1 28/06/01

 Page 7 of 12

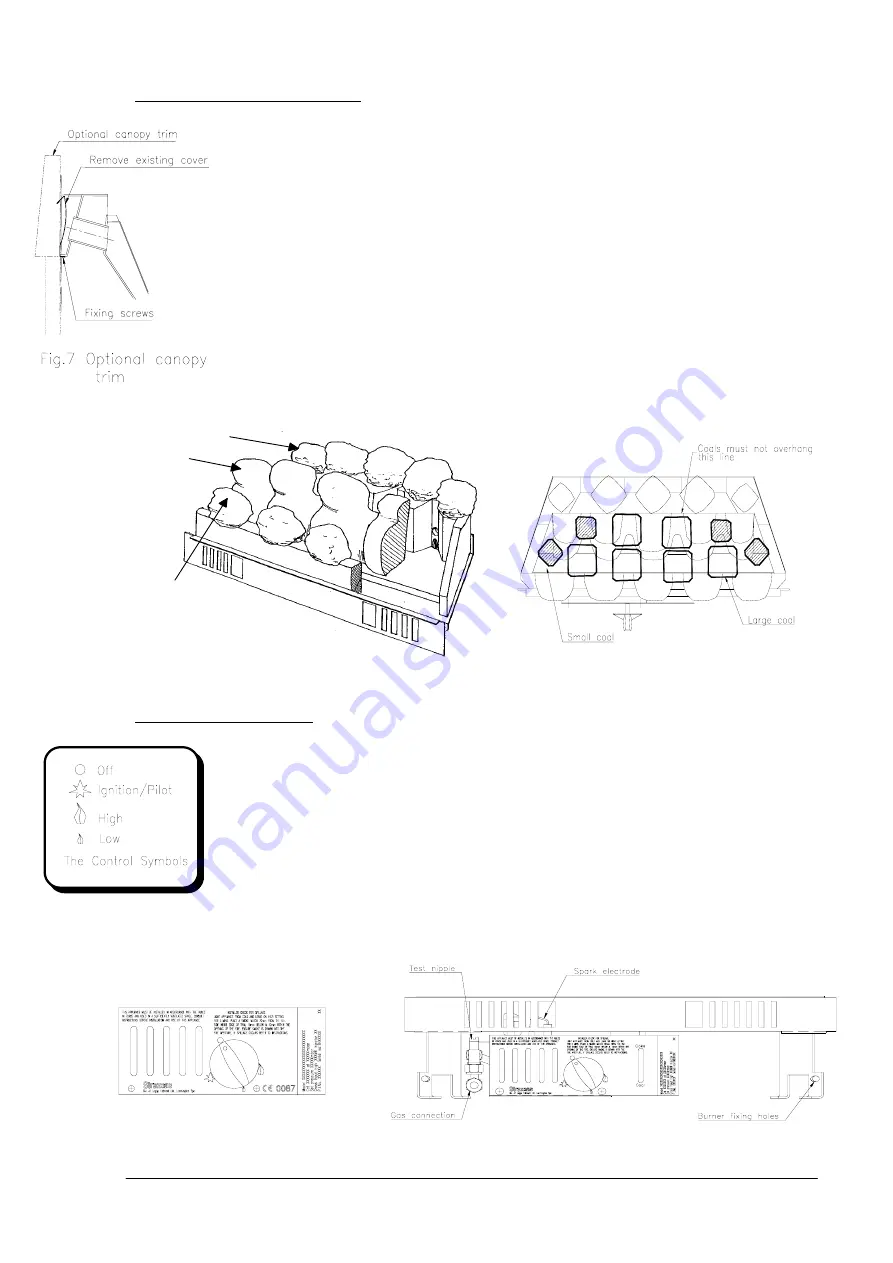
Fig. 8 The data badge plate & test

Final assembly for all types of flue

Following satisfactory installation of the convection box into the opening, proceed as follows:

1.  Secure the burner to the convection box using the two screws provided, through the

holes in the front of the legs.

2.  Connect the gas supply pipe to the inlet elbow.
3.  The ceramic components are fragile and should be handled with care. Refer to Figs.

5 and 6 for positioning of ceramic fibre blocks and coals.

4.  Place the chair shaped back ceramic on the burner, pushing it back against the

upturned edge of the burner plate.

5.  Place the centre ceramic on the back ceramic pushing it back to sit comfortably

between the tapered sides.

6.  Spring forward the slotted front plate and slide the front ceramics down as far as the

stops.

7.  Remove the coals from the bag; note that there are 2 sizes supplied with the burner.

Place them on the ceramic blocks in accordance with Fig. 6.

8.  If a flat trim or box trim has been supplied, attach it to the fire flange by means of the

magnets. If the optional canopy trim has been supplied, first remove and discard the
existing front cover by undoing the two screws in its bottom edge, then secure the
canopy trim using the same fixings. (See Fig. 7)

Note:

 The flat trim and optional canopy trim cannot be used with the spacer frame.

Leak test & pressure test

1.  Turn on the main gas supply and check for gas soundness.
2.  Remove pressure test screw, and fit pressure gauge to pressure test point.
3.  Light the fire (see next section).
4.  Turn control knob anti-clockwise to 

High

 position.

5.  When the control knob is in the 

High

 position, you should have a gas pressure of

19.0mbar ± 1.0mbar when using natural gas and 36.5mbar for propane.

6.  Extinguish the fire by turning the control knob clockwise to the 

Off

 position.

7.  Remove the pressure gauge and replace the pressure test screw. Check again for

gas soundness.

8.  Fit the front fret by hooking the support lugs at each end over the slotted front plate

on the burner (if using a Straxgas fret), or place an alternative front fret in front of the
burner.

Note:

 If a fret from another manufacturer is being used, it must comply with the minimum free

area requirements of Fig. 1.

Fig.6 Placing the loose coals

Back ceram ic

Centre ceram ic

Front ceram ic

Fig.5 Assembling the ceramic blocks

Fig.9 Data badge plate - propane version

Summary of Contents for Theme 18

Page 1: ...s The relevant British Standard installation specifications and codes of practice and Building Regulations issued by the Department of the Environment and Building Standards Scotland Consolidated Regulations issued by the Scottish Development Board Gas Safety Installation and Use Regulations Failure to install this appliance correctly could lead to prosecution and render the guarantee invalid Atte...

Page 2: ...aving a throat forming lintel conforming to BS1251 The appliance may be installed either a without removing the chairbrick but the spacer frame MUST be used see Fig 2a for minimum depth requirements or b in a builder s opening with sufficient volume for debris collection conforming to Fig 2b A pre cast block flue conforming to the requirements of BS1289 with a minimum cross sectional area of 16 50...

Page 3: ...ance avoid touching the visible painted parts as the paint requires curing this will take approximately 2 hours under fire In some cases there may be a slight odour given off for a short period Fret options The following Straxgas frets are suitable for use with this appliance Black finger brass or stainless finials ash pan ring Brass finger Stainless finger polished or satin Classic Silver Classic...

Page 4: ...ine version 569mm Lowline version 499mm Min 524mm Max Lowline version 569mm Lowline version 569mm Lowline version 569mm Lowline version 499mm Min 524mm Max Lowline version 499mm Min 524mm Max Lowline version 499mm Min 524mm Max Lowline version 569mm ...

Page 5: ...four holes in the flange of the appliance and insert the plugs provided 5 Secure the convection box using the screws provided or alternatively use optional wire fixing kit Pre cast block flue Figs 2c and 2d Note The outlet restrictor plate must not be used with this installation 1 If the spacer frame is being used attach it to the back of the convection box flange using the four countersunk screws...

Page 6: ...e sure that the foam seal behind the fire flange is compressed all round and then using two spanners screw the backnuts down the sleeve bolts in order to tension the wire ropes and hold the convector box against the surround 10 Coil up surplus wire rope and store inside convection channel see drawing Do not cut off surplus possible future removal and refitting of convector box requires the full le...

Page 7: ...al canopy trim has been supplied first remove and discard the existing front cover by undoing the two screws in its bottom edge then secure the canopy trim using the same fixings See Fig 7 Note The flat trim and optional canopy trim cannot be used with the spacer frame Leak test pressure test 1 Turn on the main gas supply and check for gas soundness 2 Remove pressure test screw and fit pressure ga...

Page 8: ...oke fire effect Moving it down will close off some of the air and simulate a coal fire with flickering flames 6 To turn the fire off depress the knob slightly and turn it to the pilot position 7 To completely extinguish the fire depress the knob slightly and turn to the Off position Check for clearance of products of combustion 1 Light the fire 2 Close all windows and doors 3 After approximately 5...

Page 9: ...e that the chimney is swept clean Before commencing any service or replacement of parts turn off the main gas supply and ensure that the fire is cold When ordering spare parts please quote appliance serial number which can be found on the data badge plate Ceramics Examine the coals and ceramic blocks for signs of cracking and replace if necessary Handle the ceramic components with care Dust off an...

Page 10: ...tion in the pilot outlet orifice on the tap body 12 Reassemble the appliance in reverse order 13 Replace the ceramic blocks and coals see Figs 5 and 6 14 Turn on the gas supply and check for soundness Note The igniter is not replaceable separately Replacement of main injector 1 Repeat operations 1 5 as described for Replacement of gas tap FSD piezo igniter 2 Remove gas pipe from gas valve to injec...

Page 11: ...right reserved Legge Fabheat Ltd SPARE PARTS When ordering spare parts please quote part numbers as listed below NATURAL GAS L P G Propane Gas tap FSD piezo igniter BV50023 BV50147 Oxypilot assembly BA50004 BA50041 Injector BI70800 BI70530 Back ceramic BC11300 BC11300 Centre ceramic BC11296 BC11296 Front ceramic set of 2 BC11295 BC11295 Set of 10 loose coals BC50032 BC50032 Fig 12 Theme Plus outli...

Page 12: ...Theme Plus Issue 2 1 28 06 01 Page 12 of 12 Lowline Version 565mm Lowline Version 545mm Lowline Version 565mm Lowline Version 579mm Lowline Version 495mm Lowline Version 495mm ...

Reviews: