background image

R2W PLUS


24 


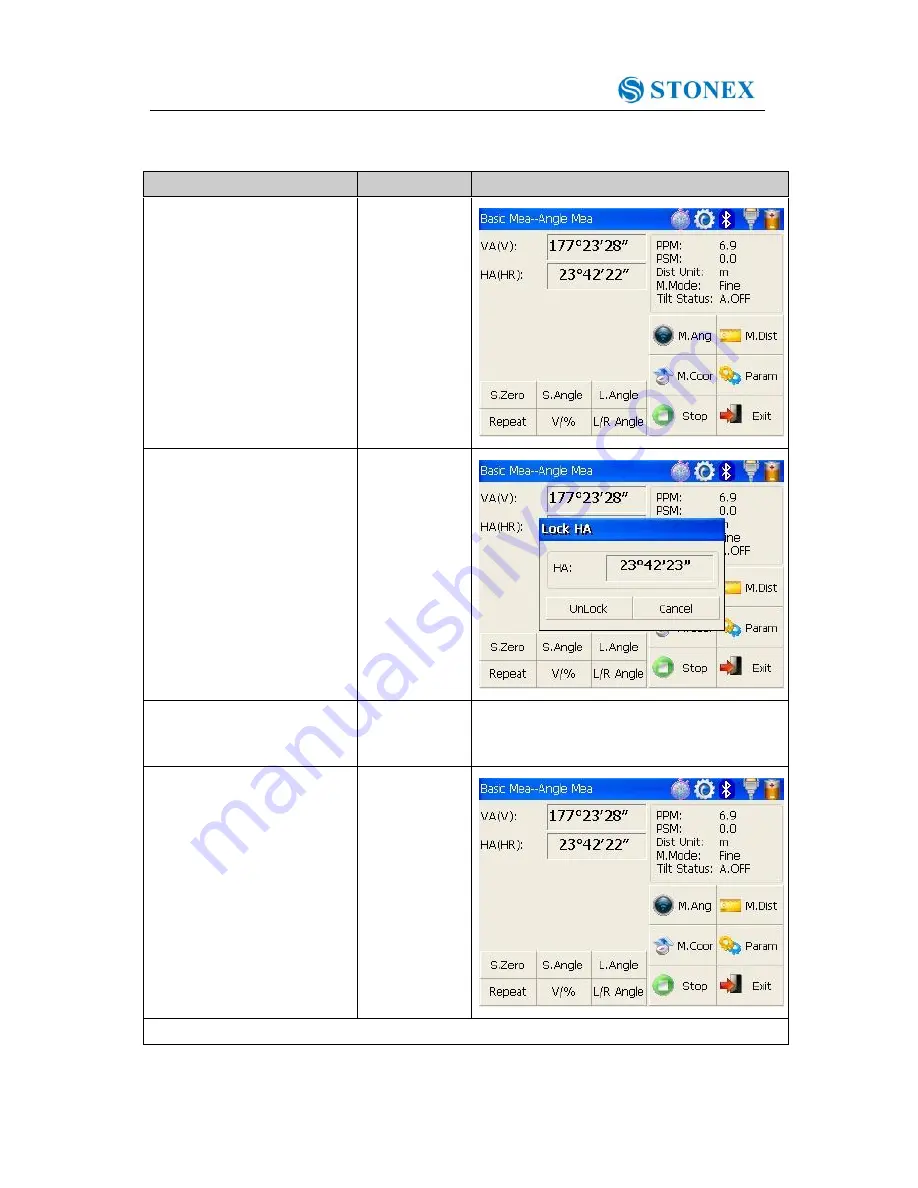
4.3.3 Setting horizontal angle with the “L.Angle” key 

Make sure the operation is under angle measurement mode. 

Operation steps 

Keys 

Display 

Turn  horizontal  circle  unit 

in  the  needed  direction  with 

horizontal clamp and tangent 

part. 


Click  “L.Angle”  key,  and 

activate  the  function  of                 

locking horizontal angle. 


L.Angle


Collimate target point used     

for Orientation.   


Click  “unclock”  key  to 

deactivate  the  function  of 

locking  horizontal  angle. 

Then  the  screen  will  return 

to 

normal 

angle 

measurement 

mode, 

and 

meantime  horizontal  angle 

will be set as locked angle. 


Unlock


1    Click “Cancel” key before it returns to Previous mode. 

Summary of Contents for R2W 2 PLUS 500

Page 1: ......

Page 2: ...and reliable instrument whose performance and design are not surpassed To fully appreciate and protect your investment we suggest that you take the necessary time to read and fully understand this manual We have a dedicated service organization If the need arises please don t hesitate to call us Thank you for your trust and confidence ...

Page 3: ... held tight High temperature condition If put the instrument in high temperature condition for a long time it is bad for the instrument performance Temperature changing sharply The sharp temperature changing on the instrument or prism will shorten the distance measurement range for example after taking the instrument out from a warm car to a cold condition wait for some time it can be used when it...

Page 4: ... wet battery or charger maybe result fire or electronic shock Do not close the instrument to burning gas or liquid and do not use the instrument in coal mine Blast could be result Do not put the battery in the fire or high temperature condition Explosion damage could result If use the battery which is not specified by STONEX there is a danger of fire electric shock or burn If use the power cable w...

Page 5: ...ons before operating inspecting or adjusting 2 Wear the required protectors safety shoes helmet etc when operating Exceptions from Responsibility 1 The user of this product is expected to follow all operating instructions and make periodic checks of the product s performance 2 The manufacturer assumes no responsibility for results of a faulty or intentional usage or misuse including any direct ind...

Page 6: ...ed in Config mode as target the output is equivalent to the safer class 1 Once the instrument is damaged do not disassemble it You d better contact STONEX or local dealer Labels Follow the safety instructions on the labels as well as in this manual to ensure safe use Note for Safety Never point the laser beam at other s eyes it could cause serious injury Never look directly into the laser beam sou...

Page 7: ... 10 1 7 USB connection 11 1 8 Guide light Optional 12 2 Preparation before Measurement 13 2 1 Setting up the instrument 13 2 2 Levelling Up 13 2 3 Centering 15 2 3 1 Centering with Optical Plummet Optional 15 2 3 2 Centering with Laser Plummet 16 3 Instrument settings 17 3 1 INST Setup 17 3 1 1 Setting the measure condition 18 3 1 2 Setting the units 18 3 1 3 Setting parameters of communication po...

Page 8: ...asurement REM 36 4 4 7 Missing Line Measurement MLM 41 4 4 8 Line height Measurement 44 4 5 Coordinate Measurement Mode 49 4 5 1 Setting coordinate of occupied point 49 4 5 2 Setting backsight point 50 4 5 3 Setting instrument height and prism height 52 4 5 4 Operation of coordinate measurement 53 4 5 5 Traverse Surveying 54 4 5 6 Offset Measurement Mode 58 4 6 About 67 5 Check and Adjustment 68 5...

Page 9: ...US 3 Appendix I Atmospheric correction formula and chart Just for reference 81 Appendix II Correction for refraction and earth curvature 83 Appendix III Assembling and disassembling for three jaw tribrach 84 ...

Page 10: ...R2W PLUS 1 1 Nomenclature and Functions 1 1 Nomenclature Handle Optical sight Tribrach Handle screw Vertical motion screw Vertical clamp screw Battery USB port Instrument height mark Eyepiece ...

Page 11: ...R2W PLUS 2 Touch screen Keypad Objective Horizontal motion clamp Horizontal tangent screw ...

Page 12: ...ong number smaller letter and capital letter Star key Normal configurations can be set here Tab Tab key Move the cursor right or next position BS BackSpace key Move the cursor left and delete one character Ctrl Ctrl key Same with the Ctrl key of PC Space Space key Enter the space Enter Enter key Confirm an entry or selection ESC Escape key Quit a screen or edit mode without saving changes Return t...

Page 13: ...nstrument Setup and About Relevant Information 1 3 1 Basic Measurement Function introduction Display Click BSC Measure key to activate basic measuring This function is used for surveying and calculating including some modes that is angle measurement distance measurement coordinate measurement and parameter setting during conventional surveying Distance measurement mode underpins Remote Elevation M...

Page 14: ...looking measurement cross sectional measurement setting out of point bunch and alignment road design traverse adjustment coordinate geometry batter board label steel ruler connection survey data query and editing and so on NOTE This part is optional it is normal to display as right figure 1 3 3 Instrument Setup Function introduction Display Instrument setup function is mainly applied for instrumen...

Page 15: ...f FieldGenius in the right figure In fact the application program interface of STONEX instrument system supports more third party softwares 1 3 6 Convenient panel Function introduction Display Click key to enter into convenient panel Electronic bubble function on this panel is used for dynamic display of electronic bubble during leveling up Furthermore functions like settings of meteorological con...

Page 16: ...ion at the same time before starting up to erase all settings FUNC BS Turn on off backlight of key panel in face left position FUNC TAB Turn on off backlight of key panel in face right position CTRL ESC Enter boot menu CTRL TAB Start touch screen calibration FUNC CTRL Turn on off soft keyboards FUNC Increase backlight brightness of LCD FUNC Decrease backlight brightness of LCD FUNC Turn on off LCD...

Page 17: ...ination key CTRL TAB so as to enter into touch screen calibration The calibration process is shown in the figure below 1 Carefully press and briefly hold stylus on the center of the target Repeat as the target moves around the screen 2 After all the targets are clicked the screen will display as left tap the screen to register saved data The screen goes back to Stylus Properties menu ...

Page 18: ...current measurement mode The power consumption in distance measurement mode is more than in angle mode if the instrument enters into distance measurement mode from angle mode the power maybe auto off because of lower battery 3 The symbol only indicates the supply power but not the instantaneous power change And if the measurement mode changes the symbol will not show the power s decrease or increa...

Page 19: ...harging If interval time is longer the connector isn t fixed well 3 That the green lamp flashes means recharging is complete NOTE 1 New battery or battery does not used for several months should be recharged for several times Please recharge it more than 10 hours and then the battery can attain best status 2 Please recharge the battery continuously for another 1 2 hours after the light turning gre...

Page 20: ...stick could be used by USB Host connector The file in the external memory stick could be read in the instrument interface 1 Open the cover of USB which behind the display panel 2 Input external memory stick into USB Host connector 3 The external memory stick could be recognized as hard disk automatically It could be file copy etc ...

Page 21: ...rs Under the face left situation the Surveyor should move telescope to left direction when he only saw the green light or the light became bigger If only saw the red light or red light became bigger the surveyor should move telescope to the right direction The move direction will be contrary when the telescope is in face right Guide light on off press to open fast setting menu select Battery if th...

Page 22: ...aching the instrument on the tripod head set the instrument carefully on the tripod head Supporting it with one hand tighten the centering screw on the bottom of the unit to make sure it is secured to the tripod 2 2 Levelling Up 1 Basic Levelling Up with the circular level 1 Move the foot screws A and B in opposite direction till the circular bubble is perpendicular to a line shaped with screw A a...

Page 23: ...on the screen It is convenient for R2W PLUS Series to level up with electronic level especially when it is difficult to observe the circular level and plate level Firstly press the key to turn on the electronic bubble as shown in left figure On the electronic bubble screen five function keys are displayed in the left column which is listed as follows TiltXY dynamic display of electronic bubble T P...

Page 24: ...ngle and vertical angle at the same time XONYOFF just compensate X axis XYOFF don t compensate X axis and Y axis A OFF don t compensate X axis and Y axis and turn off the popup function of electronic bubble In STONEX FieldGenius software the Level display is always shown as left figure 2 3 Centering 2 3 1 Centering with Optical Plummet Optional ...

Page 25: ...pod to center the instrument 2 3 2 Centering with Laser Plummet Press the key to enter into the display as shown in the left figure Operation Steps Click the target button and you can turn on laser plummet and set it as three levels of brightness Thus that laser emits downwards can be seen Loosen the center screw of tripod and move the base plate on tripod head until the laser spot coincides with ...

Page 26: ...e constant settings communication port settings configuration management etc 3 1 INST Setup Enter instrument settings program by clicking INST Setup icon on the desktop And then input the password 12345678 to display configuration settings screen On the screen tap or keys different setting screen can be shifted NOTE This password is open for all users current configuration settings can be checked ...

Page 27: ...be K 0 142 K 0 2 No 5 Sea Level correction mode will be Yes or No 6 Target Type mode will be Prism No Prism Reflector You could press Enter to keep the setting or press canceled 3 1 2 Setting the units Operation 1 Angle unit mode will be DMS GON MIL 2 Angle Precision mode will be 1 second 0 1 second or 0 5 second 3 Distance Unit mode will be Meter US Feet Feet 4 Distance precision mode will be 1mm...

Page 28: ...mmunication ports As left shows click Other Setup you can activate Bluetooth BT and guidelight GL and set parameters of Bluetooth Port and Phy Port 3 1 4 Instrument parameters review Click Data Monitor used for reviewing the setting parameters ...

Page 29: ...s including Cross Light Guide Light and Laser Point Cross Light Click this item to turn on the reticle illumination and move the slipping button to adjust reticle illumination Guide Light Click Battery key resulting in display on which guide light could be adjusted Laser Point Turn on off the laser flash before distance measurement ...

Page 30: ... Lock horizontal angle Repeat Retest horizontal angle V Switch between vertical angle and percent grade L R Angle Horizontal angle switch between left and right Mode Set Fine N Fine Loop Fine Track measurement mode m ft Switch among meter international feet and American feet in terms of distance unit Setout Set out measurement mode REM Start REM function MLM Start MLM function LHM Start LHM functi...

Page 31: ...s DMS GON MIL Dist Unit Set Dist Unit as m UsFeet IntFeet Stop Stop distance measurement Exit Exit basic measurement program 4 3 Angle measurement mode 4 3 1 Horizontal angle right angle and vertical angle measurements Firstly make sure the operation is under angle measurement mode Operation steps Keys Display Collimate the first target A Collimate A Set horizontal angle as zero for target A Click...

Page 32: ...ntal angle switch between right and left Make sure the operation is under angle measurement mode Operation steps Keys Display Make sure the operation is under angle measurement mode switch horizontal angle between left and right by Clicking L R Angle key 1 L R Angle 1 Left angle or right angle will be switched in turn every time you click the L R Angle key ...

Page 33: ...rizontal clamp and tangent part Click L Angle key and activate the function of locking horizontal angle L Angle Collimate target point used for Orientation 1 Click unclock key to deactivate the function of locking horizontal angle Then the screen will return to normal angle measurement mode and meantime horizontal angle will be set as locked angle Unlock 1 Click Cancel key before it returns to Pre...

Page 34: ...et point used for Orientation Click S Angle key and a dialog box will be ejected as is showed in the right figure Input horizontal angle you need 1 Such as 232 26 26 S Angle input horizontal angle With data entry complete click Enter key and angle measurement after orientation will go on Enter 1 Data entry should be referred to the format shown in the dialog box ...

Page 35: ...ode with the V key Make sure the operation is under angle measurement mode Operation steps Keys Display Make sure the operation is under angle measurement mode Click V key 1 V 1 Vertical angle and percent grade will be switched in turn every time you click V key ...

Page 36: ... key This program is applied for adding up angle retesting values displaying the sum and the average of all observed values and meantime recording the number of observations Operation steps Keys Display Click Repeat key and activate angle retesting function Repeat ...

Page 37: ...R2W PLUS 28 Collimate the first target A Collimate A Click S Zero key and set horizontal angle as zero S Zero Collimate the second target B using horizontal clamp and tangent part Collimate B ...

Page 38: ...cond target B again using horizontal clamp and tangent part Click L Angle key And then the screen displays the sum and the average of all angles 1 Collimate B again L Angle Repeat steps according to the requirement and carry out angle retesting 2 1 Click Exit key to finish angle retesting 2 Ht the sum of multiple observed values Hm the average of multiple observed values ...

Page 39: ...M Dist key to enter distance measurement mode and then the system will carry out measurement based on previous setting mode M Dist Click Mode key to activate setting function of distance measurement mode Take Loop Fine as example here Fine single fine measuring mode N Fine n times fine measuring mode Loop Fine Continuous measuring mode Track tracking measuring mode Mode ...

Page 40: ...ring times the instrument will carry out distance measurement and display the average distance according to the setting times If you preset single observation the average distance won t be displayed In general the factory default is set as single observation Operation steps Keys Display Under distance measurement mode click Mode key to activate setting function of distance measurement mode The def...

Page 41: ... needed observations in the upper right column of screen N Fine input the number of observations Click Enter key collimate the center of prism and then the system will carry out measurement based on previous setting 1 1 Click M Ang key to return to angle measurement mode ...

Page 42: ...s mainly applied for setting out survey and useful for tracking moving target Operation steps Keys Display Collimate the center of prism Collimate prism Click Mode key to activate setting function of distance measurement mode And this mode is set as Track Mode Click Enter key collimate the center of prism and the system will carry out measurement based on previous setting Enter ...

Page 43: ...e unit will be exchanged among meter American feet and international feet every time you click m ft key 4 4 5 Distance stake out measurement This function can display the difference between measured distance and preset distance Displayed Value Observed Value Standard Preset Distance Setting out among all sorts of distance measurement modes such as slope distance horizontal distance and elevation d...

Page 44: ...to input SD to be set out is displayed in the popup dialog box Click Enter key to execute SD setting out after inputting data If you want HD setting out need to input zero in SD dialog box click Enter and the system will eject HD dialog box automatically HD setting out can go on after HD data entry If you want VD setting out need to input zero in both SD dialog box and HD dialog box thus the syste...

Page 45: ...surement will start from the prism reference point If no prism height is used the remote elevation will start from any reference point in which the vertical angle is established In both modes the reference point should be perpendicular to the remote object 1 With prism height PH input Operation steps Keys Display Under distance measurement mode click REM key to activate remote elevation measuremen...

Page 46: ...ton with stylus with PH Input the prism height following PH Input prism height Collimate the center P of prism Click M Dist key to start measuring Horizontal distance between instrument and prism will be shown Collimate prism M Dist ...

Page 47: ...ey and position of prism is locked that means reference point is confirmed Continue Collimate target K and click Continue vertical distance VD will be shown 1 Collimate K 1 Click Exit key to finish REM 2 Without prism height input ...

Page 48: ...tylus None PH Collimate the ground point Click M Dist key to start observing Horizontal distance between instrument and prism will be shown Collimate prism M Dist Click Continue key and position of ground point G is locked that means reference point is confirmed Continue ...

Page 49: ...R2W PLUS 40 Click Continue key Continue Collimate remote target K Vertical distance VD will be shown 1 Collimate target 1 Click Exit to finish REM ...

Page 50: ... Measurement program calculates the horizontal distance dHD slope distance dSD and elevation dVD between two target prisms The instrument can accomplish this in two ways 1 MLM Method A B A C Measurement is A B A C A D 2 MLM Method A B B C Measurement is A B B C C D ...

Page 51: ...s Display Under distance measurement click MLM key to activate Missing Line Measurement MLM Select method A B A C with stylus Collimate prism A click M Dist key Horizontal distance between instrument and prism A will be shown M Dist ...

Page 52: ...ce dHD elevation difference dVD and slope distance dSD between prism A and prism B will display 1 Continue In order to calculate the horizontal distance between points A and C collimate prism C and click M Dist key again Thus horizontal distance between instrument and prism C will be shown M Dist ...

Page 53: ...ermining a height of line like electric wire above ground which is hard to reach See following image L is point on the overhead line G is projective point on the ground which is also difficult to set target A and B are baseline which are set up in a certain distance under line After measuring horizontal distances from instrument to prisms A B and confirm the base line VD between A and B VD between...

Page 54: ...lay Under distance measurement mode click LHM key to activate line height measurement program LHM Select With PH button with stylus With PH Click Setup key to input instrument height IH and prism height PH After that click Enter key Setup ...

Page 55: ...te prism A click Measure key and distance measurement begins After that click Continue key Measure Collimate prism B click Measure key and distance measurement begins Measure After measurement click Continue key Continue ...

Page 56: ... L HD Horizontal distance between instrument and L Off Horizontal distance between A and L Click Continue key which is used for measuring height between overhead line and ground Operation steps Collimate point on overhead line before clicking Continue key Continue Collimate ground point G by screwing vertical tangent part Collimate G ...

Page 57: ...R2W PLUS 48 Click Continue key again and then height of overhead line LH and horizontal distance Off will display 1 3 Continue 1 Click X key to end measurement 2 Click VH key to return to operation step ...

Page 58: ...e of occupied point After input coordinate of occupied point instrument location unknown point coordinate will be measured and displayed with this program Operation steps Keys Display Click M Coor key to enter coordinate measurement mode M Coor Click OCC PT key OCC PT ...

Page 59: ...nate of occupied point from N to Z Finishing data entry click Enter key and return to coordinate measurement interface Enter 4 5 2 Setting backsight point Operation steps Keys Display Click S BS key to set backsight point S BS ...

Page 60: ...point and click Enter key Enter A dialog box is ejected as figure shows Collimate backsight point click Yes key And then the system will define backsight azimuth angle which displays in the upper left corner of coordinate measurement screen Yes ...

Page 61: ...nstrument height and prism height thus coordinate of unknown point can be calculated easily and directly Operation steps Keys Display Click Setup key Setup Input instrument height IH and prism height PH Input IH and PH Finishing data entry click Enter key to return to coordinate measurement screen Enter ...

Page 62: ...pied point backsight azimuth angle Instrument height and prism height set up you can directly calculate coordinate of unknown point Operation steps Keys Display Set coordinate of occupied point and instrument height prism height 1 Set backsight azimuth angle 2 Collimate target 3 ...

Page 63: ...he S Angle key or 4 5 2 Setting backsight point 3 Click Mode key to change distance measurement method Fine N Fine Loop Fine Track 4 Click M Angle or M Dist to return to normal angle or distance measurement mode 4 5 5 Traverse Surveying Measure the coordinate of foresight point and save it in the list this point would be taken as the occupied point after transferring to point 2 and the previous oc...

Page 64: ...upied point p0 and azimuth angle from point P0 to known point A Operation steps Keys Display Click Line key Line Click Save key with stylus Save Click Setup key to reset instrument height and prism height And then click Enter key Setup ...

Page 65: ...ick Measure key Measure Click Continue key and coordinate of Point P1 displays in the lower left corner of screen Continue Click Save key Coordinate of P1 can be ascertained and it will return to main menu At last power off and transfer instrument to P1 transfer prism from P1 to P0 meantime Save ...

Page 66: ...Call button with stylus 1 Collimate last occupied point P0 Click Setup key then coordinate of P1 and azimuth angle from P1 to P0 will be ascertained And it returns to main menu at the same time Repeat steps and carry on according to the sequence of guidelines till the end 1 Click Exit key to finish Traverse Surveying ...

Page 67: ...ight When measuring coordinate of point A0 set instrument height only Prism height is set as 0 Under angle offset measurement mode there are two methods to set vertical angle 1 Free vertical angle vertical angle ranges from up and down movement of telescope 2 Lock vertical angle vertical angle is locked and can t range from up and down movement of telescope Thus if collimate A0 with the first meth...

Page 68: ...ick Offset key Offset Click ANG Offset key in ejecting dialog box Select Free VA or Lock VA with stylus to to start angle offset measurement User makes a choice on the basis of own demand Collimate prism P and click Measure key Collimate prism P ...

Page 69: ...ill be shown 1 2 Continue 1 Click Setup key to set instrument height and prism height 2 Click Exit to finish Angle Offset Measurement Set instrument height prism height before Offset Measurement Refer to 4 5 1 to set coordinate of occupied point 2 Distance Offset Measurement The measurement of a target point apart from a prism is possible by inputting offset horizontal distance of front and back l...

Page 70: ...en measuring coordinate of point A0 set instrument height only Prism height is set as 0 Refer to 4 5 1 to set coordinate of occupied point Operation steps Keys Display Click DIST Offset key in ejecting dialog box DIST Offset Finish data entry with stylus Collimate prism and click Measure key Measure ...

Page 71: ...Column Offset Measurement It is possible to measure circumscription point P1 of column directly the distance to the center of column P0 coordinate and direction angle can be calculated by measured circumscription points P2 and p3 The direction angle of the center of column is 1 2 of total direction angle of circumscription points P2 and P3 Refer to 4 5 1 to set coordinate of occupied point Operati...

Page 72: ...R2W PLUS 63 Click CYL Offset key CYL Offse t Collimate the center P1 of column surface and then click Measure key Measure Collimate left point P2 of column surface and then click Continue key Continue ...

Page 73: ...offset measurement 4 Plane Offset Measurement Measuring will be taken for the place where direct measuring can not be done for example distance or coordinate measuring for an edge of a plane Three random points P1 P2 P3 on a plane will be measured at first in the plane offset measurement to determine the measured plane collimate the measuring point P0 the instrument calculates and displays coordin...

Page 74: ...R2W PLUS 65 Refer to 4 5 1 to set coordinate of occupied point Operation steps Keys Display Click PLANE Offset key PLANE Offset Collimate prism P1 and click Measure key Measure ...

Page 75: ...onal values between collimation axis and plane 1 Continue 1 Click Setup key to set instrument height and prism height If the three observing points can t determine a plane the system will display error message Thus observe the first point once again When collimation axis doesn t intersect with determined plane the system will display error message ...

Page 76: ...R2W PLUS 67 4 6 About Operation 1 Click about icon on desktop 2 Press Exit to return to the basic measurement ...

Page 77: ...100 meters long Measure the distances of lines AB AC and BC 2 The instrument constant can be calculated instrument constant AB BC AC 3 If there is a difference between the instrument standard constant and the calculated value colligate the measured constant and the prism constant to get a new value then input the value into the instrument as a prism constant 4 Compare length of the instrument s te...

Page 78: ...screws then adjust the two screws to center the air bubble 4 Turn the instrument 180 adjust the Adj screw with adjustment pin slightly to correct half of the bubble s displacement when it doesn t move 5 Repeat the operation 3 and 4 until the air bubble remains centered in any position 5 2 2 Circular Level 1 Check 1 Mount the instrument on a stable device and fix it 2 Level it accurately by the pla...

Page 79: ...unt the instrument at the tripod and fix it 2 Set a cross mark under the instrument 3 Coincide the center mark of the optical plummet with the cross mark by adjusting three leveling foot screws 4 Turn the instrument 180 check the center mark and cross mark if they are coincide no adjustment is necessary if not adjust it 2 Adjustment 1 Set the instrument on stable device and fix it 2 Set a cross ma...

Page 80: ...pot and cross mark if they coincide adjustment is not required Otherwise adjust it Adjustment 1 Setting up the instrument on the checking tool or tripod which is 1 5m apart from ground 2 Turn on laser plummet turn tribrach foot screws until laser spot coincide with cross mark If you use tripod make a cross mark on the laser spot directly 3 Rotate instrument 180 around if the laser spot is over 2mm...

Page 81: ...nstrument 50m apart 2 Take off cover of telescope eyepiece there are 4 screws for the reticle part 3 Loosen all four fixing screws slightly with the cross screw drive 4 Revolve the eyepiece section so that the vertical cross hair coincides to point A finally re tighten the four screws 5 Repeat the checking and adjusting until there is no deviation NOTE 1 After the adjustment of cross hair please c...

Page 82: ...al collimation error C according to C Hl Hr 180 2 if C 8 no adjustment will be necessary If C 8 proceed with the following adjustment 2 Adjustment by program Set up the instrument on tripod or adjustment platform and leveling accurately Procedures 1 Power on run the software INST Setup on the screen tap or keys until Collimation displays tap it to display collimation error and vertical index error...

Page 83: ...cal index error by program 5 7 Vertical Index Error The deviation between vertical circle zero position and horizontal direction is vertical index i it is necessary to concern this error when measure vertical angle The instrument program applied a formula to remove this error This correction can offer the index for the formula Warning Before starting this operation be sure to read manual carefully...

Page 84: ...he software INST Setup on the screen tap or keys until Collimation display tap it to display collimation error and vertical index error setting menu 2 Aim at the cross hair of collimator at telescope left tap Left value to read the horizontal and vertical angles 3 Aim at the cross hair of collimator at telescope right tap Right value to read the horizontal and vertical angles 4 The software will c...

Page 85: ... the red mark is clear if the deviation between mark and cross hair is not over 1 5 of red mark diameter adjustment is unnecessary 2 Checking For R2W PLUS Series 1 Install the instrument at the tripod or a stable device and level it accurately then power on the instrument 2 Set a reflective sheet about 5m 20m far away from the instrument 3 Aim at the sheet cross mark with telescope reticle 4 Enter...

Page 86: ...ement Display resolution m inch selectable 0 1mm 1mm Laser class Prism Class 1 Reflectorless Reflective sheet Class 3R Distance unit m ft US ft selectable Measurement range good condition Single prism 1 to 3000m Reflective sheet RP60 1 to 800m Reflectorless 1 to 500m Mini reading Fine mode 0 1mm 1mm 0 001ft 0 01ft Tracking mode 10mm 0 1ft Accuracy Prism 2mm 2ppm Reflective sheet RP60 3mm 2ppm Refl...

Page 87: ...mm Compensation Dual axis System Liquid type Range 3 Resolving power 1 Data processing system Operating system Windows CE CPU 32 bit Optical plummet Factory optional Accuracy 0 8mm 1 5m Image Erect Magnification 3 Focusing range 0 5m Field of view 4 Laser plummet Standard Accuracy 1 0mm 1 5m Laser class Class 2 IEC60825 1 Laser spot size brightness Adjustable Laser wave length 635nm Display Touch ...

Page 88: ...mory 2GB internal memory Guide Light System Factory optional Sensors Built in temperature and pressure sensors Keyboard Alphanumerical illuminated key board both sides Operating temperature 20 50 Storage temperature 40 70 Dimension W D H 185 220 360mm Weight including batteries 5 5kg Dimensions W D H 185 220 360mm Interface USB host USB slave RS 232C Bluetooth Optional Water and dust protection IP...

Page 89: ...s bag 1 each Adjusting pin 2 each Cleaning cloth 1 each Cleaning brush 1 each Screwdriver 1 each Wrench 2 each Silica gel 1 each CD 1 each USB Communication cable 1 each Rainproof 1 each Reflective sheet RP30 4 each Reflective sheet RP60 1 each Laser caution sign board 1 each Touch pen 2 each Tribrach 1 each ...

Page 90: ...e p Pressure value hPa t Temperature value Kpt Atmospheric correction ppm Example t 20 p 1013hpa L0 1000m Then Kpt 0ppm Kpt 4ppm L L0 1 Kpt 1000 1 0 10 6 1000 000m L L0 1 Kpt 1000 1 4 10 6 1000 004m The atmospheric value is obtained easily with the atmospheric correction chart Find the measured temperature in horizontal axis and pressure in vertical axis on the chart Read the value from the diagon...

Page 91: ...R2W PLUS 82 ...

Page 92: ...ope distance horizontal distance and vertical distance applied in the instrument are as followings The conversion formula for horizontal and vertical distance is as follows when correction for refraction and earth curvature is not applied HD SD COS VD SD SIN NOTE The factory setting for the refraction coefficient K is 0 142 Refer to the section 3 10 to change the value of K ...

Page 93: ...ment and lift out the instrument from the tribrach Assemble 1 Put the instrument into the tribrach lightly let the communication port against in the indentation of the tribrach 2 Rotate the tribrach clamp clockwise until the lever is tighten Note Fix the tribrach clamp If the instrument don t need assembly or disassembly from tribrach frequently it is necessary to fix the tribrach clamp by fixed s...

Page 94: ...R2W PLUS 85 NOTE These designs figures and specifications are subject to change without notice We shall not be held liable for damages resulting from errors in this instruction manual ...

Page 95: ...ship for generally 2 year except for accessories or specific parts for which different limited warranty period shall apply have been tested calibrated in proper working status prior to shipment The warranty period starts from date of first sale of the instruments At its sole discretion under the warranty period STONEX Europe will repair the product or send parts for replacement at its expense STON...

Page 96: ...chieve a better and prompt service result Return policy Dead On Arrival instruments All returned products have to be shipped to STONEX Europe representative office The original Purchaser has a period of seven 7 days starting from date data of purchasing to signal the existence of a defect in the instrument for a full refund less shipping and handling provided the merchandise is in new resalable co...

Page 97: ...ILITY AND FITNESS FOR A PARTICULAR PURPOSE AND OR NONINFRINGEMENT OF ANY THIRD PARTY S RIGHTS ARE HEREBY DISCLAIMED STONEX EXPRESSLY DISCLAIMS ALL WARRANTIES NOT STATED IN THIS LIMITED WARRANTY ANY IMPLIED WARRANTIES THAT MAY BE IMPOSED BY LAW ARE LIMITED IN DURATION TO THE TERM OF THIS LIMITED WARRANTY SOME JURISDICTIONS DO NOT ALLOW THE EXCLUSION OF IMPLIED WARRANTIES OR LIMITATIONS ON HOW LONG ...

Page 98: ...LAIM BY ANY OTHER PARTY SOME JURISDICTIONS DO NOT ALLOW THE EXCLUSION OR LIMITATION OF INCIDENTAL OR CONSEQUENTIAL DAMAGES FOR SOME PRODUCTS SO THE EXCLUSIONS OR LIMITATIONS MAY NOT APPLY TO CUSTOMER THIS LIMITED WARRANTY GIVES CUSTOMER SPECIFIC LEGAL RIGHTS AND CUSTOMER MAY ALSO HAVE OTHER RIGHTS WHICH VARY FROM COUNTRY STATE JURISDICTION TO COUNTRY STATE Two 2 years on STONEX Product Total Stati...

Page 99: ...ll verify it and if everything is ok the cost of the part shall be refund refund will be done only after check of the failure part and final approval of STONEX Europe 3 If the instrument needs to be sent back to STONEX Europe for repair replacement dealers customers has to send to STONEX Europe a Returned Merchandise Authorization RMA before they send back the fault instrument STONEX Europe shall ...

Reviews: