background image

15

MODEL: SCC6T | PRODUCT CODE: 53592 | 06/2016

Operating Instructions Cont.

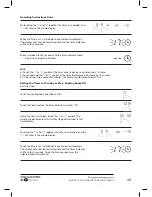
Switching on a Cooking Zone and Setting a Power Level

After switching on your cooktop, a buzzer will sound once and all the indicators will light up for 1 second. 
This indicates that the ceramic cooktop has entered standby mode.

Press the ON/OFF button. 
All of the indicators will show “-“.

Place a suitable pan on the cooking zone that you 
wish to use.
•  Make sure the bottom of the pan and the surface of 

the cooking zone are clean and dry.

Touching the heating zone selection control (e.g. 
zone 3)

Select a heat setting by touching the “-” or “+” 
control.
•  If you don’t choose a heat setting within 1 minute, 

the ceramic cooktop will automatically switch off. 
You will need to start again at step 1.

•  You can modify the heat setting at any time during 

cooking.

•  By holding down either of these buttons, the value 

will adjust up or down.

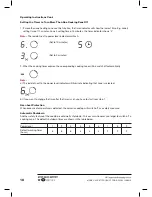
Switching off a Cooking Zone

Touch the heating zone selection control that you 
wish to switch off. (e.g. zone 3).

Turn the cooking zone off by pressing the minus 
control button until you reach “0” or by touching the 
“-” and “+” controls together.

OR

Turn all zones of the cooktop off by touching the 
Power button.

Summary of Contents for SCC6T

Page 1: ...MODEL SCC6T PRODUCT CODE 53592 06 2016 Ceramic Cooktop INSTRUCTION MANUAL Issue Date 06 2016 IM Version No V1 7 Model Number SCC6T ...

Page 2: ...products brought to you by STIRLING are manufactured to the highest standards of performance and safety and as part of our philosophy of customer service and satisfaction are backed by our comprehensive 3 Year In Home Warranty We hope you will enjoy using your purchase for many years to come Welcome ...

Page 3: ...ome 04 Warranty Details 05 General Safety Instructions 08 Product Overview 10 Installation 13 Getting Started 13 Operating Instructions 19 Heat Settings 20 Care and Cleaning 21 Hints and Tips 22 Repair and Refurbished Goods or Parts notice 23 Warranty Returns ...

Page 4: ...to all rights and remedies in respect of the product that the consumer has under the Competition and Consumer Act 2010 and similar state and territory laws Our goods come with guarantees that cannot be excluded under the Australian Consumer Law You are entitled to a replacement or refund for a major failure and for compensation for any other reasonably foreseeable loss or damage You are also entit...

Page 5: ... caused by the appliances being installed in contravention of this temperature limit or by placing adjacent cabinetry closer than 4mm to the cooktop Adequate Ventilation Use of your cooktop will create heat steam and moisture Ensure that care is taken to avoid injury as a result of use and that the room containing the cooktop is adequately ventilated Consult your qualified installer as to an appro...

Page 6: ...g connection leads do not touch the cooktop as their insulation materials are usually not resistant to high temperatures Cut Hazard The razor sharp blade of a cooktop scraper is exposed when the safety cover is retracted Use with extreme care and always store safely and out of reach of children Failure to use caution could result in injury or cuts Important safety instructions WARNING Fire Safety ...

Page 7: ...erated by means of an external timer or separate remote control system Do not overload Do not put pots or pans weighing over 25kg on the cooktop Frying Food Check constantly when frying food on the cooktop to avoid overheating oil and becoming a fire hazard WARNING The appliance and its accessible parts become hot during use WARNING Unattended cooking on a cooktop with fat or oil can be dangerous ...

Page 8: ...ODUCT CODE 53592 06 2016 Ceramic Cooktop Layout 1 200mm diameter Max 1800W 2 165mm diameter Max 1200W 3 200mm diameter Max 1800W 4 165mm diameter Max 1200W 5 Glass panel 6 Control panel Key Product Overview 2 3 1 4 5 6 ...

Page 9: ...cial note of the Safety Warnings section Remove any protective film that may still be on your ceramic cooktop 1 Cooking zone indicators and buttons 2 Minus or Plus buttons to increase the zone heat level and timers 3 Child lock button 4 Power On Off button 5 Timer Button 6 Timer display Key Product Overview Cont 3 4 2 1 1 5 6 ...

Page 10: ...packaging materials are out of their reach and disposed of safely Bench top Preparation Create a cutout in the bench top according to the cut out dimensions illustrated in Fig 1 below Allow a minimum distance of 50mm from the cutout to any vertical surface Ensure the thickness of the bench top is at least 30mm Fig 2 The bench top and wall surfaces must be able to sustain temperatures of 95 C Pleas...

Page 11: ...sions required for ventillation Fig 4 A mm B mm C mm D E 760 50 min 20 min Air intake Air exit 5mm Before locating the fixing brackets Place the unit upside down on a smooth stable surface to avoid damaging the glass surface of the cooktop place some of the foam packaging from the box underneath the glass Attach the four brackets using the screws supplied as per Fig 4 below Insert your cooktop into...

Page 12: ...olar circuit breaker must be installed with a minimum gap of 3mm between the contacts The installer must ensure that the correct electrical connection has been made and that it complies with safety regulations The cable must not be bent or compressed The cable must be checked regularly and only replaced by a properly qualified person Technical Specification Cooktop SCC6T Cooking Zones 4 Zones Suppl...

Page 13: ...n one cooking zone at a time and let it heat up for 5 minutes at the maximum heat setting Place a suitably sized saucepan filled half full with cold water on to each zone as you burn it off Note Do not burn off more than one zone at a time Any odour or smoke can be disregarded safely ensure good room ventilation whilst following this procedure Refer to the following pages for the switching on off ...

Page 14: ...ssible to remove Make sure that the base of your pan is smooth sits flat against the glass and is the same size as the cooking zone Always centre your pan on the cooking zone Fig 10 Always lift pans off the ceramic cooktop do not slide or they may scratch the glass Fig 11 WARNING Take care when frying as the oil and fat heat up very quickly particularly if you re using Power Boost At extremely hig...

Page 15: ... clean and dry Touching the heating zone selection control e g zone 3 Select a heat setting by touching the or control If you don t choose a heat setting within 1 minute the ceramic cooktop will automatically switch off You will need to start again at step 1 You can modify the heat setting at any time during cooking By holding down either of these buttons the value will adjust up or down Switching...

Page 16: ... button for several using the on off button seconds and the cooktop will be unlocked WARNING When the cooktop is in the Child Lock mode all the controls are disabled except the Power button You can always turn off the ceramic cooktop in the case of an emergency by pressing the Power button but you would need to unlock the cooktop first when next turned on The Cooktop Timer You can use the timer in...

Page 17: ... timer to decrease or increase by 10 minutes c If the setting time exceeds 99 minutes the timer will automatically return to 0 Setting the Timer to Turn One or More Cooking Zones Off Set One Zone Touch the heating zone selection control Touch the timer control the timer indicator will show 10 Adjust the timer setting by touch the or control The minute minder indicator will start flashing and will ...

Page 18: ...ires the corresponding cooking zone will be switch off automatically Note a The red dot next to the power level indicator will illuminate indicating that zone is selected b If you want to change the time after the timer is set you have to start from step 1 Over heat Protection When excessive temperature is detected the ceramic cooktop will switch off as a safety measure Automatic Shutdown Another ...

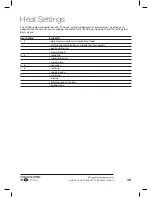
Page 19: ... are cooking Experiment with the Ceramic Cooktop to find the settings that best suit you Heat Setting Suitability 1 2 delicate warming for small amounts of food melting chocolate butter and foods that burn quickly gentle simmering slow warming 3 4 reheating rapid simmering cooking rice 5 6 pancakes 7 8 sautéing cooking pasta 9 stir frying searing bringing soup to the boil boiling water ...

Page 20: ...scraper suitable for Ceramic glass cooktops but beware of any hot cooking zones 1 Switch the power to the cooktop off at the wall 2 Hold the blade or utensil at a 30 angle and scrape the soiling or spill to a cool area of the cooktop 3 Clean the soiling or spill up with a dish cloth or paper towel 4 Follow steps 2 to 4 for Everyday soiling on glass above WARNING When the power to the cooktop is sw...

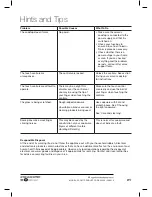
Page 21: ...h control area is dry and use the ball of your finger when touching the controls The glass is being scratched Rough edged cookware Unsuitable abrasive scourer or cleaning products being used Use cookware with flat and smooth bases See Choosing the right cookware See Care and cleaning Some pans make crackling or clicking noises This may be caused by the construction of your cookware layers of diffe...

Page 22: ...ta may be lost We recommend you save this data elsewhere prior to sending the product for repair You should also be aware that rather than repairing goods we may replace them with refurbished goods of the same type or use refurbished parts in the repair process Please be assured though refurbished parts or replacements are only used where they meet ALDI s stringent quality specifications If at any...

Page 23: ...MODEL SCC6T PRODUCT CODE 53592 06 2016 ...

Page 24: ...24 MODEL SCC6T PRODUCT CODE 53592 06 2016 This page is intentionally left blank ...

Reviews: