8
PAINTING
YOUR PEDAL
ENCLOSURE
1
1N914 rectifier diode (3)
#7521
1N5817 rectifier diode (1)
#7522
2C1815 transistor (2)
#7516
CE
N
2C
18
15
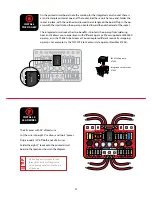
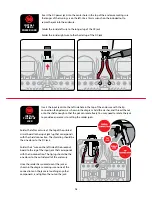
It’s time to install your parts! Before soldering the diodes and
transistors to your printed circuit board, make sure you thread the
leads through the correct side. The side of the printed circuit board
that has white values and outlines of the components is the correct
side. In some cases, components must be inserted into the printed
circuit board in a specific direction due to their polarity, so follow the
graphics carefully.
INSTALL
4 DIODES
AND 2
TRANSISTORS
2
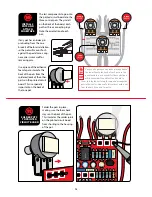
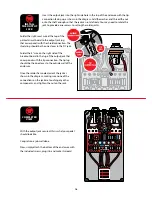
Note the stripe around one end of each diode. This
marks the negative (–) lead. On the printed circuit
board, the printed outline of the diodes also shows
this stripe. Install each diode to match the direction
shown, and solder in place. Similarly, the transistors
are directional, and must be installed in a specific
orientation. Match the flat side of the transistors to
the outline printed on the printed circuit board.
2N5089
1.
To minimize redoing steps,
make sure you have a solid idea of
the look and feel you’re going for.
2.
Lightly sand the outside of
the enclosure with 220-grit
sandpaper and wipe clean any
debris.
3.
Cover the holes from the
inside with masking tape.
4.
On a piece of cardboard, place
the enclosure and bottom cover
on scraps of wood to lift them off
the cardboard when spraying.
5.
With long, even strokes, spray
a light coat of primer or paint.
Allow 45 minutes of drying time
before the next coat.
6.
If you’re using primer-
followed-by-paint method, paint
three coats with 45 minutes
between coats.
7.
Now, add your included
stickers and any other desired
decoration (paint pens, acrylic
paint, Sharpie, etc.).
Allow drying time.
8.
Add three coats of clear-coat
glaze with 45 minutes between
coats. Wait at least two hours
before adding parts.
You’re creating a pedal from the ground up, so add your own custom paint job too!
Painting your pedal and adding the stickers provided in this kit (or custom decals
that you can create on your own) in advance is not only fun, but it’s much easier than
disassembling the pedal to paint it once you have put it together.


