Build Instructions
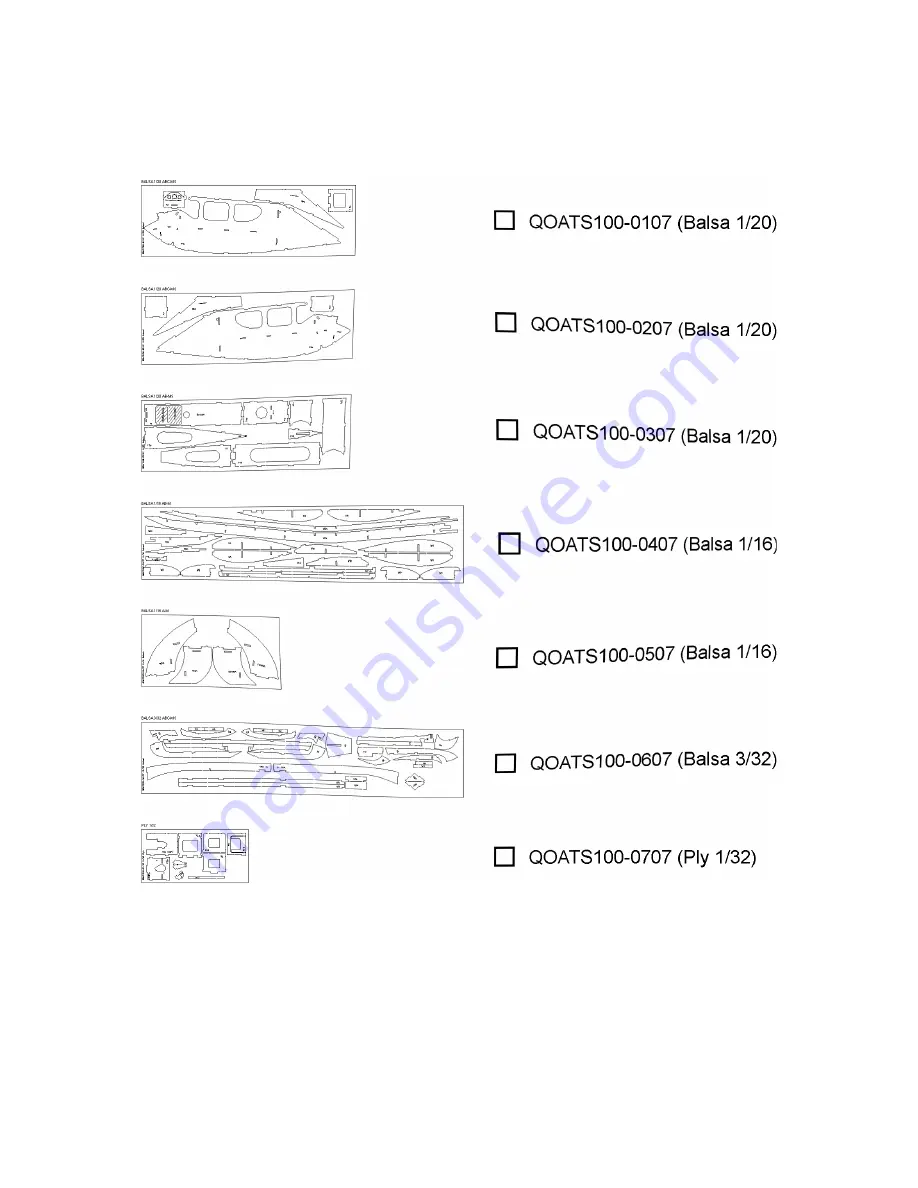
Sheet Wood Inventory (1 of 1)
QuickOats™ (100)
- Build Instructions © 2010 Stevens AeroModel, all rights reserved.
Page 5
Page 1: ...Wing Span 21 75 inches Wing Area 100 square inches Average Flying Weight 2 0 ounces Build Instructions Version 1 18 revised 03 09 2020...
Page 2: ...d to accept the liability associated with the use of this product the buyer is advised to return this kit immediately in new and unused condition to the place of purchase THIS PRODUCT IS NOT INTENDED...
Page 3: ...nes First and foremost we concentrated on creating a versatile easy to fly radio control arrangement that would be suitable for both novice and experienced pilots alike We also chose to support popula...
Page 4: ...quality covering film may be used to finish this model superior results will be achieved by using genuine AeroLITE brand covering film available exclusively from Stevens AeroModel The lower working t...
Page 5: ...Build Instructions Sheet Wood Inventory 1 of 1 QuickOats 100 Build Instructions 2010 Stevens AeroModel all rights reserved Page 5...
Page 6: ...s tabs and notches interlock like a 3D puzzle We strongly suggest that when fitting parts you dry fit use no glue the parts together first It is advised to work 1 2 steps ahead in the instructions usi...
Page 7: ...rit sand paper and a sanding block Lightly radius the leading edge of the horizontal and vertical stabilizes leaving the trailing edge of parts square 7 Follow sanding instructions given on the plan s...
Page 8: ...aft and etched arrow on part W7 facing rib W3 Use plan set as a placement guide Fit W7 flush with bottom of ribs W3 W4 and W5 at leading edge Ensure that W7 is properly seated to rib assembly and reta...
Page 9: ...rit sand paper and a sanding block lightly sand exterior edges of wing in preparation for covering Use the airfoil profile on the fuselage plan set as a guide to shape leading edge At wingtip taper le...
Page 10: ...or mount Use plan set to reference part orientation Attention when fitting parts please observe top and forward orientation F5a has etch lines to reference motor right thrust angles that must be visib...
Page 11: ...per Remove protrusion of F11 forward of F7 windscreen Lightly radius corners of fuselage 50 Cover fuselage using a high quality light weight covering film We suggest AeroLITE by Stevens AeroModel Note...
Page 12: ...bond dowel with thin CA glue to secure rear wing retention dowel 59 Remove covering from tab on bottom of vertical stabilizer where it will insert through horizontal stabilizer and fuselage Next remo...
Page 13: ...orward of gear to adjust balance of model forward 69 Mount EFL9051 propeller by screwing onto threaded propeller shaft of PKZ3624 Now adjust balance of model by moving battery or adding a bit of model...
Page 14: ...pect control surfaces for center proper direction of travel rate of throw secure pushrod connections hinges and receiver servo mounting hardware Check wing attach points for damage and or wear Inspect...
Page 15: ...and equipment for damage improper installation and or twists and warps Check to make sure that the model is properly balanced Moving the C G forward slightly can also improve flight performance The mo...