4
MAS TER
TEM PO
PL AY
ON
SYN C
EFFECT SELECT
SC RATCH
EFFECT ON
FOLDER/SKIP +
SE AR CH
FOLDER OUT
BP M
LOOP ADJ+
FOLDER IN
EFFECT SELECT
SC RATCH
EFFECT ON
FOLDER/SKIP +
SE AR CH
FOLDER OUT
BP M
LOOP ADJ+
FOLDER IN
MAS TER
TEM PO
PL AY
ON
SYN C
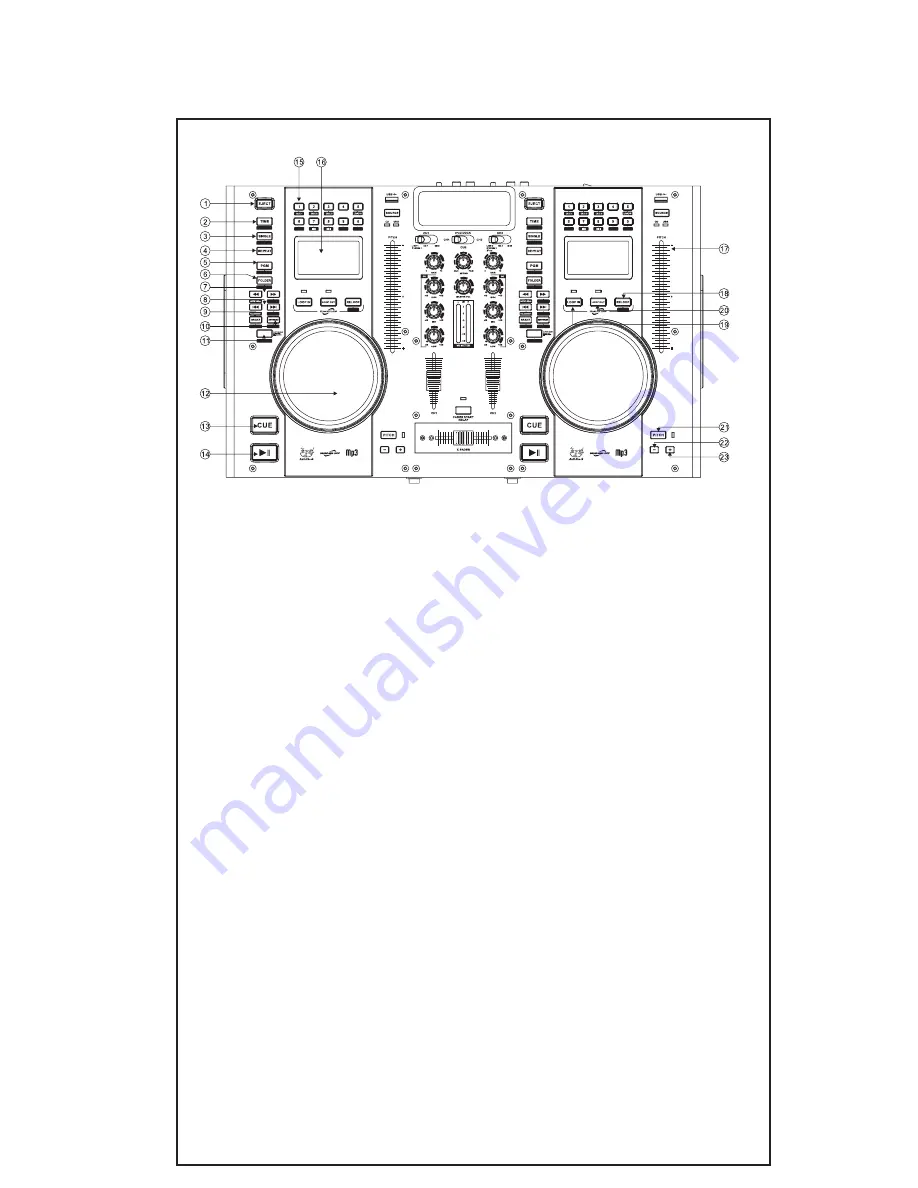
Mixer Deck Functions
1) Eject Button
Press to load or eject disk. Each press will open
or close the tray. Note: The Disk tray will not
open unless PAUSE is first pressed.
2) Time Button
Use this button to toggle between the three
time modes. ELAPSED, REMAINING or TOTAL
REMAINING. This works for CD’s as well as MP3
files on the USB drive.
3) Single Button
Press this button to switch between the SINGLE
or CONTINUOUS play modes. The selected
mode will be indicated on the LCD display. In
SINGLE mode, after each track, the unit stops
reading the disk. In continuous mode the unit
plays all tracks and stops. This works for CD’s as
well as MP3 files on the USB drive
4) Repeat Button
Use this button to repeat one track or all tracks
on a CD or USB drive.
5) PGM Button
This is for programming a playlist of up to 20
tracks from a CD or the USB drive. Press the
PAUSE button, then press the PGM button to
enter the Program mode. Use the SKIP+ and
SKIP- buttons to select a desired track. After
track is selected press PGM. Repeat this until
all desired tracks are selected. Then press PLAY
to begin sequence. Program will not be
retained if CD or USB drive is changed.
6) Folder Button
This allows you to navigate through multiple
folders, especially useful on USB thumb drives
with tracks divided into alums or genres of
music.
7) Search << or >> Buttons
These allows you to search forward or
backwards through the track you are playing.
This essentially mimics fast-forward and rewind
functions.
8) Track Select Buttons
These allow you to select previous or next
tracks. They are also used in programming
playlists as described in #5 above.
9) Brake Button
While in play mode, press the BRAKE button,
the button will light red. When this mode is
active, pressing the PAUSE button will cause the
music to slow to a stop, simulating the brake
effect on a vinyl LP. Pressing Play will cause the
music to advance from stop to normal speed.
This works for CD’s as well as MP3 files on the
USB drive.
10) Reverse Button
While in the play mode, press the REVERSE
button, the button will light red. This will
reverse the track currently being played,
causing it to play backwards. Pressing again will
revert back to normal play.
11) Scratch Button
This button toggles the JOG/SHUTTLE wheel
between the Pitch Bend, Scratch and Search
modes.
Press the button, it lights solid red, and you are
in the Search mode. Rotating the Jog/Shuttle
wheel will advance you forward or reverse
within the track you are playing.
Press the button again, it blinks on/off red, you
are in the Scratch mode. Rotating the
Jog/Shuttle wheel will provide a scratch effect,
very similar to that with vinyl DJ turntables.
Fortunately, this is fully electronic and will
cause no additional wear or harm to disks.
Press the button again, the red light goes off,
you are in the Pitch Bend mode. Rotating the
Jog/Shuttle wheel will either increase or
decrease the pitch of the track playing. Release
the wheel and the track will revert back to
normal speed/pitch.
Summary of Contents for 555-19520
Page 2: ...2...


