


09-282C
4 - 2
3/96
OPERATION
Section 4.2
Shredding Instructions
1. Place material to be shredded (leaves, garden
debris, sticks and branches up to 1-1/2"
diameter and 24" long, etc.) into the hopper.
2. Feed material evenly into the shredder so that the
tractor does not lug down or the shredder
become clogged. If necessary, use the hopper
lid to push the material through the inlet guards.
If the machine becomes plugged it may be
necessary to remove the discharge shield and
screen to clean rotor. Branches or items that
plug or cause the machine to stall should be fed
slowly and carefully.
3. If equipped with a blower, it is recommended to
alternate between dry and green material to
avoid blower plugging.
Chipping Instructions
1. Select limbs that are up to 4 inches in diameter.
Trim side branches that do not fit into the
chipper chute. Small diameter branches can be
h e l d t o g e t h e r i n a b u n d l e a n d f e d i n
simultaneously.
2. Place limb, butt end first, into the chipper chute
until it contacts the chipper blades. The actual
feed rate of the limb into the chipper will depend
on the type of material fed, and sharpness of the
cutting blades. Alternately insert and retract the
limb or insert continuously at a rate that will not
stall the tractor. Rotating the branch as it is fed
will improve cutting action. The chipping knives
will dull with use and require periodic
sharpening. Refer to Service Section 5.2 for
instructions to sharpen chipper knives.
Stopping Instructions
Do not leave machine unattended, or attempt any
inspection or service unless the PTO is disengaged
and tractor engine is shut off. Allow machine to
come to a complete stop.
To stop machine proceed as follows:
1. Move tractor throttle to slow position.
2. Disengage PTO and shut off tractor engine.
3. Allow machine to come to a complete stop.
The rotor is heavy and has inertia that will make the
rotor continue to turn for some time after the tractor
has been shut off. The stopping time can be short-
ened by inserting a branch in the chipper chute so
that it contacts the knives and slows the rotor to a
complete stop.
Summary of Contents for CS312
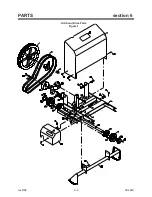
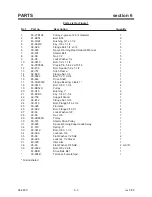
Page 16: ...rev 8 98 6 2 09 282C PARTS section 6 Hitch and Drive Parts Figure 1 ...
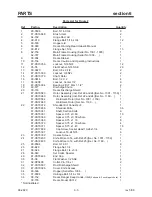
Page 18: ...rev 5 00 6 4 09 282C PARTS section 6 Frame Parts Figure 2 ...
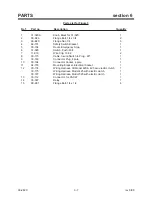
Page 20: ...rev 8 98 6 6 09 282C PARTS section 6 Emergency Stop Switch Parts Figure 3 ...
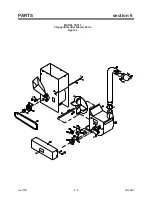
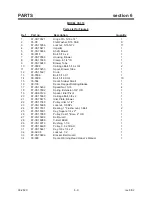
Page 22: ...rev 5 00 6 8 09 282C PARTS section 6 MODEL CS313 Chipper Shredder Blower Parts Figure 4 ...
Page 30: ......