1.
Turn OFF the power to the unit first
.
Do not manually open the tray when there is power to the drive!
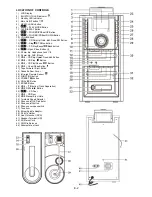
2. Locate the
Manual Eject Hole
(32) on the front panel below the
CD 2
tray, as
indicated by the arrow in the line drawing.
3. Carefully insert a stiff wire (for instance a straightened paper clip) into the
CD 2
Manual Eject Hole
.
4. When resistance is felt, gently press harder until the drive tray opens slightly.
5. Gently pull the tray out the rest of the way by hand to expose the CD and remove this.
6. Re-connect the unit to the mains and restart the system - then repeat the burning
/recording process again.
A) CD RECORDING MODE
i) CD Recording from Phono
1. Press the Function button (24) to select
Phono
(record player).
2. Place a vinyl record you wish to record to CD on the turntable and get it ready for playback.
3. P
ress the “
CD 2
“ REC“ button (29) and then the
CD 2
“Play/Pause
” button (19) to confirm recording until
the
play “ “ & “
“ indicators show on the CD Recorder operation display.
4. After a few seconds, the CD Recorder display will show the numbers of the
Time Counter
– recording has now
started.
5. Now start playback of the record (Phono), separating the tracks during recording if required.
6. When the recording has finished, press the
“
CD 2
Stop
” button (18) and then stop playback of the vinyl
record.
7.
Finalize
the recorded disc, as described elsewhere in this manual.
ii) CD Recording from Cassette Tape
1. Press the Function button (24) to select
TAPE
(Cassette Player).
2. Place a pre-recorded cassette tape in the cassette player slot (22), ready to play back the track(s) you wish to
record
– but do not push it all the way in yet.
3. P
ress the “
CD 2
REC
“ button (29) and then the
CD 2
“Play/Pause
” button (19) until the play indicator
“ “ shows on the CD Recorder operation display.
4. After a few seconds, the CD Recorder operation display will show the numbers of the
Time Counter
– recording
has now started.
5. At this point, push the tape into the cassette mechanism to start playback of the track(s) you wish to record.
6. After recording has finished, press the
“
CD 2
Stop
” button (18)
and then stop playback of the cassette tape.
7. Remove the cassette from the player when finished.
8.
Finalize
the recorded disc if you wish it to play it in another CD Player - as described elsewhere in this manual.
iii) CD Recording from an Audio CD in CD 1
1. Press the Function button (24) to select
CD 1
mode.
2. Press the
CD 1
“ open/close button” (14), open the drawer and insert the pre-recorded Audio CD you wish to
record on a blank CD.
3. P
ress the “
CD 2
REC
“ button (29) and then the “
CD 2
Play/Pause
” button (19) until the play indicator
“ “ shows on the CD Recorder operation display.
4. After a few seconds, the CD Recorder operation display will show the numbers of the
Time Counter
- recording
has now started.
5. Now press the
“
CD 1
Skip up
or down
button“ (11) to choose the track you wish to record, then press the
“
CD 1
Play/Pause
” button (13) to start playback of the track to be recorded.
6. If recording the complete CD, separate the tracks if required.
7. After recording has finished, first press the
“
CD 1
Stop
” button (12)
to stop the CD playing,
and then the
“
CD 2
Stop
” button (18) to stop the recording.
8.
“Finalize”
the recorded disc if you wish it to play it in another CD Player - as described elsewhere in this manual.
iv)
CD Recording from Aux-in
1. Press the Function button (24) to select
AUX
(external device)
mode.
2. Connect another audio device (such as an MP3 player, CD player, DAB Radio, etc.) via its output or headphone
socket, to the 3.5mm dia. Aux-in jack (16) of this unit (use a connecting cable with 3.5mm dia. stereo input plug).
3. P
ress the “
CD 2
“ REC“ button (29) and then the
CD 2
“Play/Pause
” button (19) to confirm recording until
the
play “ “ & “
“ indicators show on the CD Recorder operation display.
4. After a few seconds, the CD Recorder display will show the numbers of the
Time Counter
- the system has now
started recording.
5. Now start playback of the external device connected to Aux-in, separating the tracks during recording if required.
6. When the recording has finished, press the
“
CD 2
Stop
” button (18) and then stop playback of the connected
external device (remove it after the recording process has finished).
7.
“Finalize”
the recorded disc
if you wish it to play it in another CD Player as described elsewhere in this manual.
E-9


