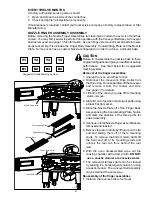
Star Ultra-max UM3240 Installation And Operation Instructions Manual Download Page 35

Fig

No.

Part 

Number

Description

Quantity

Per

B5-Z9016 

CONTROL

 BOX 

T

OP

 LID 

2C-H8670


W

ASHER #8 INT

 STL

 NP


2C-1494


SCREW 8-32X1/2 RHP

 STL

 NP


2C-Z3447 

HEX NUT

 W/W

ASHER 8-32, FREQ. INVER

TER 

2E-200468


CLAMP

, NYLON WIRE 7/8 

2E-Z9007


FREQUENCY

 INVER

TER 

2T

-Z5177


THERMOST

A

T

 HIGH LIMIT


2C-Z0215 

SCREW M4X5 ST

 NP

 P

AN PH 

2E-Z5206


BREAKER, 

CIRCUIT

-10A


10 

2C-Z8652 

CLAMP

, BLOWER 3” 

11 2F-Z8616-1 

COMBUSTION 

BLOWER 

12 

B5-Z9028-1 

PRESSURE HOSE, SWITCH 

T

O BLOWER 

13 

B5-Z9008 

CONTROL

 BOX REAR COVER 

14 

2K-Y3240


BUSHING HEYCO SR 17-2 


2E-Z3034


IEC CORD INLET

 HOT

 10 

AMP

 230 VOL

T


CE

15 

2E-Z9858 

CORD SET

, 14/3 6-15P

 10' 


208/240V


2E-Z7278


CORDSET

, UK 10A

 90° BOTH ENDS 2.5METERS 

UK


2E-Z0512


CORD SET

, CONT

. EUR 10A


CE

16 

B5-Z8668 

POWER INLET

 PLA

TE 

17 

2C-Y2344


TERMINAL

 GROUND  


CE

UM3240, UM3255 Series Control Box 

Assembly

Rev

. D  6/26/2007

18 

B5-Z10050 

CORD HOLDER - IEC INLET


CE

19 

2C-200201 

6-32 HEX NUT

,W/ST

AR W

ASHER 

CE

20 

2C-200004


SCREW

, 6-32X38PHITRU SS410N 

CE

21 

2C-1810


W

ASHER 3/16 BURR STL

 NP


22 

2C-08-07-0207

 2 

NUT

 10-24 HEX STL

 NP

 W/LOCKW

ASH 

23 

2C-1515


SCREW 10-24X.75 ST

 RH NP


24 

2E-Z5163


IGNITION CONTROL, 24V

AC 

25 

2C-1496


SCREW 8-32 X 3/4 ST

 RH NP


26 

2C-Z6925


SCREW #8 X .5 

TEK HW SS 

27 

2E-Z5683


SWITCH-DIFFERENTIAL

 PRESSURE

28 

2C-H1027 

NUT

 WELD 1/4-20, 

ANTI ROT

A

TION, MOT

OR

29 

2U-Z8629


GEAR 

MOT

OR 

W/CAP

ACIT

OR 

30 

B5-Z8661


GEAR MOT

OR COVER PLA

TE 

31 

2C-Z5556 

W

ASHER, FLA

T

 1/4 SS 

32 

2C-Z5557


W

ASHER, LOCK 1/4 SPLIT

 SS 

33 

2C-Z5555


SCREW

,1/4-20 X 3/4 HEX SS 

34 

2A-Z8633


DRIVE 

COG 

35 

2T

-Z5175


THERMOST

A

T, 

COOLDOWN 

TIMER

36 

B5-Z9028-2 

SUCTION HOSE, SWITCH 

T

O COOKING CHAMBER 

37 

2E-Z7476


RELA

Y, 

TIME 

DELA

Y


38 

2K-Z2895


BUSHING

39 1L-14-07-0100 

  1FT


TUBING-SILICONE 1/4 OD 1/16 W

AL

NI = NOT

 ILLUSTRA

TED

Fig

No.

Part 

Number

Description

Quantity

Per

Summary of Contents for Ultra-max UM3240

Page 1: ...1 CONVEYOR OVEN MODEL UM3240 UM3255 Installation and Operation Instructions 2M Z9045 Rev D 6 26 2007 UM3255 UM3240 ...

Page 2: ... in information provided or conclusions reached as a result of using the specifications By using the information provided the user assumes all risks in connection with such use MAINTENANCE AND REPAIRS Contact your local authorized service agent for service or required maintenance Please record the model number serial number voltage and purchase date in the area below and have it ready when you call...

Page 3: ...IQUIDS IN THE VICINITY OF THIS OR ANY OTHER APPLIANCE The installation of the Appliance must conform to the NATIONAL FUEL GAS CODE ANSI Z223 1 LATEST EDITION AND ALL LOCAL GAS COMPANY RULES AND REGULATIONS IN CANADAINSTALLATION SHALLBE INACCORDANCE WITH THE CURRENT CAN CGA B149 1 NATURAL GAS INSTALLATION CODE OR CAN CGA B149 2 PROPANE INSTALLATION CODE AND LOCAL CODES WHERE APPLICABLE IMPROPER INS...

Page 4: ...aint Requirement 15 OPERATING INSTRUCTIONS Safety Operating Instructions 16 Operation 16 Turn Unit On 17 Adjusting Time Temp 17 Shut Down Procedures 17 DISPLAY INFORMATION Store Level 18 Manger Level 18 Additional Functions 18 Error Codes 18 Bake Time versus Temp 19 Conveyor Speed 19 Time of Delivery 19 MAINTENANCE INSTRUCTIONS Daily Monthly 3 Months Annually 20 21 Nozzle Finger Assembly Dissembly...

Page 5: ...eyor Extensions to Wall 6 0 cm Allowing 16 25 on the control panel door to open will allow for easier service UM3255 NAT UM3255 LP Gas Rating Connection 150 000 BTU hr 630 kcal min 3 4 NPT male pipe connection BSP adapter supplied on CE models Gas Supply Pressure Natural 5 6 water column 15 30 mBar rated flow Propane 11 12 water column 27 5 30 mBar rated flow Electrical Supply Separate 15 Amp 208 ...

Page 6: ...s settings depending on product being placed in the oven to prevent heat loss H Crumb Tray Catches crumbs and other material that drops through the conveyor belt Located at each end of the conveyor assembly I Conveyor End Side Stops Prevents product from falling off of the moving conveyor J Fingers Projects streams of hot air onto the product K Circuit Breaker 10Amp Protects components from over a...

Page 7: ...a stand and casters designed by Star Manufacturing as part of a complete installation The installation must also include a connector complying with either ANSIZ21 69orCAN CGA 6 16andaquick disconnectdevicecomplyingwitheitherANSIZ21 41 or CAN1 6 9 It must also be installed with restraining means to guard against transmission of strain to the connector as specified in the appliance manufacturer s in...

Page 8: ...y phone number of your local gas company They will have personnel and provisions available to correct the problem It is required that the oven be placed under a ventilation hood to provide for adequate air supply and ventilation Minimum clearances must be maintained from all walls and combustible materials Minimum clearances for this unit should be 0 inches from the rear and 6 inches from both sid...

Page 9: ... of all combustibles such as paper cardboard flammable liquids and solvents Oven should only be used on Non Combustible Floors 3 Do not place the oven on a curb base or seal to a wall This will restrict the flow of air and prevent proper ventilation to the blower motors This condition must be corrected to prevent permanent damage to the oven 4 On all models tripping of the blower motor s thermal o...

Page 10: ...ectrical connections are to be in accordance with CSA C22 1 Canadian Electrical Code Part 1 and or local codes This device is equipped with a 3 prong grounded plug for your protection against shock hazard and should be plugged directly into a properly grounded three prong receptacle DO NOT cut or remove the grounded prong from this plug EQUIPOTENTIAL GROUNDING CE ONLY On CE units connect an equipo...

Page 11: ...ing 1 The oven and its individual manual shut off valve must be disconnected from the gas supply piping system during any pressure testing of that system at test pressures in excess of 1 2 psig 3 45 kPa Turn OFF main gas shut off valve or main gas supply line 2 The oven must be isolated from the gas supply piping system by closing its individual manual shut off valve during any pressure testing of...

Page 12: ...d could be used as supply air but the design would have to accommodate potential operational changes IL1177 RIGHT SIDE FRONT SIDE VENTILATION CAPTURE AREA VENTILATION CAPTURE AREA CAUTION Prevent airflow through the cooking tunnel Air must NOT be directed onto the oven s front or rear or to the sides of the cooking area The following drawing shows a typical installation and is intended to be a gui...

Page 13: ...ware 2 Bolt the caster assembly to the Bottom Leg Plate using provided hardware 3 Screw the Foot Assembly in place as shown 4 Bolt the Bottom plate assembly to the Support Leg securing with the washer nuts provided 5 With assistance turn the Base Pad upright OVEN TO BASE ASSEMBLY 1 Remove any packaging material that was shipped with the oven and base 2 Prior to placing the oven onto the base make ...

Page 14: ...hown being sure to secure the two rear with a screw 5 Using an Oven Lift see Pre Install Manual for specific Oven Lifting Instructions carefully place the upper oven on top of the lower oven Note Be careful not to lift the unit by the Control Box Assembly 6 Be certain the insulation is properly positioned 7 Repeat steps 4 6 if for Triple Oven Installations 8 Install the Top Panels on top of the ov...

Page 15: ...at the opening at each end of the cooking chamber 2 Open the conveyor assembly pull on the conveyor belt making sure it moves freely without obstruction 3 With assistance lift the conveyor and slide it along the Conveyor Guides into position from the drive motor side be certain the crumb tray brackets are on the outside of the oven and the Drive Collar is on the control panel side as shown below 4...

Page 16: ...driver into the square hole on top of the connector you will be able to remove reverse the black brown wires of the connector on the DRIVE MOTOR SIDE ONLY 5 Close the Control Box Door and secure with hardware 6 Reconnect the unit to its electrical power source and test for proper conveyor belt direction change Wiring Harness Drive Motor FACTORY PRESET LEFT TO RIGHT CONVEYOR BELT DIRECTION RIGHT TO...

Page 17: ...ble Gas Appliances ANSI Z21 69 CSA 6 16 and a quick disconnect device that complies with the Standard for Quick Disconnect Devices for Use With Gas Fuel ANSI Z21 41 CAN1 6 9 2 The installation of the restraint must limit the movement of the oven s without depending on the connector the quick disconnect device or associated piping to limit the oven movement 3 If the restraint must be disconnected d...

Page 18: ...ce with the operation of the equipment described Adherence to the procedures recommended herein will assure the achievement of optimum performance and long trouble free service Please take time to read the following safety operating instructions They are the key to the successful operation of your Ultra Max Conveyor Oven SAFETY TIPS For your safety read before operating If you smell gas 1 DO NOT t...

Page 19: ...fter five seconds the new numbers will be saved and the oven will display new settings 4 Après cinq secondes les nouveaux nombres seront sauvés et le four montrera de nouveaux arrangements 3 Tenez vers le haut bouton pour augmenter ou vers le bas boutonnez pour diminution de le TEMPS ou TEMPÉRATURE Maintenez le bouton pour des changements plus rapides 1 Press the up and down buttons at the same ti...

Page 20: ...NTER button ADDITIONAL FUNCTIONS Theconveyorbeltdirectionandthetemperaturedisplaycanbechangedontheconveyorovenbyaqualified technician To change the belt direction the technician needs to see the section on CONVEYOR BELT DIRECTION A technician can also change the temperature display from Fahrenheit to Celsius These changes can be made by the technician during the start up check out or at a later da...

Page 21: ...bakehasbeenestablished thefine adjustments should be made by holding either the bake time or bake temperature constant then varying the other CONVEYOR SPEED BakeTime Conveyor Speed As stated previously baketime conveyorspeed isdefinedastheamount oftimeelapsedbetweenthetimetheleadingedgeof the product enters the oven and the leading edge of theproductexitstheoven Baketimeiscontrolledby adjusting th...

Page 22: ...lth standards If the gas oven needs to be moved the gas must be turned off and disconnected from the unit before removing the restraint Reconnect the restraint after the oven has been returned to its original location Follow this recommended cleaning schedule for proper oven performance DAILY 1 Clean the conveyor belt using a nylon brush Allow any foreign material to drop into the crumb pans 2 Emp...

Page 23: ...low to cool 2 Disconnect the conveyor s Drive Collar from theDriveCog Onceseparated lifttheconveyor and remove it from the control end side See page 13 for details 3 Lift both of the conveyor guide off its mounting studs remove 4 Slide B1 out of position marking all parts using a black flet tip marker 3 Slide the Nozzle Plate off of the Finger Body Assy exposing the Coulumnating Plate Notice and m...

Page 24: ...y steps for removing links 1 Move the splice clips to either end of the oven for easy access 2 Unhook the splice clips using long nose pliers 3 Unhook the full link to be removed and slideitout Donotdiscardthelinkremoved as it may be used for making spare splice clips 4 Reconnect the inside splice clips 5 Reconnect the outside splice clips 6 Replace all parts removed from the oven 7 Straightenanyb...

Page 25: ...T 56 55 4 55 TB 36 48 50 4 39 47 49 TB 21 8 9 7 15 20 19 TB 11 SSC XF1 0V 120V 208V 240V ORN RED WHT BLK LT1 SD1 SD2 C NO C NO 10 10 17 6 5 6 BLU YEL F4 F3 SCF POWER FAULT TQ LIMIT BOOST MAX ACCEL TQ DECEL L1 L2 W V U E2 E1 S1 S2 S3 DIR 58 59 36 38 NC C 2 NO TFS 1 61 62 61 62 45 41 44 42 46 43 44 45 46 57 43 41 42 60 60 F1 F2 F5 BLU BRN 48 47 9 53 C NO NC SD2 HIGH PRESSURE PORT ATTACH TO COMBUSTIO...

Page 26: ...ners This warranty does not apply to the non stick properties of such materials This warranty does not apply to Special Products but to regular catalog items only Star s warranty on Special Products is six 6 months on parts and ninety 90 days on labor This warranty does not apply to any item that is disassembled or tampered with for any purpose other than repair by a Star Authorized Service Center...

Page 27: ......

Page 28: ...ACTURING INTERNATIONAL INC SK2198 Rev B 12 5 06 CERTAIN INSTANCES MAY NOT BE AVAILABLE SOME ITEMS ARE INCLUDED FOR ILLUSTRATIVE PURPOSES ONLY AND IN MODEL UM3255 Front Panel Assy No reproduction or disclosure of its contents is permitted This drawing contains information confidential to Star Manufacturing International Inc Nameplate ...

Page 29: ...1 ACCESS DOOR HANDLE 23 2C Z5026 4 SCREW 8 32X1 2 SS SHCS 24 B5 LC0031 1 BASE FRAME UM3240 B5 LC0032 1 BASE FRAME UM3255 25 B5 Z9039 6 2 INSULATION BASE TRAY UM3240 B5 Z9071 3 2 INSULATION BASE TRAY UM3255 26 B5 Z8602 4 BASE LEG BODY 27 2A Z8600 4 BOTTOM LEG PLATE 28 2P Z8617 4 CASTER 5 H 2 W 29 2A Z8618 4 6 EQUIPMENT LEG UM3240 UM3255 Front Panel Assy Rev D 6 26 2007 30 2C Z2206 32 BOLT 3 8 16X1 ...

Page 30: ...R MANUFACTURING INTERNATIONAL INC CERTAIN INSTANCES MAY NOT BE AVAILABLE ILLUSTRATIVE PURPOSES ONLY AND IN SOME ITEMS ARE INCLUDED FOR MODEL UM3255 Rear Panel Assy SK2199 REV A 9 29 06 No reproduction or disclosure of its to Star Manufacturing International Inc This drawing contains information confidential contents is permitted ...

Page 31: ... Z5555 34 SCREW 1 4 20 X 3 4 HEX SS 12 B5 LC0006 1 BLOWER FAN WALL ASSY UM3240 B5 LC0023 1 BLOWER FAN WALL ASSY UM3255 13 2J Z5189 1 THERMOCOUPLE ASSY 14 2C Z3350 1 HALF CLAMP 188 DIA 15 1 UM3240 UM3255 Rear Panel Assy Rev D 6 26 2007 16 B5 LC0045 1 BLOWER ASSY COMPLETE LEFT B5 LC0044 1 BLOWER ASSY COMPLETE RIGHT 17 2U Z8670 1 2 BLOWER 18 2C 1824 9 WASHER LOCK 5 16 SPLIT 19 2C Z8651 9 BOLT HEX 5 1...

Page 32: ... INSTANCES MAY NOT BE AVAILABLE ILLUSTRATIVE PURPOSES ONLY AND IN SOME ITEMS ARE INCLUDED FOR MODEL Conveyor Assembly SK2201 REV 6 14 06 No reproduction or disclosure of its to Star Manufacturing International Inc This drawing contains information confidential contents is permitted LEFT SIDE RIGHT SIDE ...

Page 33: ...X3 8 SS 8 2A Z8621 16 SPROCKET WIRE BELT 9 2V LC0014 1 DRIVE SHAFT ASSY 10 2A Z9052 1 ROLL PIN UM3240 UM3255 Conveyor Assembly Rev D 6 26 2007 11 2P Z9051 1 SPRING COUPLING 12 B5 LC0013 1 COUPLING ASSY 13 2A Z8601 1 AXLE COG 14 B5 LC0011 2 END CONVEYOR ASSY 15 B5 Z9086 1 END STOP 16 B5 Z9454 1 SIDE STOP 17 B5 LC0012 1 CENTER CONVEYOR ASSY UM3240 B5 LC0029 1 CENTER CONVEYOR ASSY UM3255 18 B5 LC0017...

Page 34: ...CERTAIN INSTANCES MAY NOT BE AVAILABLE ILLUSTRATIVE PURPOSES ONLY AND IN SOME ITEMS ARE INCLUDED FOR MODEL UM3200 Series Control Box Assembly SK2203 REV C 6 25 07 No reproduction or disclosure of its to Star Manufacturing International Inc This drawing contains information confidential contents is permitted See SK2002 35 See SK2199 FOR BLOWER MOTOR W WIRING HARNESS 37 38 39 22 16 21 15 23 18 ...

Page 35: ...D CE UM3240 UM3255 Series Control Box Assembly Rev D 6 26 2007 18 B5 Z10050 1 CORD HOLDER IEC INLET CE 19 2C 200201 2 6 32 HEX NUT W STAR WASHER CE 20 2C 200004 2 SCREW 6 32X38PHITRU SS410N CE 21 2C 1810 1 WASHER 3 16 BURR STL NP 22 2C 08 07 0207 2 NUT 10 24 HEX STL NP W LOCKWASH 23 2C 1515 4 SCREW 10 24X 75 ST RH NP 24 2E Z5163 1 IGNITION CONTROL 24VAC 25 2C 1496 2 SCREW 8 32 X 3 4 ST RH NP 26 2C...

Page 36: ...INC CERTAIN INSTANCES MAY NOT BE AVAILABLE ILLUSTRATIVE PURPOSES ONLY AND IN SOME ITEMS ARE INCLUDED FOR MODEL UM3200 Series Control Box Door Assembly SK2202 REV 6 1 06 No reproduction or disclosure of its to Star Manufacturing International Inc This drawing contains information confidential contents is permitted ...

Page 37: ...L PANEL 11 2K Z1971 4 SPACERS 12 2J Z7279 1 CONTROLLER TIME TEMP 13 2C 1513 7 SCREW 10 24X1 2 RHP STL NP 14 B5 Z8626 1 CONTROL MOUTN PANEL UM3240 UM3255 Series Control Box Door Assembly Rev D 6 26 2007 15 2T Z5176 1 THERMOSTAT 140V 16 2C 4538 2 WASHER LOCK EXT 6 STL NP 17 2C 1487 2 SCREW 6 32X1 4 RHP STL NP 18 2E Z8629 1 GEARMOTOR BROTHER 19 2C 1827 2 WASHER 10 EXT STL NP 20 2E Z4597 3 TERMINAL BL...

Page 38: ...URING INTERNATIONAL INC CERTAIN INSTANCES MAY NOT BE AVAILABLE ILLUSTRATIVE PURPOSES ONLY AND IN SOME ITEMS ARE INCLUDED FOR MODEL UM3200 Manifold Blower Burner Assembly SK2200 REV A 9 29 06 No reproduction or disclosure of its to Star Manufacturing International Inc This drawing contains information confidential contents is permitted ...

Page 39: ...ION 1 2 NPT 16 2K 1388 5 NIPPLE 1 2 NPT CLOSE STL 17 2K Z9001 1 NIPPLE 1 2 NPT X 22 437 UM3240 2K Z9056 1 NIPPLE 1 2 NPT X 29 938 UM3255 UM3240 UM3255 Manifold Blower Burner Assy Rev D 6 26 2007 18 2K Z9004 1 TEE 1 2 NPT 19 2K 3671 1 REDUCER 1 2 NPT TO 3 8 NPT 20 2K Z9025 1 1 ORIFICE LOW FIRE NAT 43 20 2K Z9025 2 1 ORIFICE LOW FIRE LP 48 21 2K Z9025 1 PILOT ELBOW 22 2K Z7221 1 NIPPLE GAS TEST PRES...

Page 40: ...STAR MANUFACTURING 10 Sunnen Drive St Louis MO 63143 U S A 800 807 9054 314 781 2777 Parts Service 800 807 9054 www star mfg com ...

Reviews: