


21
EVERY TWELVE MONTHS
A factory authorized service person should:
1. Open and clean the inside of the control box.
2. Check and tighten all electrical components.
If maintenance is required, contact your local service company, a factory representative, or Star
Manufacturing.
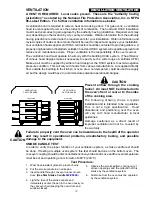
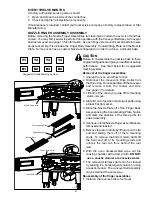
NOZZLE FINGER ASSEMBLY DISSEMBLY
Before removing the Nozzle Finger Assemblies for cleaning be certain the oven is off and has
cooled. You may
fi
nd it easier to perform this operation with the Conveyor Belt Assy & Conveyor
Guides removed, see page 13 for information. As each
fi
nger is removed, mark all parts to insure
proper assembly, this includes the Finger Body Assembly, Coulumnating Plate and the Nozzle
Plate. Some ovens have a custom Nozzle con
fi
guration in order to achieve a piticular bake.
T1
B1
T4
B4
T2
B2
T3
B3
Suggested Nozzle Marking System
CAUTION
Failure to re-assemble the nozzles back to there
original con
fi
guation will give you a different baking
performance See chart below for a suggested
marking system.
Removal of the
fi
nger assemblies:
1. Unplug the oven and allow to cool.
2. Disconnect the conveyor's Drive Collar from
the Drive Cog. Once separated, lift the conveyor
and remove it from the control end side.
See page 13 for details.
3. Lift both of the conveyor guide off its mounting
studs, remove.
4. Slide B1 out of position marking all parts using
a
black
fl
et tip marker.
3. Slide the Nozzle Plate off of the Finger Body
Assy exposing the Coulumnating Plate. Notice
and mark the direction of the three parts for
easier
assembly.
4. Continue until all Nozzle Finger Assemblies are
removed and labeled.
5. Remove top return ducts by lifting up on the far
end and sliding them off of there mounting
studs. To remove the bottom return ducts lift
the front end off of its mounting studs and
unhook the rear tab from behind the rear
wall.
6. With the oven disassembled wipe out the
cooking chamber with a damp cloth,
DO NOT
use a caustic cleaner or excessive water
.
7. The removed stainless parts can be cleaned
by soaking in a hot detergent solution or using
a caustic cleaner. The conveyor belt assembly
can be cleaned the same way.
Reassembly of the
fi
nger assemblies
1. Install in the reverse order of removal.
IL1195
Nozzle Plate
Finger Body Assy
Coulumnating Plate
Nozzle Finger Assy
Top Air Return Duct
Lower Air Return Duct
Tabs
Summary of Contents for Ultra-max UM3240
Page 27: ......


