


7
(Original instructions)
ENGLISH
Position of date barcode
The Date Code, which also includes the year of
manufacture, is printed into the housing.
Example:
2016 XX ZY
Year of manufacturing
Electrical safety
This tool is double insulated; therefore no earth
wire is required. Always check that the power
supply corresponds to the voltage on the rating
plate.
• If the supply cord is damaged, it must be replaced by the
manufacturer or an authorised STANLEY Service Centre
in order to avoid a hazard.
Using an extension cable
• Always use an approved extension cable suitable for the
power input of this tool (see technical data). Before use,
inspect the extension cable for signs of damage, wear
and ageing. Replace the extension cable if damaged or
defective. When using a cable reel, always unwind the
cable completely. Use of an extension cable not suitable
for the power input of the tool or which is damaged or
defective may result in a risk of fire and electric shock.
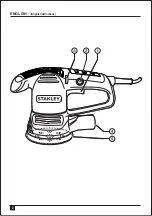
Features
This tool includes some or all of the following features.
1. On/off switch
2. Lock-on button
3. Variable speed control knob
4. Dust extraction outlet
5. Sanding base
Assembly
Warning!
Before assembly, make sure that the
tool is switched off and unplugged.
Fitting the sanding disc (fig.A)
• Place the tool on a table, with the spindle facing up.
• Place the sanding disc (5) onto the spindle.
• Secure the sanding disc using the screws (6).
Fitting sanding sheets (fig. B)
Warning!
Never use the tool without a sanding sheet or
accessory in place.
• Press the sheet firmly and evenly onto the sanding disc
(5), making sure that the holes in the sheet line up with
the holes in the base.
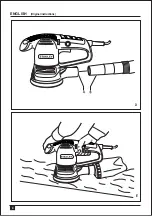
Fitting and removing the dustbag (fig. C)
• Fit the dustbag (7) over the dust extraction outlet (4).
• To remove the dustbag, pull it off the dust extraction
outlet.
Connecting a vacuum cleaner (fig. D)
• Insert the hose (8) of the vacuum cleaner into the dust
extraction outlet (4).
Use
Warning!
Let the tool work at its own pace. Do not overload.
Variable speed control
The variable speed control allows you to adapt the speed of
the tool to the workpiece material.
• Set the control knob (3) to the desired setting. Use a
high speed for wood, medium speed for veneer and
synthetics and low speed for acrylic glass, non-ferrous
metals and for removing paints.
Switching on and off
• To switch the tool on, press the on/off switch (1).
• For continuous operation, press the lock-on button (2)
and release the on/off switch..
• To switch the tool off, release the on/off switch. To switch
the tool off when in continuous operation, press the
on/off switch once more and release it.
Automatic brake system
This feature keeps the speed of the disc limited as long as
the tool does not touch the workpiece. As soon as the tool is
placed on the workpiece, the disc will reach its normal
operating speed.
Emptying the dustbag
The dustbag should be emptied every 10 minutes.
• Shake the dustbag to empty the contents.
Summary of Contents for SRS480
Page 1: ...SRS480 English Page 05 Turkish Page 10 Russian Page 16 Ukrainian Page 22...
Page 2: ...ENGLISH Original instructions 2...
Page 3: ...3 Original instructions ENGLISH A B C...
Page 4: ...4 ENGLISH Original instructions D E...
Page 16: ...16 Stanley SRS480 1 b 2 b d f 3 a b...
Page 17: ...17 d f g 4 a b c d c f g 5...
Page 18: ...18 2016 XX ZY STANLEY...
Page 19: ...19 1 2 3 4 5 5 6 B 5 7 4 D 8 4 3 1 2 10...
Page 22: ...22 Stanley SRS480 1 a b c 2 a b c d e f 3 a b...
Page 23: ...23 c d e f g 4 a b c d e f g 5 a...
Page 24: ...24 2016 XX ZY STANLEY...
Page 25: ...25 1 2 3 4 5 A 5 6 B 5 C 7 4 D 8 4 3 1 2 10...
Page 28: ...24 12 2016...


