


6
Connecting the RAM4W and the GX6500/GX6000
Once the
GX6500
/
GX6000
and the
RAM4W
have been connected, and the settings
have been stored to each other, when both are turned ON, they are automatically con-
nected. Up to four
RAM4W
remote microphones can be connected at the same time.
WARNING
Keep the device away from 802.11b/g/n Wi-Fi devices, Bluetooth devices, cordless phones,
transformers, heavy-duty motors, fluorescent lights, microwave ovens, and refrigerators to
prevent signal interference or loss.
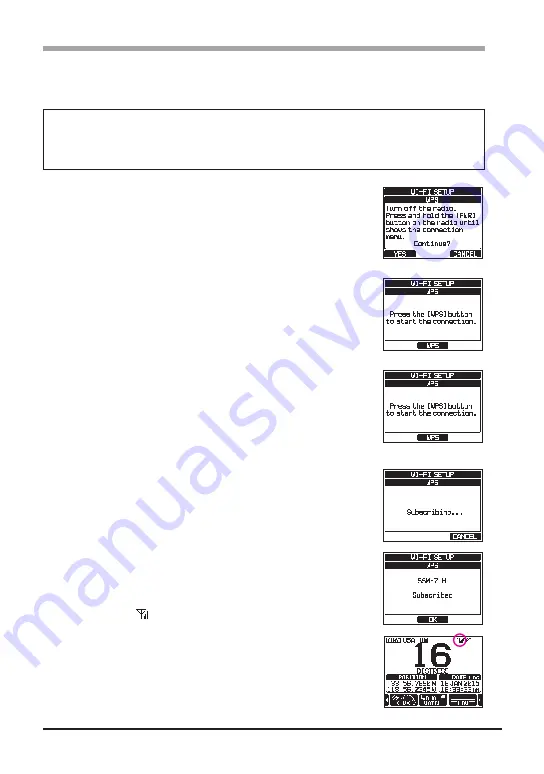
1. When the
RAM4W
is turned ON for the first time after
purchase, the WI-FI SETUP screen will be displayed auto-
matically.
(RAM4W Screen)
2. Press the [
YES
] soft key on the
RAM4W
to display the WPS
screen.
押下後
(RAM4W Screen)
3. Press and hold the [
PWR
] switch on the
GX6500
/
GX6000
for about 10 seconds until the WPS screen is displayed.
NOTE
:
If the
SCU-30
is not connected to the
GX6500
/
GX6000
, a warning screen will be displayed. In that
case, press the [
OK
] soft key, check the connection
between the
GX6500
/
GX6000
and the
SCU-30
,
and then perform step 3.
押下後
(GX6500/GX6000 Screen)
4. Press the [
WPS
] soft key on both the
GX6500
/
GX6000
and
the
RAM4W
.
NOTE
: If “Error!” appears on the screen, press the [
OK
]
soft key, then perform step 1.
5. If “
Subscribed
” appears on both the
GX6500
/
GX6000
and
the
RAM4W
screens, the connection is completed.
Press the [
OK
] soft key to return to the normal operating
screen. The signal strength of WI-FI is displayed with the
antenna icon “
”.
Once the connection is completed, when the
GX6500
/
GX6000
and the
RAM4W
are turned ON, they will be connected auto-
matically.
NOTE
: To connect with two or more
RAM4W
microphones,
repeat the same procedure as above, or connect with
the
RAM4W
using the WI-FI SETUP screen (see Page
7 or Page 8) for the
GX6500
/
GX6000
setup.
OK
押下


