background image

Charging 

• •


Only charge the Staaker battery with the accompanying Staaker charger. Damage 

to the battery and fire can occur when using the wrong charging equipment. 

 
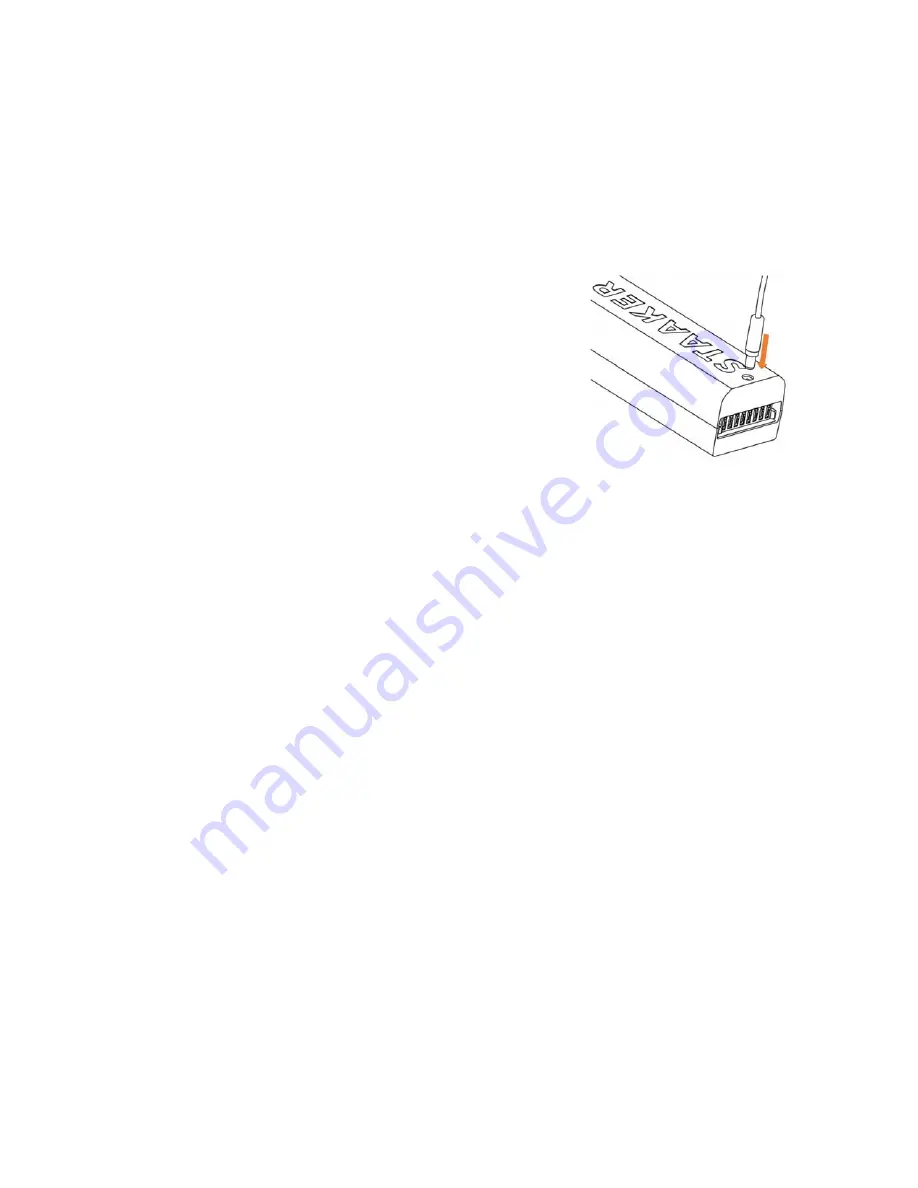
To charge the battery, insert the Staaker battery charger jack 
into the charging plug on the battery. 
 
There are 2 indicators of a charging battery: 

1. The 4 battery status LEDs will start flashing to indicate 

the charge progress.  

2. The charger status light is red. 

 
When the battery is finished charging, the 4 battery status LEDs 
will be off, and the battery charger status led will show green. 


When the battery is fully charged and plugged into the charger, it is not possible to 

check the battery charge status or turn the battery on by pressing the circular button.


Batteries are based on a chemical reaction and can not deliver power if they are 

frozen. When flying in freezing conditions, remember to keep the battery warm before 
you fly. After takeoff, the battery will heat itself because draining power generates 
internal heat. Our test pilots usually keep the batteries in their inner pockets while they 
are preparing to fly. 


Keep in mind that that the drone will do a forced emergency landing if you reach 

0% battery during flight which 

cannot

 be aborted. 


40 

Summary of Contents for 820101

Page 1: ...Staaker 1 User manual Draft20170721...

Page 2: ...n 1 0 12 07 2017 This document is subject to change Download the latest digital version of the document at www staaker com Legend Warning Explains something that if not obeyed could cause serious inju...

Page 3: ...not included With the touch of a button it follows and films you automatically The Staaker drone follows whomever or whatever is wearing the tracker by itself Using the tracker Staaker follows you an...

Page 4: ...tom of the Staaker drone Locate Staaker A menu option on the Tracker for locating the Staaker drone Requires GPS on the Tracker Return to Home A procedure where the drone flies back to a designated lo...

Page 5: ...kill switch 20 Tracker Radio Signals 20 User Interface 21 Navigating the Main Menu 22 Quick Staak 22 Water Staak 22 Pro Staak 23 Calibrate Altitude 23 Locate Staaker 23 Pairing 24 About 24 Pro Staak S...

Page 6: ...Replacing Gimbal 44 Replacing landing gear 45 Motors 45 Propellers 46 Staaker tips 47 Camera tips 47 Drone Tips 47 Troubleshooting 48 Error Messages 48 Before or during takeoff 48 Under Flight 50 Lan...

Page 7: ...Liability 60 Software License 61 Dispute Resolution 61 General Terms 64 Technical Specifications 65 PRODUCT FEATURES 65 Staaker Drone 66 Tracker 67 Smart Battery 67 Smart Battery Charger 67 CE FCC and...

Page 8: ...erence e g radio transmission towers 7 Do not use the drone over people animals urban areas or trafficked roads 8 Do not breach the bounds of privacy Ask for permission before flying on private proper...

Page 9: ...dable and compact designed to be durable and lightweight The drone is equipped with an intelligent autopilot to aid you in flying the drone and keeping you always in the video frame The Staaker drone...

Page 10: ...nking yellow light Drone is powered on and searching for GPS Blinking green light Drone has sufficient GPS and ready for takeoff Blinking red light Drone has an error check tracker for message Status...

Page 11: ...important that all arms are unfolded completely reaching endpoint before the landing gear is pulled out This will ensure the arms are completely locked and prevent vibrations which degrade flight perf...

Page 12: ...3 axis gimbal supports the following cameras GoPro Hero 3 all versions GoPro Hero 4 all versions GoPro Hero 5 black Garmin VIRB ultra 30 Camera installation guide 1 Make sure the drone is powered off...

Page 13: ...d all the way in and is aligned with the edge where it stops 5 Tighten the two screws on the camera holder and check if the camera is not loose 6 Insert the power cable to the Gimbal and the camera on...

Page 14: ...Tip Lead the charging cable between the camera and the screw before inserting the camera to better secure the cable 14...

Page 15: ...ecured by the battery lock To take it out pull the battery while pressing the battery lock button If the battery is not properly secured there s a risk that it may fall out during flight This can happ...

Page 16: ...n the gimbal The gimbal will spin erratically without the counter weight from the camera and can damage your equipment Do not modify or tamper with the drone or attempt to use non authorized Staaker r...

Page 17: ...er away from the tracker Left Right Two buttons located on the face pointing against you Used for orbiting the drone left or right around the tracker Mode Used for navigating menus same as up down and...

Page 18: ...important one Illustration shows where on the tracker that the wireless signals to the Staaker is being sent from and the GPS location These locations should be unobstructed while flying the drone Los...

Page 19: ...reens that are available When you power on the tracker the following screen should appear If the Tracker has no connection with the drone as shown by the radio signal strength indicator on the bottom...

Page 20: ...n battery is low The drone will also Return to Home if it loses connection with the tracker This mode should be used when doing watersports NB In Water Staak the drone automatically engages Return to...

Page 21: ...location of the drone It will point you towards the last known location of the drone The tracker needs a GPS fix for this functionality to work You can use Locate Staaker before takeoff to determine...

Page 22: ...ce You can only pair two devices that are running the same software version the tracker will tell you if this fails You can determine which version the tracker and drone are running in the About scree...

Page 23: ...configuration that fits your usage and quickly takeoff using these settings SETTING Quick Staak Default settings Water Staak Default settings Pro Staak Optional settings Return to Home Off On On Off T...

Page 24: ...ude changes When using Pro Staak in watersports this option should be always disabled Else the drone will rapidly fall in altitude and crash if the tracker barometer connects with water Responsivity T...

Page 25: ...de tracking performance when tracker rapidly descends in elevation Takeoff After selecting a takeoff mode Quick Staak Water Staak or Pro Staak the system prepares for liftoff Initially both the tracke...

Page 26: ...warnings displayed on the tracker If both the tracker and drone is ready for takeoff the following screen will appear Press and hold to start the takeoff procedure Once the takeoff procedure has start...

Page 27: ...ter takeoff is complete the drone will by default enter the Compass Tracking Mode and is instantly ready to track your movements You can now use the navigation buttons to reposition the drone Increase...

Page 28: ...and Opens the Land Menu See section Tracking Modes on how each of the tracking modes work If you do not select an action within 10 seconds after opening the mode menu the tracker will automatically re...

Page 29: ...le in the land menu If the drone lands by itself the reason for landing is shown on the bottom of the land screen Land now The drone will execute landing in its current position and start the descent...

Page 30: ...ker until it starts the descent If the drone runs out of battery while flying towards home it will land at its current position You can abort Return to Home at any time as long as you have connection...

Page 31: ...topping the drone in the air Mounting the Tracker The tracker comes with two straps in different lengths short and long 1 Short strap designed for sizes between 6 and 10 inches 15 to 26cm in circumfer...

Page 32: ...periods Connect the USB cable to a power supply and then plug the end of the USB into the tracker USB port Once connected the tracker will display that it is charging Only use the accompanying orange...

Page 33: ...the video frame at all times The drone is not equipped with any anti collision sensors and it is important that you takeoff and position it in a location free from obstacles While the autopilot will a...

Page 34: ...keoff location First ensure that the you area you intend to operate the drone in is not a designated no fly zone This includes nearby airports helipads military installations and any local laws preven...

Page 35: ...ng the button 11 Press and hold the button and the takeoff countdown starts this takes 10 seconds and displayed on the tracker The drone will liftoff when the countdown reaches 0 If there is any reaso...

Page 36: ...ltitude Down Decrease altitude Increase Distance The drone will move further away from you V Decrease Distance The drone will move closer towards you Left The drone will move to the left around you Ri...

Page 37: ...move closer towards you Left Increase counter clockwise orbit speed Right Increase clockwise orbit speed Scenery In Scenery mode the drone does not follow the tracker position You gain full freedom of...

Page 38: ...and pitch the camera to keep you in the video frame Up Increase altitude Down Decrease altitude Increase Distance The drone will move further away from you V Decrease Distance The drone will move clos...

Page 39: ...a mounted in the gimbal The gimbal will spin erratically without the counter weight from the camera and can damage your equipment To turn the power off 1 Press the circular button once 2 Press and hol...

Page 40: ...ttery charger status led will show green When the battery is fully charged and plugged into the charger it is not possible to check the battery charge status or turn the battery on by pressing the cir...

Page 41: ...ries should be stored in a dry place at 5 C to 20 C degrees 41 F to 68 F and be charged to 50 This puts the minimal strain on the internal chemistry of the battery preserving it longer To make your ba...

Page 42: ...k for damages after hard landings Always use the rubber USB protector on the tracker Warranty warning We recommend that all repairs is done by personnel authorized by Staaker if this is done by unauth...

Page 43: ...le 2 Loosen all set screw on all four legs 3 Unscrew all four socket head cap screws for the legs and remove them 4 Replace the broken parts 5 Assembly by doing point 1 3 in reverse Motors 1 Place the...

Page 44: ...hite dot on top of the shaft If the motor doesn t have a hvite dot use the propellers with no white markings 4 Spin the propellor in the directed direction shown on the top of the propellor to tight i...

Page 45: ...to become visible or moving both the tracker and drone which has a clear unobstructed view of the sky in all directions Picking up the tracker and drone and walking around with them can also reduce GP...

Page 46: ...rror Message Description What to do GPS interference detected Unusual interference detected on Staaker s GPS Change the drone location or try again later Magnetic interference detected Magnetic distur...

Page 47: ...ous system error was detected More detailed error message appears in the main menu This usually indicates a fatal system error for one of the drone s sensors Contact support for more help Bad battery...

Page 48: ...attery temperature detected Battery is too cold The drone will go to preselected landing mode Land the drone as soon as possible Drone GPS interference detected The drone has bad GPS because of radio...

Page 49: ...rrent location You cannot abort this landing Staaker lost GPS The Drone has no GPS and doesn t know where it is and if it s moving or not You cannot abort this landing keep distance until landing is c...

Page 50: ...erature Battery is too hot The drone will go to preselected landing mode You cannot abort this landing RTH due to low battery temperature Battery is too cold The drone will go to preselected landing m...

Page 51: ...connect to Staaker Assist 1 Make sure the tracker is off 2 Check for damages on the USB connectors and cable 3 Try to re plug the USB 4 Unplug the USB and press and hold while turning on the tracker...

Page 52: ...onditions for tracker by moving around with it Try to keep the tracker s screen pointing towards the sky Keep clear of obstacles between the tracker and the sky and do not cover the tracker with any m...

Page 53: ...ce to the last known position of the Staaker relative to your current position The tracker needs GPS reception for this functionality to work Press the button while in this mode and the drone will bee...

Page 54: ...ows and Ubuntu It requires Java 8 or later installed to work Flight logs By using the Staaker Assist application on your desktop you will help us improve reliability and user experience when using the...

Page 55: ...the latest firmware different versions are not compatible Step by Step Guide Go to www staaker com and download the latest version of Staaker Assist for your computer Check if you got the latest firm...

Page 56: ...use of the Product contrary to Staaker s published information specifications and instructions including but not limited to storage requirements and environmental conditions or ranges for temperature...

Page 57: ...ichever is longer Please note that this warranty ONLY applies to the original purchaser Warranty Exclusions You agree to fully read the instructions and guidance we provide and review the Product s ca...

Page 58: ...fic location Please do not hand deliver your product to the addresses provided even if you are local These locations are not set up to receive visitors Indemnity You agree to defend indemnify and hold...

Page 59: ...quired by or on behalf of the U S Government then as provided in FAR 12 212 and DFARS 227 7202 1 through 227 7202 4 as applicable the U S Government s rights in the software and any related documentat...

Page 60: ...ng or the arbitrator determines that a hearing is necessary If your claim exceeds 10 000 U S dollars your right to a hearing will be determined by the AAA Rules Subject to the AAA Rules the arbitrator...

Page 61: ...61...

Page 62: ...r transfer these Terms without restriction Subject to the foregoing these Terms will bind and inure to the benefit of the parties their successors and permitted assigns Any notices or other communicat...

Page 63: ...and tested in all kinds of weather Staaker flies in snow wind and rain PERFECTLY STABLE FOOTAGE 3 axis gimbal with high accuracy stabilizes the camera at all times WIND RESISTANCE Staaker can withsta...

Page 64: ...t Min Distance 3 m 10 ft Max Alt 50 m 165 ft above tracker Min Alt 2 m 6 5 ft above tracker Water resistance Splash proof Operating Temperatures 20 C 4 F To 40 C 104 F Camera Stabilizer 3 axis brushle...

Page 65: ...Intelligent LiPo Battery Art nr 120000 Rated Capacity 6400mAh 94 72Wh Max Charge Voltage 16 8V Nominal Voltage 14 8V Charging temperature 0 45 C Optimal storage temperature 20 25 C Optimal environment...

Page 66: ...nt has been tested and found to comply with the limits for a Class B digital device pursuant to part 15 of the FCC Rules These limits are designed to provide reasonable protection against harmful inte...

Page 67: ...conditions 1 this device may not cause interference and 2 this device must accept any interference including interference that may cause undesired operation of the device There are no restrictions fo...

Page 68: ...ompany in Norway Assembled in Norway Customer Support Website www staaker com E Mail support staaker com Address The Staaker Company AS Martin Linges vei 25 1364 Fornebu Norway www youtube com staaker...

Page 69: ...69...

Reviews: