background image

8

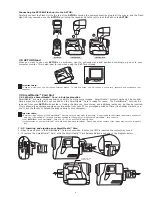
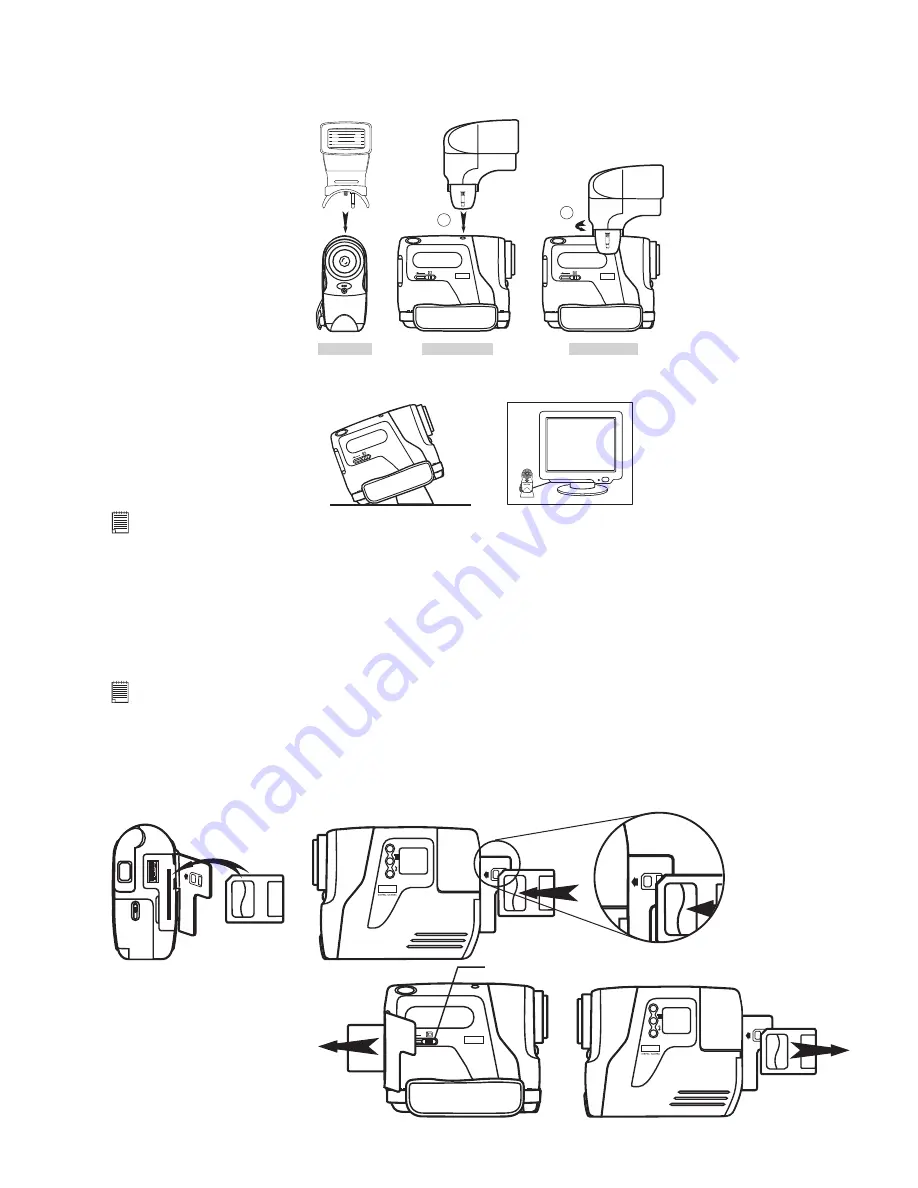
Connecting the 

SPYPEN

 Flash 

unit

 to 

the ACTOR:

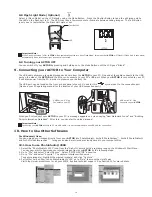
Carefully connect the Flash Unit to the top of the 

ACTOR

 ensuring the power connection plug is all the way in, and the Flash 

Light is rmly secured on to the 

ACTOR 

by winding the round knob to the left to lock the ash to the


ACTOR


Left Side View

Left Side  View

Front View

F3.

0

f=5

.3m

m

CO

OL

-ICA

M DIGITAL CAM

ER

A

1

DIGITAL CAMERA

DIGITAL CAMERA

2

7.8 

ACTOR

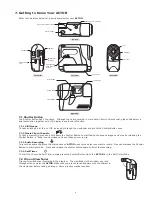
 Stand

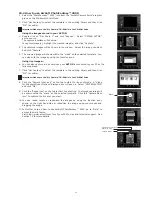
When  you  want  to  use  your 

ACTOR

  as  a  web-cam,  use  the  enclosed  stand  and  position  accordingly,  e.g.next  to  your 

computer monitor. This is also ideal for use when using the Self-Timer Modes.

DIGI

TAL

CA M

ERA

F3.

0

f=5

.3m

m

CO

OL

-ICA

M DIGITAL CAM

ER

A

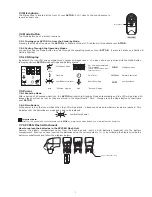
 Important Note:

To  use  as  a  web-cam,  you  will  require  Internet  access.    To  talk  and  listen,  you  will  require  a  sound  card,  speakers  and  microphone  (not 
supplied). 

7.9 SmartMedia™ Card Slot

7.9.1 What is a SmartMedia™ Card - a brief explanation

SmartMedia™  memory  cards  expand  your  ability  to  store  more  images.    SmartMedia™  memory  cards  can  be  reused.  

Simply erase the data that is not needed and the SmartMedia™ card is ready for reuse.  The SmartMedia™ card can be 

removed from your 

ACTOR

 without fear of losing the data you have stored, and additional cards can be then be inserted.  

This is especially advantageous when you are away from your PC for prolonged periods of time (like holidays) where you 

don’t have the facility to upload the images daily to your computer.

 Important Note:

• Before deciding the size of the SmartMedia™ memory card you may want to purchase, it is advisable to understand the memory capacity of 

each size of SmartMedia™ card and how that equates to the number of images each SmartMedia™ card can hold.

• Your 

ACTOR

 can use SmartMedia™ Card of 8, 16, 32, 64 and 128MB memory sizes.

• Images stored on your SmartMedia™ card are an approximate calculation.  Depending on the content of the image may vary the image le 

size.

7.9.2  Inserting and ejecting your SmartMedia™ Card

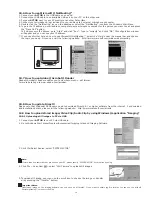
1. Open ap and slide in the SmartMedia™ Card slot provided.  Ensure the SMC is inserted the correct way round.
2. To remove the SmartMedia™ Card, slide the SmartMedia™ Card Release Button as shown in the diagram below.

M


M

DIGITAL CAMERA

SmartMedia™ Card 

Release Button

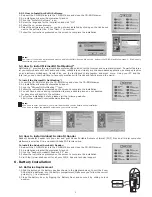
Summary of Contents for ACTOR

Page 1: ...ime Memory for storing digital images and video clips can be added by inserting a SmartMedia Card SMC in the ACTOR Memory card slot provided When you have taken your images the ACTOR will wait for 60 seconds and then automatically switch to Stand by mode to preserve battery life For ACTOR User s Manual update information please visit http www spypen com 2001 plawa EUS Version 2 0901 Part no 0098 W...

Page 2: ...Audio Mode 9 8 4 Self Timer Mode 9 8 5 Audio Recording Mode 9 8 6 Deleting the Last Image Last Movie Clip with Audio Last Audio Clip 9 8 7 Changing the Image Resolution 9 8 8 Flash Light Mode Included 10 8 9 Turning your ACTOR OFF 10 9 Connecting your ACTOR to your Computer 10 10 How to Use Other Softwares 10 For Windows Users 10 1 How to use PhotoStudio 2000 10 10 2 How to use ArcSoft PhotoFantas...

Page 3: ...pleting the camera setup from your installation CD plug your camera into the USB port on your computer There are four camera components that will be installed for your camera Follow the steps below for a proper installation Your original Windows Installation CD MAY be requested Insert the CD into your CD ROM Drive when requested 1 Upon plugging in your camera to the USB Port the Add New Hardware W...

Page 4: ...then plug the camera into your USB port Notes Uninstalling your My Camera Driver does not delete your album folders and therefore all images transferred into your default or created albums will be preserved You will be able to access these folders on your system desktop 5 2 How to Install ArcSoft Software Introduction to the Software PhotoStudio 2000 PhotoStudio 2000 is a full featured easy to use...

Page 5: ...r 2 An installation wizard will automatically launch 3 Click the Microsoft NetMeeting icon 4 Follow the instructions presented on the screen to complete the installation 5 You will have a choice during installation to place a desktop icon on your desktop for easy access directly to the software 6 For further installation details please visit the following website http www microsoft com windows net...

Page 6: ...looking through the view nder and press the Shutter Button once 7 1 2 Movie Clip with audio To take a movie clip press and hold down the Shutter Button to start taking continuous images and stop by releasing the Shutter Button a beep sound means you have taken an movie clip 7 1 3 Audio Recording To record an audio clip place the microphone on ACTOR close to the object you want to record Press and ...

Page 7: ...arate sections Normal Resolution Self Timer sec Low Resolution Second Display HIGH LOW sec min min Minutes Display AUTO AUTO 7 6 Power 7 6 1 Stand by Mode After a period of 60 seconds inactivity the ACTOR will switch to Stand by Mode automatically and the LCD will go blank All images taken will not be lost as they are stored in the SmartMedia Card Simply press the Mode Button to reactivate your AC...

Page 8: ...be reused Simply erase the data that is not needed and the SmartMedia card is ready for reuse The SmartMedia card can be removed from your ACTOR without fear of losing the data you have stored and additional cards can be then be inserted This is especially advantageous when you are away from your PC for prolonged periods of time like holidays where you don t have the facility to upload the images ...

Page 9: ...appears on the LCD There are two modes Normal mode for CIF recording and Low mode for QCIF recording 2 Press and hold the Shutter Button to start taking the movie Release the Shutter Button to stop recording the movie 3 During Movie Recording the 3 digits 7 segments will display number of seconds taken 4 When recording is nished the 3 digits 7 segments will display number of clips remaining Import...

Page 10: ...nection port Also see your PC operating manual for the location of your USB connection port USB Series A Plug Connects to your PC USB Series A Plug Connects to your ACTOR When you rst connect your ACTOR to your PC a message appears on screen saying New Hardware Found and Building Driver Information Database After this you can start to upload images Important Note Connecting your ACTOR directly to ...

Page 11: ...t when your ACTOR is connected to your PC by the following steps 7 Click Get Fantasy to select the template in the existing library and then click OK to con rm Important Make sure the My Camera CD ROM is in the CD ROM Drive 8 Click the Camera front icon on the top to start the live shot mode A Video for Windows Driver Options dialogue box will pop up Select SPYPEN ACTOR and click OK 9 Click the Ro...

Page 12: ...ouble click on the next right large frame and repeat step 3 using a video template and double click template 5 Countdown avi Repeat step 4 Static avi 1 Fire Countdown avi 1 Fire Storyboard Adding an existing video Step 6 To add a video you have already made double click on the next large frame in the story board to the right Click on the Get icon and select a video you had made and led in the fold...

Page 13: ... R A 10 7 How to use Adobe Acrobat Reader Adobe Acrobat Reader enables you to view document in pdf format For more details go to www adobe com acrobat 10 8 How to update DirectX Please note that Window 98SE users need to download DirectX 6 1 or higher software from the internet For download and installation details please visit the following website http www microsoft com directx 10 9 How to uploa...

Page 14: ...take some times but it doesn t freeze up the computer You can give back to desktop and use the other application when the uploading is in progress 2 Enter the le name and path where movie clip will be located Important Notes The saved le name s is in n1 nx where n is the le name you input and x is the number of stored audio clip s The saved le will be in wav format 10 10 How to capture the video i...

Page 15: ...ort arcsoft com support mds2000 com For China For South Central America ArcSoft China Support Center Beijing Tel 1 510 979 5520 Tel 8610 6849 1368 Fax 1 510 440 1270 Fax 8610 6849 1367 E mail latinsupport arcsoft com E mail china arcsoft com For Oceania For Europe Middle East Africa Rest of the World ArcSoft Australian Support Center ArcSoft Europe Support Center Ireland Baulkham Hills New South W...

Page 16: ...batteries in the Flash Unit have no or insuf cient power My Flash Unit will not operate My image is too dark even though I used the Flash Unit I receive a message no image to download when I try to upload to my computer Connection failure Check all cables connections are secured Con ict with another camera driver capture device If you have any other camera installed on your computer remove the cam...

Page 17: ...ed under adult supervision if removable Different types of batteries or new and used batteries are not to be mixed Only batteries of the same or equivalent type as recommended are to be used Batteries are to be inserted with the correct polarity Exhausted batteries are to be removed from the camera The supply terminals are not to be short circuited Do not mix alkaline standard carbon zinc or recha...

Page 18: ... 320 x 240 for 128MB SMC Low mode 50 minutes 160 x 120 for 128MB SMC Audio Recording Approximately 32 minutes for 8MB SMC in audio recording clip File Format For Windows Users Still Image Compression in JPEG format after download to PC via USB depend on application used Audio default WAV format Video Clip AVI format External Connector USB external ash connector Auto Power Off 60 seconds after inac...

Page 19: ... frequency energy and if not installed and used in accordance with the instructions may cause harmful interference to radio communications However there is no guarantee that interference will not occur in a particular installation If this equipment does cause harmful interference to radio or television reception which can be determined by turning the equipment off and on the user is encouraged to ...

Reviews: