4
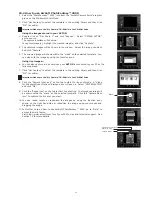
5.1.4 Uninstalling your My Camera Driver
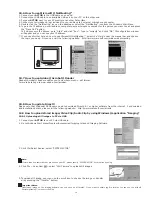
There are two tasks that need to be done to uninstall the
ACTOR
driver. Firstly, remove the device from the Operating System
through the Device Manager. To do this:
1. Make sure the
ACTOR
is connected to the host computer.
2. Open the System Control Panel and go to the Device Manager.
3. Open the “Imaging Devices” section.
4. Click once on the “Still Camera Interface” that appears in the “Imaging Devices” list.
5. Remove the “Still Camera Interface”:
• In the Windows® 98SE and ME, you can select the “REMOVE” button on the bottom of the Device Manager window.
6. The Windows Device Manager will ask you to conrm that you want to uninstall the camera.
7. Click once on the “Video Camera Interface” that appears in the “Imaging Devices” list.
8. Remove the “Video Camera Interface”:
• In the Windows® 98SE and ME, you can select the “REMOVE” button on the bottom of the Device Manager window.
9. The Windows Device Manager will ask you to conrm that you want to uninstall the camera.
10. Open the “Universal Serial Bus controllers” section.
11. Click once on the “
SPYPEN ACTOR
” that appears in the “Universal Serial Bus controllers” list.
12. Remove the “USB Composite Device”:
• In the Windows® 98SE and ME, you can select the “REMOVE” button on the bottom of the Device Manager window.
13. The Windows Device Manager will ask you to conrm that you want to uninstall the camera.
14. Close Device Manager.
15. Unplug the camera.
The second part is to run the driver uninstall appplication that was created when the drivers were orginally installed.
16. Open to the “Add/Remove Programs” located in the control panel.
17. Select
ACTOR
from the list and click on the remove button. Follow the on-screen instructions.
You have removed the driver les and associated registry entries. To reinstall your camera, run the driver installation
setup.exe and then plug the camera into your USB port.
Notes:
Uninstalling your
My Camera Driver
does not delete your album folders and therefore all images transferred into your default or created albums
will be preserved. You will be able to access these folders on your system desktop.
5.2 How to Install ArcSoft® Software
Introduction to the Software
PhotoStudio® 2000
PhotoStudio® 2000 is a full-featured, easy-to-use digital image-editing program that provides a complete set of photo
editing and retouching tools, plus a wide selection of special effects and enhancements. Its powerful features include a
wide variety of input and output options, layers, multiple undo and redo functions, image management tools, editable text,
multiple le format support and a lot more.
ArcSoft PhotoFantasy™ 2000
ArcSoft PhotoFantasy™ is an image entertainment application that enables users to create “photo fantasies” by combining
their personal photos with a wide variety of fantasy backgrounds. Users can get their own images from digital cameras,
scanners, disk drives and Photo CDs, and seamlessly combine them with just a few clicks of the mouse. The fantasy
backgrounds include ctional characters, classic works of art, Olympic heroes, 50’s funnies, bathing beauties, muscle men
and a lot more.
ArcSoft PhotoPrinter® 2000
ArcSoft PhotoPrinter® is an easy-to-use printing utility that enables the user to layout and print multiple images in different
sizes quickly and easily on a single sheet of paper. The program offers a large selection of printing templates, including
Kodak Digital Science Inkjet Photo Paper Templates and Avery-brand paper products. It also includes commonly used
image-editing tools and a wide selection of templates for frames, edges and backgrounds for enhancing images.
ArcSoft VideoImpression™ 1.6
ArcSoft VideoImpression™ is an easy-to-use video and image editing software program. The program enables users to
create and edit new videos using existing video and image les - making desktop video presentations for home, business,
and the Web.

