background image

13

12

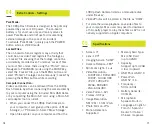
Extra Controls - Still Images

Extra Controls - Still Images

04.

04.

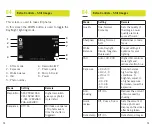
This screen is used to take still photos.
In this screen the DOWN button is used to toggle the 
Day/Night lighting mode.

Mode

Setting

Remark

Quality

Fine, Normal, 
Economy

Sets the quality of 
the image. Lower 
quality are more 
space efficient.

Sharpness

Strong, Normal, 
Soft

Determines camera 
focus.

White 
Balance

Auto, Daylight, 
Cloudy, Tungsten, 
Fluorescent

Pre-set settings to 
optimise for your 
lighting.

ISO

Auto, 100, 200

Higher ISO captures 
more light and 
reduces motion blur.

Exposure

+2.0 +5/3  
+4/3 +1.0  
+2/3 +1/3  
+0.0  
-1/3 -2/3  
-1.0 -4/3  
-5/3 -2.0

Counter balance 
high or low light 
conditions. To 
brighten, adjust to 
a higher exposure. 
To darken, lower the 
exposure.

Anti-
shaking

Off / On

Reduces the amount 
of blur caused by 
shaking. 

Quick 
review

Off, 2 secs, 5 secs

Sets the amount of 
time a photo will 
display on the screen 
after being taken.

Date stamp Off / On

Date stamps images. 

Mode

Setting

Remark

Resolution 5M: 2592x1944 

2M: 1920x1080 
1.3M: 1280x960 
VGA: 640x480

Higher resolution 
gives your photos 
more detail.

Sequence

Off / On

Will take a sequence 
of 3 photos every 
time the shutter is 
triggered.

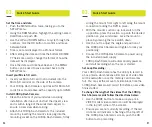
1.  STILL mode 
2.  Exposure
3.  White balance
4.  ISO
5.  Photo number

6.  Resolution/MP
7.  Photo quality 
8.  Micro SD card
9.  Power

1

5

2

6

8

3

7

9

4

Summary of Contents for SDCAMAKLB30

Page 1: ...1080p Dash Camera INSTRUCTION MANUAL Sprout Accessories Pty Ltd Ph 07 3624 6666 W Sproutinc com au E sproutenquiries sproutinc com au...

Page 2: ...o be an Australian owned brand Starting small in 2011 we are now one of the largest single branded accessory providers in Australia We have an extensive range that highlights our pursuit of innovation...

Page 3: ...ease read instructions carefully before usage Please keep this manual for future reference 01 02 1 Wide angle lens 2 Speaker 3 OK button 4 Mode button 5 Hold button 6 Power button 7 HDMl out mini port...

Page 4: ...the mounting socket on the 1080p Dash Camera firmly 07 06 sliding the mount from right to left along the mount connection locking the DVR in place With the mount s suction cup lock switch in the up p...

Page 5: ...ght the setting named G Sensor and push OK Using the UP and DOWN button highlight the required sensitivity of the G Sensor 2G is the most sensitive setting only requiring small bumps to log footage as...

Page 6: ...the in built microphone Day and Night lighting modes can be toggled with the DOWN button Extra Controls 04 Mode Setting Remark Resolution 1080FHD 1920x1080 1080P 1440x1080 720P 1280x720 WVGA 848x480...

Page 7: ...posure 2 0 5 3 4 3 1 0 2 3 1 3 0 0 1 3 2 3 1 0 4 3 5 3 2 0 Counter balance high or low light conditions To brighten adjust to a higher exposure To darken lower the exposure Anti shaking Off On Reduces...

Page 8: ...or key haptics Language Select language Change the menu language TV mode NTSC PAL Changes the output format Frequency 50Hz 60Hz Screen Hz settings Format Cancel OK Format the inserted Micro SD card de...

Page 9: ...the MODE key select the Locked file push the MENU button and select Protect Footage can be manually Locked by pressing the MENU button while recording Computer Connection Videos and photos can be retr...

Page 10: ...tomer support team For warranty and technical support please visit sproutinc com au or email sproutenquiries sproutinc com au Thank you for choosing a Sprout product 18 19 Important Safety Information...

Reviews: