
Quick Start Guide
Quick Start Guide
03.
03.
Set the time and date:
• Push the MENU button twice, taking you to the
SETUP menu.
• Using the DOWN button highlight the setting named
Date/Time and push OK.
• Use the UP and DOWN buttons to cycle through the
numbers. Use the OK button to confirm and move
between fields.
• Time is set and displayed in a 24-hour format
• After setting the date and time the bottom DD/MM/
YY fields are used to change the format of how the
date will be displayed.
• Once the date and time have been set, the MENU
button can be used to save and exit back to the
SETUP menu.
Insert your Micro SD card:
• Insert your Micro SD card (not included) into the
Micro SD card slot on the side of the camera.
• Your 1080p Dash Camera is optimised for Micro SD
cards Class 4 and above with a capacity up to 32GB.
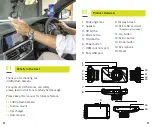
Install 1080p Dash Camera:
• Clean the interior of your windscreen ensuring
installation site does not obstruct the driver’s view
and is within range of the windscreen wipers to
ensure a clear view when raining.
• Attach the 1080p Dash Camera to the included
mount by inserting the mount’s lock peg into the
mounting socket on the 1080p Dash Camera, firmly
07
06
sliding the mount from right to left along the mount
connection locking the DVR in place.
• With the mount’s suction cup lock switch in the
up position, press the suction cup onto the desired
position on your windscreen. Lock the mount in
place by pressing the lock switch down.
• Use the nut to adjust the angle and position of
the 1080p Dash Camera and tighten to lock your
positioning.
• Connect the 1080p Dash Camera to power using
the included power supply.
• 1080p Dash Camera will automatically power on
and start recording when the car is started.
Set Loop Recording:
Your 1080p Dash Camera has the ability to record in
a Loop mode, which means older blocks of video files
will be overwritten once the memory card becomes
full. You can set the amount of video block time the
1080p Dash Camera will record for before a new video
file is started.
To change the length of the videos that the 1080p
Dash Camera records follow the directions below:
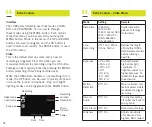
• Use the MODE button to make sure you are in
VIDEO mode (video camera icon will be displayed
in the top left corner of the screen).
• Ensure you are not currently recording. If the red
circle record indicator is flashing at the top left of
the 1080p Dash Camera’s screen, push the OK
button to stop recording.