1.800.732.0144
SPORTDOG.COM
16
17
GE
TTI
NG
S
TA
RTE
D
GE
TTI
NG
S
TA
RTE
D
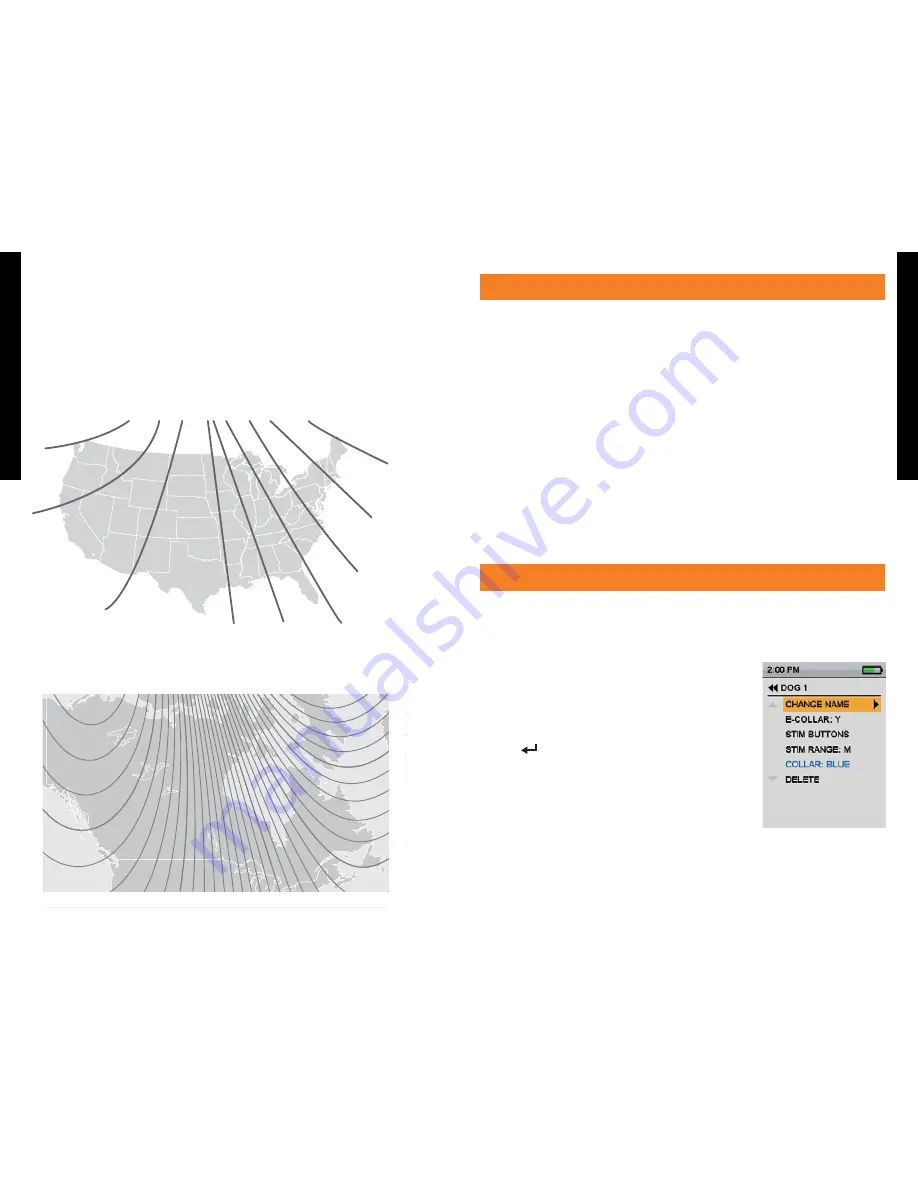
TO SET THE MAGNETIC DECLINATION ANGLE:
Magnetic declination is the angle between magnetic north (the direction the north end of a compass needle
points) and true north. The declination is positive when the magnetic north is east of true north and negative
when the magnetic north is west of true north. To find your exact declination angle go to:
www.ngdc.noaa.gov/geomag/declination.shtml
NOTE: Incorrect magnetic declination will result in inaccurate compass readings.
1. From the main menu, select
SETTINGS > GENERAL > MAG DEC ANGLE.
2. Press the up or down arrows on the Menu Selection Pad to select the amount of declination. Magnetic
declination ranges from -70 to 70. The default is 0.
3. Press the right arrow when finished.
4. Press
BACK to return to the main menu.
20°
15°
10°
5°
-5°
-10°
-15°
-20°
0°
MAGNETIC DECLINATION: CANADA
Magnetic declination is the angle between magnetic north (the direction the north end of a compass needle
points) and true north. The declination is positive when the magnetic north is east of true north and negative
when the magnetic north is west of true north.
-20º
0º
0º
10º
-10º
20º
10º
20º
-10º -20º
-30º
-30º
STEP::03
PAIR COLLARS TO THE HANDHELD DEVICE
Your system will already be paired when you get it, but in the event you need to pair the Handheld Device to the
GPS Collar / GPS E-Collar Module, follow the steps below. The Handheld Device can support up to 12
collars at a time. You must repeat this procedure for each GPS Collar / GPS E-Collar Module that you
want to monitor with this Handheld Device.
TO PAIR THE COLLARS TO THE HANDHELD DEVICE
1. On the main menu, select
SETTINGS > MY COLLARS > COLOR where COLOR is the icon color that you want to
associate with this collar.
2. Press the right arrow to open the configuration window.
3. To enable the GPS Collar, select and press the right arrow key to set
ACTIVE to Y.
4. To enable the E-Collar Module, select and press the right arrow key to set
E-COLLAR to Y.
5. With the GPS Collar / GPS E-Collar Module turned off, press and hold the On/Off button until its
indicator light is solid amber. The collar is now in “pairing mode.”
6. On the Handheld Device, select
PAIR COLLAR and press the right arrow key to complete the pairing process.
The indicator light on the collar will blink 5 times to confirm that it is paired to the Handheld Device.
7. When finished, press
BACK to return to the main menu.
STEP::04
ADD YOUR DOG
The TEK Series 1.5 allows you to track or track/train up to 12 dogs with purchase of additional GPS Collars, or
GPS C E-Collar Modules (see back cover). After a collar has been paired to the Handheld Device, you must
add the dog to the system. You must repeat this procedure for each dog that you want to work with the system.
TO ADD A DOG
1. From the main menu, select
SETTINGS > MY DOGS > ADD A DOG >.
A screen labeled
DOG
n
appears where n is the next available number
of the dog.
2. To enter the dog’s name, select
CHANGE NAME. A text entry screen
displays. Select
Clr
and press
ENTER (bottom-right button) to clear
the name. Use the arrow keys to select letters to enter a new name.
Select
9:40 AM
GENERAL
Time
Brightness
Battery Gauge
Up / Down Indicators
More / Select
Back
Text Enter
100 YDS
TRACKING
GPS Lock/Fix Indicator
Compass
Dog Direction Indicator
Dog Direction Indicator Communication Lost
Dog On Point / Treed
Scale Indicator
Battery Gauge on Collar
C
V
T
TRAINING
Continuous Stimulation
Vibration
Tone
My Dog
R
M
P1
P2
Rising Stim
Momentary Stim
Programmable 1
Programmable 2
to complete the new name.
3. Assign a collar to this dog by selecting
COLLAR. Use the arrow keys to
select the color matching the desired collar from the previously paired
collars.
4. Once a collar is assigned to the new dog, you are ready to track or
track/train this dog. Press
BACK to return to the main menu.


