background image


8


1.  Connect a lift device to two places on the top angle iron of the left section assembly. 


2.  Lift the left section assembly into place with the 

bottom edge of the scoreboard at least 10’-0” off 

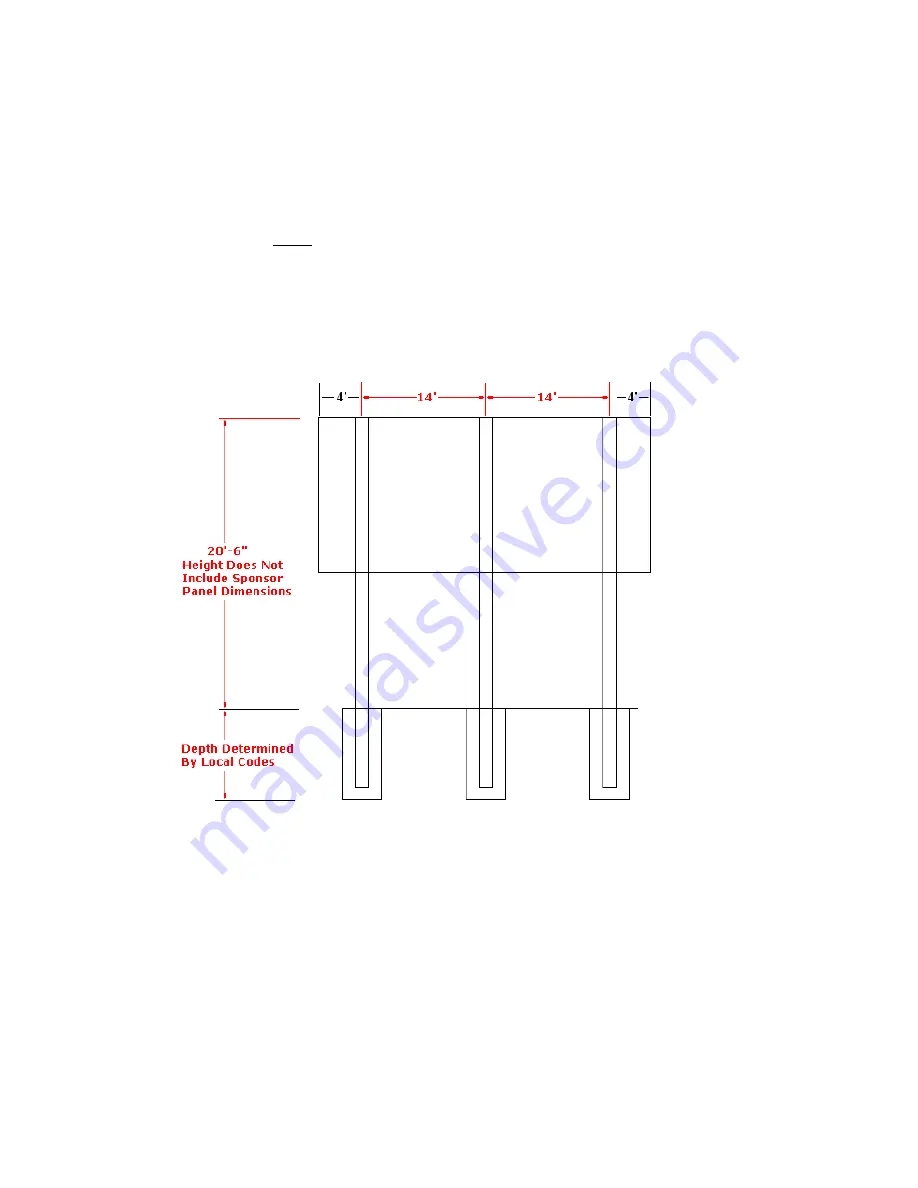
of the ground, ensuring that the scoreboard is level.  Refer to the illustration below in positioning 
the scoreboard left-to-right.  The seam between the first SPD-8 sponsor section and the second 
DSP-8 sponsor section should be centered on the far left I-beam.   


3.  Secure  the  scoreboard  to  the  I-beam  using  the  mounting  angle  irons  already  attached  to  the 

scoreboard.    The  unit  must  be  attached  to  each  pole  or  beam  on  top 

and

  on  bottom.    The 

mounting angle irons may be welded to the I-beams or the mounting angle irons and I-beams may 
be drilled so that a combination of 

GRADE 5

 bolts, washers, and nuts may be used to secure the 

mounting angle irons to the I-beams. 


Summary of Contents for SSB-3328DSP

Page 1: ...1 INSTALLATION INSTRUCTIONS MODEL SSB 3328DSP...

Page 2: ...IENTATION 4 INSTALLING THE MOUNTING POLES BEAMS 5 ASSEMBLING THE SCOREBOARD 6 MOUNTING THE SCOREBOARD 7 RUNNING CONNECTING THE CONTROL CABLE 9 At the scorekeeper s location 9 At the scoreboard 9 RUNNI...

Page 3: ...below If you find that damage has occurred during shipping 1 accept the shipment from the carrier DO NOT refuse the shipment 2 follow the instructions for filing a freight damage claim found below an...

Page 4: ...left section assembly to the mounting poles beams 6 Mount the right section assembly to the mounting poles beams 7 Connect wiring and install crossover bushings between cabinets C in the left section...

Page 5: ...eet zero inches center to center with 20 6 of pole beam above ground refer to the installation diagram below If a sponsor panel is to be mounted above the scoreboard leave 23 6 of pole beam above grou...

Page 6: ...d cabinet C on the right Align the cabinets so that they are flush across the top and bottom and the edges of the cabinets are touching Each cabinet is lettered A through G on the back 3 Using two of...

Page 7: ...ctions should be made between cabinets before the access doors are replaced Inside each set of access doors connect all wiring harnesses between cabinets For each set of harness connections between sc...

Page 8: ...seam between the first SPD 8 sponsor section and the second DSP 8 sponsor section should be centered on the far left I beam 3 Secure the scoreboard to the I beam using the mounting angle irons alread...

Page 9: ...on the junction box cover using the crimp on butt connectors already attached to the leads on the junction box cover Connect the leads in the control cable to those on the junction box cover according...

Page 10: ...terminal block regardless of the color s of the wires in the control cable that connect them 4 Re secure the signal power access door to the scoreboard NOTE Even if the control cable was not buried in...

Page 11: ...ONNECTED TO THE SCOREBOARD A 120 VOLT CIRCUIT MUST ALSO BE INSTALLED IN A STANDARD DUPLEX OUTLET AT THE SCOREKEEPER S LOCATION FOR THE CONTROLLER S 12 VOLT DC WALL TRANSFORMER IF AN EXTERNAL BATTERY P...

Page 12: ...will briefly display the controller s software version When the display changes and reads SELECT DIAG MODE DIGIT TEST press ENTER The LCD will now read SEGMENT TEST ALL SEGMENTS OFF Pressing the UP ar...

Page 13: ..._____ Date Installation Completed _________________________________ Company or Person Responsible For Installation address phone number ________________________ This document confirms that the install...

Reviews: