background image

4

  Treadmill Assembly

STEP 1:  Remove treadmill / parts from carton.  Inspect for any possible freight

damage.  Place treadmill near any AC power source (extension cord, etc.).

STEP 2:  Raise console upright(s) into extreme forward upright position.  Place the

longest hex bolt (in parts bag) through the front towards the rear of both uprights.

Start (only) hex lock nut.  A shorter hex bolt attaches similar to existing (from factory)

already installed hardware.  Tighten all hardware securely using the enclosed 14 / 13

mm wrenches.

STEP 3:  Locate the upper display assembly and place in general position over

both console uprights.  Attach both* black control cables found in each upright to the

display (cables).  Note they are polarized and make certain they lock in place.

Observe for proper wire routing and place display assembly into the right / left

console upright.  Locate the 10 shortest (1/2”) Allen bolts.  Start all 1/2” Allen bolts

before securing any.  Tighten all 10 Allen bolts with enclosed hex wrench.

*Note:  SL188 has only one (in right hand upright).

STEP 4:  Locate both right / left cushioned hand rails.  The speed (fast / slow) hand

rail attaches on the right side.  Incline (up / down) hand rail will attach on the left

side.  You may begin assembly with either side.  Locate the small black wire(s)

coming from each console housing.  Connect the polarized wires (console / handle)

and make certain they are securely fastened.  Place handle into upper console

general position.  Install (start only) the long Allen bolt (with washer) thru the upright

and into the hand rail.  Align the tapped hole in the top of the hand rail to the console

and install the 3/4” long Allen bolt.  Tighten both upper / lower Allen bolts only after

both are started.  Repeat procedure for opposite hand rail side.

Keep large hex Allen wrench for future treadbelt adjustment.

Attach polarized AC power cord securely to front of treadmill base
receiver and make certain red power switch is on (lit).

Unit is ready for operation.

SL188 / 198

08/15/03

Damage to the treadmill due to improper assembly is not covered under warranty.

Attention

Use caution when mounting the display head assembly to the console upright(s).  Observe all black cables 

(

SL188 has

only one)

 for potential damage during this assembly process.  Wires may be damaged (pinched / cut) which will result in

treadmill failure.  Pay close attention to the mounting hole areas when starting each bolt.

Summary of Contents for SL188

Page 1: ...PLEASE CAREFULLY READ THIS ENTIRE MANUAL BEFORE OPERATING YOUR NEW TREADMILL MOTORIZED TREADMILL OWNER S MANUAL SL188 SL198 Part No 22412 ...

Page 2: ...uture needed contact easy We appreciate your support and we will always remember that you are the reason that we are in business Please complete and mail your registration card today and enjoy your new treadmill Yours in Health Spirit Manufacturing Inc Name of Dealer______________________________________ Telephone Number of Dealer___________________________ Purchase Date___________________________...

Page 3: ...ctions 6 Operation ofYour New Treadmill 7 Programmable Features 9 Programmable Operation of Your New Treadmill 9 Maintenance of Your New Treadmill 10 Service Checklist Diagnosis Guide 12 Manufacturer s Limited Warranty 13 ATTENTION THIS TREADMILL IS INTENDED FOR RESIDENTIAL USE ONLY AND IS WARRANTED FOR THAT APPLICATION ANY OTHER APPLICATION VOIDS THIS WARRANTY IN ITS ENTIRETY ...

Page 4: ...ints and other caution areas that can cause harm Keep hands away from all moving parts Never operate the treadmill if it has a damaged cord or plug If it is not working properly call your dealer Keep the cord away from heated surfaces Do not operate where aerosol spray products are being used or where oxygen is being administered Never drop or insert any object into any openings Do not use outdoor...

Page 5: ...ing an equipment grounding plug The plug must be plugged into an appropriate outlet that is properly installed and grounded in accordance with all local codes and ordinances DANGER Improper connection of the equipment grounding conductor can result in a risk of electric shock Check with a qualified electrician or serviceman if you are in doubt as to whether the product is properly grounded Do not ...

Page 6: ...eed fast slow hand rail attaches on the right side Incline up down hand rail will attach on the left side You may begin assembly with either side Locate the small black wire s coming from each console housing Connect the polarized wires console handle and make certain they are securely fastened Place handle into upper console general position Install start only the longAllen bolt with washer thru ...

Page 7: ...unction properly with little finger pressure Pushing harder is not going to make the unit go faster or slower If you feel the buttons are not functioning properly with normal pressure contact your Spirit dealer adjustments can be made All buttons should operate and control treadmill functions without excessive finger effort Damage to overlay will result if excessive control pressure continues Impo...

Page 8: ...en square switch until base stops at minimum incline Unit is now ready to operate Note Similar instructions are printed on left hand console frame SL188 Folding Instructions Caution You must be able to safely lift 40 lbs in order to raise lower and move the treadmill To Fold The Treadmill Make certain the treadmill is at minimum incline Lift the treadmill running deck until it is secured by the lo...

Page 9: ...e the desired speed level of Walk 3 mph Jog 5 mph or Run 7 mph Belt will begin to move after 5 second countdown Note You may also press and release green Start Display On key to begin belt movement at 6 mph and adjust speed with Fast Slow keys console or hand rail You must have belt movement for Fast Slow keys to function STEP 3 To slow treadbelt push and maintain Slow key console or hand rail to ...

Page 10: ...will also display every 10 seconds Time Pulse window does not scan Assuming no speed incline value change Select Feature SL188 Alternately press and release this key to choose the large portion of the display mode For example Distance value can be displayed on large screen at all times during exercise Pulse Grip Feature The Pulse console window will display your current heart rate in beats per min...

Page 11: ...n turned off at the end of your pro gram and will return to the original factory program Chart Profile of Preset Programs A chart is located on the right hand side of computer console It illustrates how the program will run The 5 numbers on the right of the graph indicate the maximum speed and incline of that program P1 for example has a maximum speed of 3 5 mph 9 Programmable Operation Note All p...

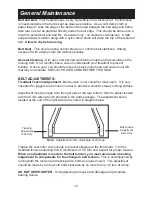
Page 12: ...LUG POWER CORD BEFORE THIS TASK BELT ADJUSTMENTS Treadbelt Tension Adjustment Belt tension is not critical for most users It is very important for joggers and runners in order to provide a smooth steady running surface Adjustment must be made from the right side of the rear roller in order to adjust tension with the 6 mm Allen wrench provided in the parts package The adjustment bolt is located at ...

Page 13: ...Proper belt tracking is an owner responsibility common with all treadmills ATTENTION DAMAGE TO THE RUNNING BELT RESULTING FROM IMPROPER TRACKING TENSION ADJUSTMENTS IS NOT COVERED UNDER THE SPIRIT WARRANTY BELT DECK LUBRICATION Do not relube with other than Spirit lubricant Spirit provides one application with this unit See your Spirit dealer for additional purchases The use of some other lubrican...

Page 14: ... See General Maintenance section under Belt Tracking A user may be walking while favoring or putting more weight on either the left or right foot If this walking pattern is natural track the belt slightly off center to the side opposite from the belt movement See Maintenance section on Treadbelt Tension Adjust as necessary Make certain clock is running This indicates motor should be receiving powe...

Page 15: ...r than authorized Spirit servicers use of parts other than original Spirit parts or external causes such as alterations modifications abuse misuse accident improper maintenance inadequate power supply or acts of God 4 Products with original serial numbers that have been removed or altered 5 Products that have been sold transferred bartered or given to a third party 6 THIS WARRANTY IS EXPRESSLY IN ...

Reviews: