background image

SnapServer/MOBOTIX Installation Guide

10400783-001

©2016 Sphere 3D Corp.


 Page 6 of 9


3.

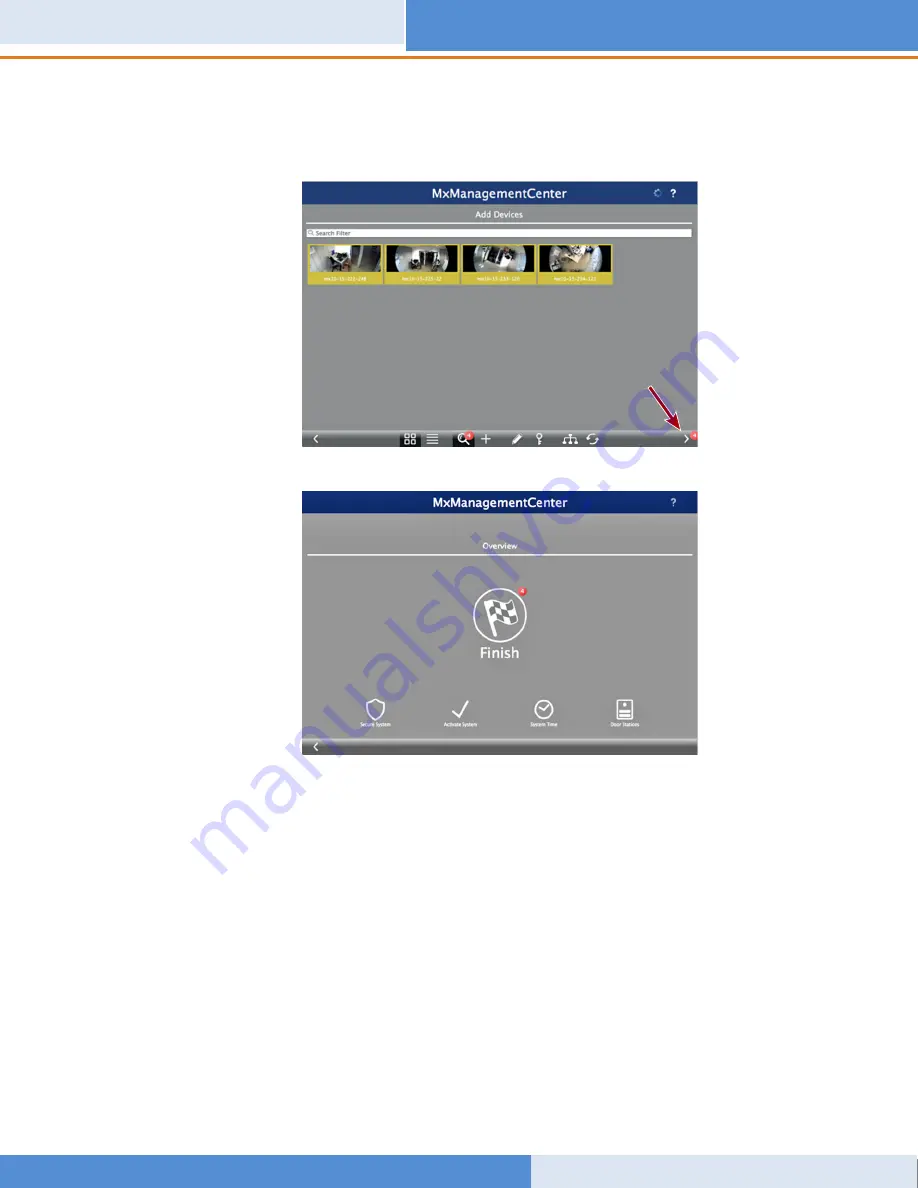
Hold down the 

Shift

 key and click the camera windows to select and highlight the ones you 

want to manage.
The number of selected cameras is shown in the lower-right corner:

4.

In the lower-right corner, click the 

right arrow

 next to the number of cameras.

Summary of Contents for MOBOTIX

Page 1: ...e 3D It addresses all the parts and includes the special steps required for network connections STOP DO NOT ATTACH THE CAMERAS UNTIL DIRECTED To ensure video data is written to the server the SnapServer NAS must be installed and fully booted before plugging in and powering on any cameras PoE switch adapter 4 customized network cables 4 MOBOTIX cameras styles vary examples are shown SnapServer with...

Page 2: ...he Drives The SnapServer NAS appliance comes with its four drive bays empty Packed in the shipping box are two pre configured disk drives in carriers along with two blanking trays All four need to be installed into the appliance IMPORTANT To maintain proper airflow and cooling a drive assembly or blanking tray must be installed in every bay No empty bays are allowed 1 Slide the release button to t...

Page 3: ... Attach the power cord into the AC power socket on the appliance 5 Plug the other end of the power cord into a properly grounded AC power source 6 Briefly press the front power button to power ON the unit IMPORTANT To assure all the cameras are discovered wait about two minutes until the SnapServer Status LED is green before proceeding with the camera installation 4 Camera Installation and Cabling...

Page 4: ...rts on the switch 5 Installing the MxManagementCenter The MxManagementCenter software MxMC is for managing your cameras live video monitoring and video recording To obtain the software 1 Go to the MxMC Software Downloads section of the MOBOTIX website https www mobotix com eng_US Support Software Downloads MxMC 2 At the bottom of the Available Updates and Tools page select the newest release for y...

Page 5: ...he MxManagementCenter default screen The Add Devices icon magnifying glass shows 0 devices attached 2 Click Add Devices to allow MxMC to search for your cameras When the search is complete you will see all the connected cameras NOTE In no cameras are found you need to adjust your IP addresses Refer to the guide How to change your IP address on the MOBOTIX website ...

Page 6: ...orp Page 6 of 9 3 Hold down the Shift key and click the camera windows to select and highlight the ones you want to manage The number of selected cameras is shown in the lower right corner 4 In the lower right corner click the right arrow next to the number of cameras ...

Page 7: ...address of the SnapServer NAS appliance If necessary ping the SnapServer name from your workstation or download and install SnapStorage Manager SSM from http docs overlandstorage com ssm 2 Refer to the MOBOTIX camera manual to connect to the camera s web interface and under Storage configuration change the File Server IP address from 10 0 0 254 to the IP address of the SnapServer appliance The man...

Page 8: ...r residing on the same network segment as your MxMC 5 Right click each camera and tell MxMC where to find the video written by that camera Device Directory is filled in automatically NOTE Because the cameras need time to initialize it may take several minutes for the Device Directory field to populate and to be able to view video stored on the server Now your Video Surveillance system is ready to ...

Page 9: ...earch the SnapServer community Knowledge Base https community sphere3d com community documentation nas snapserver For more information about MxMC please refer to the MOBOTIX website at http www mobotix com other Products MxManagementCenter tab 371251 tab Warranty and Technical Support For support on MOBOTIX cameras visit https www mobotix com other Support Support For warranty and general technica...

Reviews: