eLift operating instructions
- eLift equipped tables only
Control
button
Reset Procedure:
1. Press and hold the “Down” button. The worksurface will lower to the
lowest position and stop moving.
2. Release the “Down” button.
3. Press and hold the “Down” button again. The worksurface will lower
slightly and the leg mechanisms will reset.
Down
CAUTION
Always unplug the eLift before working under the worksurface.
Although this table utilizes an anti-collision feature that briefly stops
and reverses the motion of the table in the event of an obstruction,
use caution when raising or lowering the worksurface.
Do not
sit at,
under, or on the worksurface when operating the lift mechanism and
be sure the table movement does not interfere with objects or people.
Use caution when raising or lowering the worksurface
!
Up
CAUTION
Keep clear of pinch points during worksurface movement. Note:
The lift actuators are rated at a maximum capacity of 180 lbs each.
CAUTION
USE CAUTION WHEN RAISING OR LOWERING TABLE!
curved or
rectangular end
worksurface
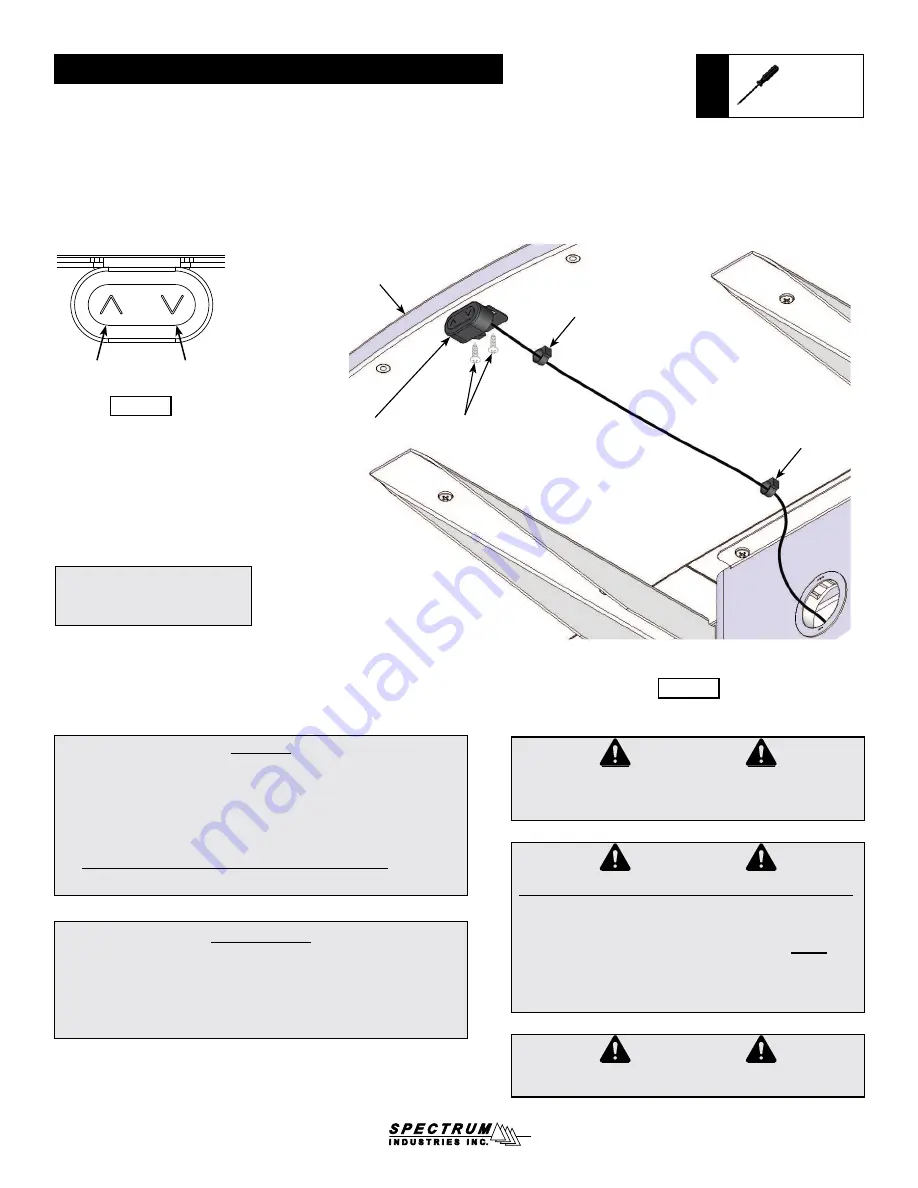
control
button
1. Attach the control button bracket under the end worksurface with (2) #8 x 5/8”
PHSM screws and pre-drilled pilot holes in the center of the end worksurface.
2. Push the control button onto the bracket.
3. Use the included pine tree clips to secure the cord to the worksurface.
0115700R2 Page 9 of 17
Phillips
screwdriver
Tools
Required
Operation:
1. Plug the 11-foot, 15-amp power cord into a wall outlet.
2. Locate the “Up” and “Down” buttons on the control pad.
3. To raise or lower the worksurface, press and hold the “up” or “down”
arrow keys on the control pad until the worksurface reaches the desired
height. The worksurface maximum height is 42”, minimum height is 29”.
Keep clear of pinch points during worksurface movement.
#8 x 5/8” PHSM
screws
Pine tree clip
pine tree clip
Figure 10
Figure 9
Note: The control button can also
be mounted under one of the side
worksurfaces if necessary.


