Speakerbus SE 708 iCS User Manual Download Page 17

17

SE 708 iCS Deskstation User Guide

Status Bar

The Status Bar contains both staus and notification icons and helps you to 

keep on top of all your messages and notifications. The icons on the bar are 

explained in later sections.

SE 708 Screens

The SE 708 screens comprises of four screens: Speed Dials, Speaker Keys, 

Intercom and Menu System.
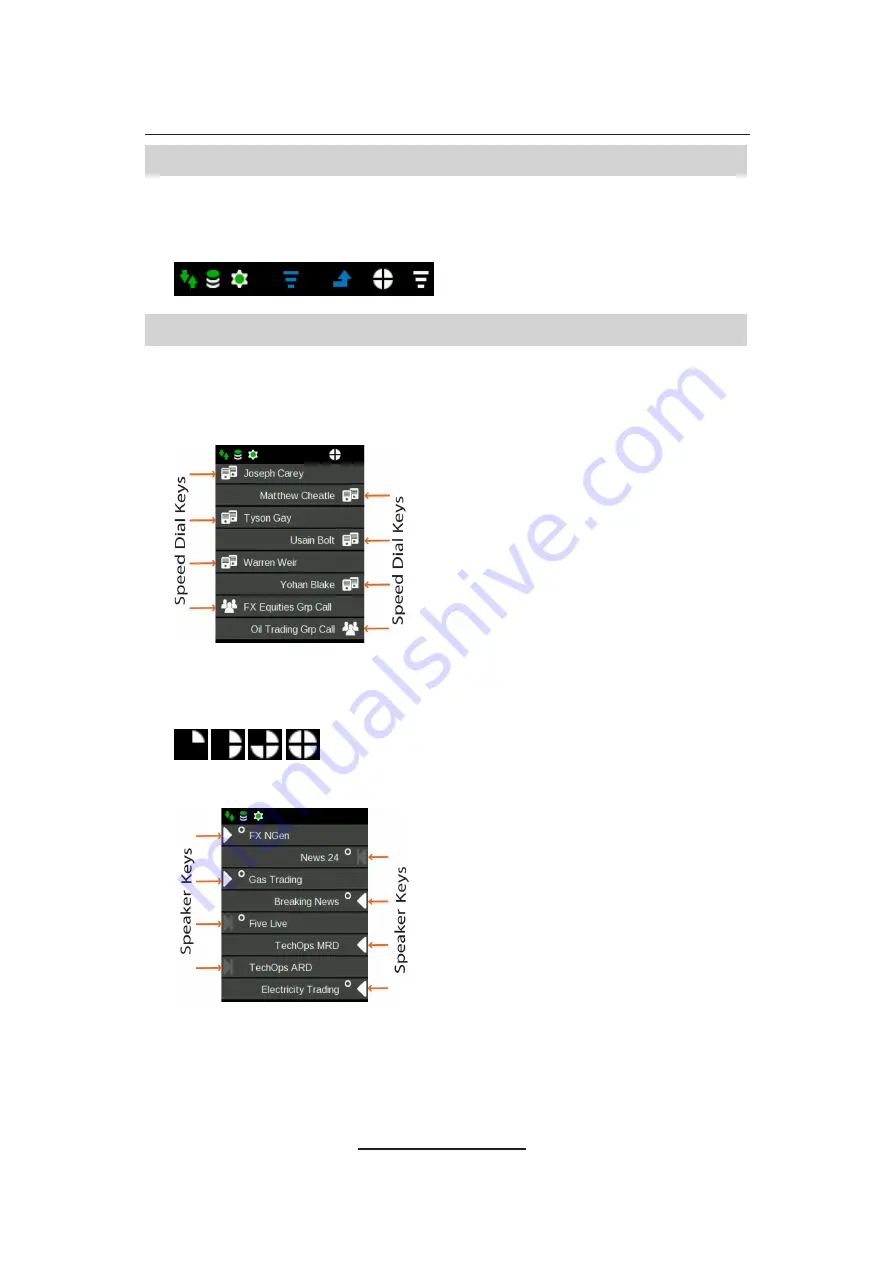
Speed Dial Page

There are four Speed Dial pages. Each page can accommodate a maximum 

of eight speed dials making a total of 32. Each speed dial page is identified by 

the icons below.


Speaker Page

The Speaker page can accommodate a maximum of eight Speaker Keys. The 

keys can be in numerous states indicated by the icon displayed on the keys. 

For more information on Speaker Key icon states, see 

Voice Service/Private 

Wire Icons 

on page 

21.

Summary of Contents for SE 708 iCS

Page 1: ...User Guide SE 708 iCS Deskstation Reordering Info UG708iCS R1 SE708 2 4 Oct 2016...

Page 2: ...property rights owned by third parties which may result from the application of this information No part of this document may be reproduced or transmitted in any form or by any means electronic or mec...

Page 3: ...Version History 10 Compatibility 11 Conventions 11 SE 708 Stand Instructions 12 Extending Legs 12 Collapsing Legs 13 SE 708 Elements 14 Front View 14 Rear View 14 Key Actions 15 Status Bar 17 SE 708 S...

Page 4: ...32 Activate Privacy Mode 32 Accept Call in Privacy Mode 33 Calling an Intercom that has Privacy Mode turned on 33 Call Information Details 34 Device Information 34 Setting the Favourite Directory 35 D...

Page 5: ...Muting Microphone During Point to Point Call 44 Receiving a Call when Intercom Automatic Call back is enabled 44 Receiving a Call when Call Forward is enabled 44 Group Calls 45 Standard Group Call 46...

Page 6: ...istening to Voice Services 56 Listening to Hoot Voice Services 56 Listening to MRD Voice Services 57 Talking back to Hoot MRD Voice Services 57 Ring on Busy MRD 58 Signal an MRD Voice Service 58 Mutin...

Page 7: ...ce Route 76 Configure Device 77 Device IP Address 77 Accessing the Device IP Address Settings 77 Device IP Address Settings 77 iCMS Server 78 Accessing the iCMS Server Settings 78 iCMS Server Settings...

Page 8: ...86 Environmental Performance 86 Operational Environment 86 Storage Environment 87 Safety and Compliance 88 Deskstation 88 CE Mark 88 Class I Pluggable Equipment Type A 88 Declaration of Conformity 88...

Page 9: ...t speakerbus co uk Getting Help with Speakerbus System Please find detailed below information we would like to receive when you are reporting problems to us This will enable us to better respond to yo...

Page 10: ...eature Note perform a send logs but do not enable any logging features unless requested by Speakerbus technical support Speakerbus firmware software levels User Name IP Address of Device and any IP PB...

Page 11: ...he SE 708 Deskstation using both numbers or the and navigation and OK keys Take for example the Main menu The Call Register option can be selected by either pressing the number 2 key on the keypad or...

Page 12: ...egs to desired position Ensure both legs are adjusted to the same height 2 Please follow this step if you require the unit to be positioned behind a keyboard Un click leg lifters behind leg and un fol...

Page 13: ...13 SE 708 iCS Deskstation User Guide Collapsing Legs 1 Pull leg outwards until it un locks 2 Collapse leg to folded position...

Page 14: ...14 SE 708 iCS Deskstation User Guide SE 708 Elements Front View Rear View...

Page 15: ...vices hoots MRDs and ARDs volume level Directories Displays the Favourite Directory A long press on a highlighted directory option sets it as the Favourite Directory Privacy Sets and removes privacy o...

Page 16: ...avigation Keys Increases Decreases handset volume when handset is in use Pressing the or Navigation key and an active ARD MRD channel mutes the audio received to the channel Displays the Main Program...

Page 17: ...s Speed Dials Speaker Keys Intercom and Menu System Speed Dial Page There are four Speed Dial pages Each page can accommodate a maximum of eight speed dials making a total of 32 Each speed dial page i...

Page 18: ...in the top left hand side of the screen The icons from left to right are Network Status iCMS Status and iCS Status Each icon can be in a number of states as described below Network Status State State...

Page 19: ...y to communicate with iCMS but profile requires synchronisation Device is out of synchronisation with the iCMS or a restart is required to apply some settings Unable to retrieve contact with the iCMS...

Page 20: ...ged on another call Info Logging is active Speed Dial Page Speed dial page numbers are indicated by quarters One of the four icons below display one of the four speed dial pages None of them displayed...

Page 21: ...te wires also referred to as private lines are MRDs and ARDs This section describes the voice service icons their states and LEDs Speaker and Call State Icon Call State Speaker Key LED Scheme 1 Scheme...

Page 22: ...f or Orange if voice activity detected Red Green flashing if channel muted MRD connected in Listen state note that listen is always active for MRD i e monitor mode Off or Red if voice activity detecte...

Page 23: ...n in this state until it succeeds or the user abandons the attempt On handset a talk attempt is automatically made when a speaker channel is placed on handset so this state can only exist following th...

Page 24: ...g the live update the iCMS status icon is displayed dynamically to give a visual indication of the update in progress Depending on the iCMS s status the following icons are displayed one after the oth...

Page 25: ...audio feed hoot service or talk hoot service that is not transmitting audio The LED is green when connected to a point to point call transmitting audio when the star key is pressed during a talk voice...

Page 26: ...int calls group calls and voice services For more information see Directories on page 37 Call Register The call register contains a list of all point to point calls received placed or missed to and fr...

Page 27: ...ore information see Call Settings Properties on page 68 Speaker Settings This option is used to set the the latch mode speaker source and enable disable the master volume For more information see Spea...

Page 28: ...icons look identical to the icons displayed on the left hand side If your icons are a different colour please contact your System Administrator For more information on the status icons please see Sta...

Page 29: ...ice to display Settings 4 Using and highlight User Settings and press OK to display User Settings 5 Using and highlight Logout and press OK This displays the Confirm screen 6 Press OK Accept to confir...

Page 30: ...layed when a point to point call is active Mute Microphone During Call To mute amicrophone during an intercom point to point group call 1 Press and hold down speaker until the Open Gooseneck Microphon...

Page 31: ...eed Dials Speaker page has been set as the home page Returning to the Home Page To return to the home screen 1 Press the Home key This displays the home page See the above section for information on s...

Page 32: ...ds 2 Press the appropriate ARD voice service channel Redial Last Call To redial the last connected call 1 Press i to display the intercom screen 2 Press redial Privacy Mode Activate Privacy Mode To ac...

Page 33: ...Call in Privacy Mode To accept a call when privacy mode is activate The screen displays the name and extension of the calling party as illustrated in the example below 1 Press speaker to accept the in...

Page 34: ...following call information Current iCS Server Call Type Called Party Configured Codec and Configuration Packet Size Device Information Device Information is viewed by completing the following steps 1...

Page 35: ...rite Directory To delete the Favourite Directory 1 Press i to display the intercom screen 2 Press OK to display the Main menu 3 Ensure Directories is highlighted and press OK 4 Using and highlight Cle...

Page 36: ...lls that have not been answered To check missed calls list 1 Press i to display the intercom screen 2 Press OK to display the Main menu 3 Using and highlight Call Register and press OK This displays t...

Page 37: ...rsonal directory by the user Group Call Contains a list of all group calls the user is a member of Location Contains a list of remote sites Each site contains a list of seated users located at that si...

Page 38: ...play the Main menu 3 Ensure Directories is highlighted and press OK 4 Using and if required highlight Global Personal or Group Call and press OK 5 Using and highlight the required user group As soon a...

Page 39: ...nu 3 Ensure Directories is highlighted and press OK 4 Ensure Global is highlighted and press OK 5 Using and select the appropriate user and press Options navigation key This displays the Global Direct...

Page 40: ...nal Intercom 5 Using and select the appropriate user and press Options navigation key This displays the Personal Directory Options 6 Ensure Delete is highlighted and press OK A confirmation screen is...

Page 41: ...Type the appropriate dial number and wait for the call to be answered Hanging Up To hang up a call Press clear Place a Call on Hold To place a call on hold Press hold Repeat to remove hold Redial Las...

Page 42: ...which contains the following Global Personal and Location Making a Point to Point Call using the Global Personal Directory To make a Point to Point call using the Global or Personal Directory 1 Press...

Page 43: ...Speed Dials To make a point to point call using speed dials 1 Press i to display the intercom screen 2 Ensure the appropriate speed dial page is displayed 3 Press the appropriate speed dial 4 Talk wh...

Page 44: ...n the SE 708 is already engaged on a call a notification is displayed on the screen for a few seconds This notification states the name and dial number of the user attempting to call An orange arrow a...

Page 45: ...he chairperson can talk without having to press the star key The remaining members need to press the star key to talk Other than the chairperson the group call member s SE 708 screens will display the...

Page 46: ...ke a standard group call using the key pad 1 Press i to display the intercom screen 2 Dial the appropriate standard group call dial number 3 Make an announcement when group call is connected 4 Press c...

Page 47: ...l number using the key pad 3 Talk when group call is connected Making a Mixing Group Call using the Directories To make a mixing group call using the directories 1 Press i to display the intercom scre...

Page 48: ...r using the key pad 3 Make request when call is connected 4 When finished press the star key and wait for answer If no one responds to the request within twenty seconds the group call is ended Making...

Page 49: ...Press the star key This establishes a point to point connection 2 Talk when call is connected 3 Press clear to end the call Talking on a Group Call To talk to on a group call 1 Simply talk if you init...

Page 50: ...roup is highlighted press OK Muting Microphone During Group Call To mute the microphone during a group call 1 Press and hold down speaker until the Gooseneck Internal Microphone Call LED Indicator cha...

Page 51: ...move and delete speed dials Adding Speed Dials Adding Speed Dials To add a speed dial 1 Press i to display the intercom screen 2 Press OK to display the Main menu 3 Press navigation key once to displ...

Page 52: ...y the Program menu 4 Ensure Speed Dials is highlight and press OK This displays Program Speed Dials 5 Using the and navigation keys highlight Move and press OK This displays page one of the four speed...

Page 53: ...ay the Program menu 4 Ensure Speed Dials is highlight and press OK This displays Program Speed Dials 5 Using the and navigation keys highlight Delete and press OK This displays the Directories This di...

Page 54: ...d the SE 708 Deskstation can run on a non iCS hoot platform The following features and functions are prevented on this platform The SIP registration icon is completely removed from the status icons No...

Page 55: ...uired voice service and press OK Deleting Voice Services from Speaker Channels To remove a voice service from a speaker channel 1 Press i to display the intercom screen 2 Press OK to display the Main...

Page 56: ...stage 3 When the call is answered at the far end the line key will look similar to the illustration below 4 Talk when the call is connected Receiving an ARD Call The icons within the illustration bel...

Page 57: ...ansmitted and received on the voice service The icons on the second illustration indicates audio is being transmitted and received on the voice service 2 Ensure the master and or speaker channel volum...

Page 58: ...Press OK to display the Main menu 2 Press navigation key once to display the Program menu 3 Using the and navigation keys highlight Alerts and press OK 4 Using and to change the setting to On or Off 5...

Page 59: ...ess OK Muting Individual Speaker Channels To mute an individual speaker channels 1 Ensure the Speaker page is displayed 2 Press navigation key once The text Select Channel is displayed at the top of t...

Page 60: ...Voice Services from Speaker Channel Removing a voice service from a speaker channel is identical to deleting a voice service a voice service from a speaker channel For more information see Deleting Vo...

Page 61: ...dd a voice service to a speaker channel 1 Press i to display the intercom screen 2 Press OK to display the Main menu 3 Press navigation key once to display the Program menu 4 Using the and navigation...

Page 62: ...peaker channel to display its properties 7 Make the required changes and press OK Save For a full discription of the settings in the above illustration see Speaker Key Properties in the section below...

Page 63: ...ing members will need to press and hold down the speaker key key to talk Alert Profile Sets the volume level for incoming ARD and MRD alerts The value range within the setting is 1 to 10 and Ringing O...

Page 64: ...s i to display the intercom screen 2 Press OK to display the Main menu 3 Press navigation key once to display the Program menu 4 Using the and navigation keys highlight Speaker Keys and press OK This...

Page 65: ...to display the Settings menu 3 Using the and navigation keys highlight Speaker Settings and press OK This displays the Speaker Settings options 4 Highlight the Latch Mode option and use the navigation...

Page 66: ...et port located at the back of the SE 708 When this setting is selected and a handset is attached audio is transmitted and received through the port Master Volume Within the Speaker Settings the Maste...

Page 67: ...K to save the changes Global Muting Global muting is a muting function applied on lines and can only be set through iManager It is applicable to hoots and ARD and MRD calls It is best described using...

Page 68: ...1 playing the quietest tone and 10 the loudest Intercom Alert Volume Sets the ringing volume level for incoming point to point calls when privacy is enabled The value range within the setting is 1 to...

Page 69: ...The Intercom Automatic Call back feature when enabled automatically makes an SE 708 call the first intercom number it received when it is engaged on a call To enable Intercom Automatic Call back 1 Pre...

Page 70: ...press OK 6 Using navigation key enable the Intercom Call Forwarding option with either On Busy or Always depending on your perefence 7 Select the user to forward the call to by Highlighting the Interc...

Page 71: ...nchronise the SE 708 Deskstation 1 Press i to display the intercom screen 2 Press OK to display the Main menu 3 Press navigation key twice to display the Settings menu 4 Using the and navigation keys...

Page 72: ...to display the Main menu 3 Press navigation key twice to display the Settings menu 4 Using the and navigation keys highlight User Settings and press OK This displays the User Settings menu options 5...

Page 73: ...y reduced by the AGC to an acceptable level Similarly if an SE 708 caller talks quietly the sound level heard at the far end is gradually increased to an acceptable level In both mentioned circumstanc...

Page 74: ...key twice to display the Settings menu 4 Using the and navigation keys highlight Call Settings and press OK This displays the Call Settings properties 5 Ensure Intercom Announce Volume is highlighted...

Page 75: ...ht Engineering Tools and press OK This displays Engineering Tools If this is the first time the Engineering Tools option is being used an Admin Login screen is displayed You will be required to type a...

Page 76: ...t Engineering Tools and press OK This displays Engineering Tools If this is the first time the Engineering Tools option is being used an Admin Login screen is displayed You will be required to type an...

Page 77: ...prompted type the administration password in Password If not prompted to type a password please proceed to step 5 6 Using and highlight Configure Device and press OK 7 Ensure Device IP Address is hig...

Page 78: ...iCMS Server Setting used to configure a static primary IP address for the SE 708 to connect to iCMS If no IP address 0 0 0 0 is set then the SE 708 will use either DHCP or DHCP and DNS to locate the...

Page 79: ...the Network Settings To access the Network settings 1 Press i to display the intercom screen 2 Press OK to display Main 3 Press twice to display Settings 4 Using and highlight Engineering Tools and p...

Page 80: ...will not be active SNMP IP and SNMP Public String SNMP IP This option allows you to set the SNMP IP address SNMP Public String This option allows you to set the SNMP public text string Send Logs The S...

Page 81: ...reen is displayed You will be required to type an administration password before proceeding further 5 If prompted type the administration password in Password If not prompted to type a password please...

Page 82: ...rd before proceeding further 5 If prompted type the administration password in Password If not prompted to type a password please proceed to step 5 6 Using and highlight Log Settings and press OK 7 Se...

Page 83: ...ration password in Password If not prompted to type a password please proceed to step 5 6 Using and highlight Factory Defaults and press OK A confirmation screen is displayed asking if you are sure yo...

Page 84: ...on microphones Handset Handset Push to Talk Please ensure the Push To Talk handset mode setting is enabled beforehand For more information see Handset Mode within User Preferences on page 72 To talk...

Page 85: ...he handset icon with a red dot is displayed on the status bar when the handset button is pressed and held down This indicates the handset is muted Headset Please ensure the Handset Mode within the Use...

Page 86: ...r software Recommended Input Devices Handset Speakerbus momentary latching noise cancelling handset Recommended Microphones Close Talking Noise Cancelling 550 x 8 5 mm 52 09 021 Cardiod 550 x 8 5 mm 5...

Page 87: ...87 SE 708 iCS Deskstation User Guide Storage Environment Temperature 0 C 60 C Humidity 10 85 RH...

Page 88: ...PSU requires an earthed mains socket outlet This equipment must be connected to an earthed mains socket outlet Finland Laite on liitett v suojakosketinpistorasiaan Norway Apparaten m tilkoples jordat...

Page 89: ...station Deskstation Model Sales Code SE 708 SE 708 Handset Deskstation Model Sales Code Momentary Handset SE HSETM Microphones Deskstation Model Sales Code Close Talking Noise Cancelling Microphone 55...

Page 90: ...alls 44 H handsets 79 headsets 79 L logging off 28 logging on 28 M menus 25 microphones 79 mute 42 48 58 P personal directory 39 point to point 41 privacy mode 32 push to mute See handset mode push to...

Page 91: ......

Page 92: ...Speakerbus Technology Limited 2016 Registered Office Ground Floor Hanover House Britannia Road Queens Gate Waltham Cross Hertfordshire EN8 7TF Registered in England No 04415859...

Reviews: