


To activate configuration via DHCP on the video matrix, proceed as follows:
• Press and hold the
OUTPUT 1
and
OUTPUT 4
buttons together for 3 seconds.
• Wait for 5 seconds and press and hold the
OUTPUT 3
and
OUTPUT
4 buttons for 3 seconds. The IP
address assigned by DHCP is shown on the LC display. Make a note of it.
• Now, use the IP address displayed in the address bar of the browser and connect to the web interface.
Once you are connected, you can assign a static IP address to the video matrix with the aid of the web
interface. Refer to the section ‘g) Setting network parameters’ in the ‘HTTP web interface’ chapter.
It is also possible to set a static IP address manually with the ‘HDMI matrix 4x4 V1.1’ control
software or with TCP/IP control commands via the RS232 serial interface. Please see the
relevant chapters ‘HDMI matrix 4x4 V1.1 software’ and ‘Serial interface connection RS232’.
b) Switching the signal path for HDMI signals
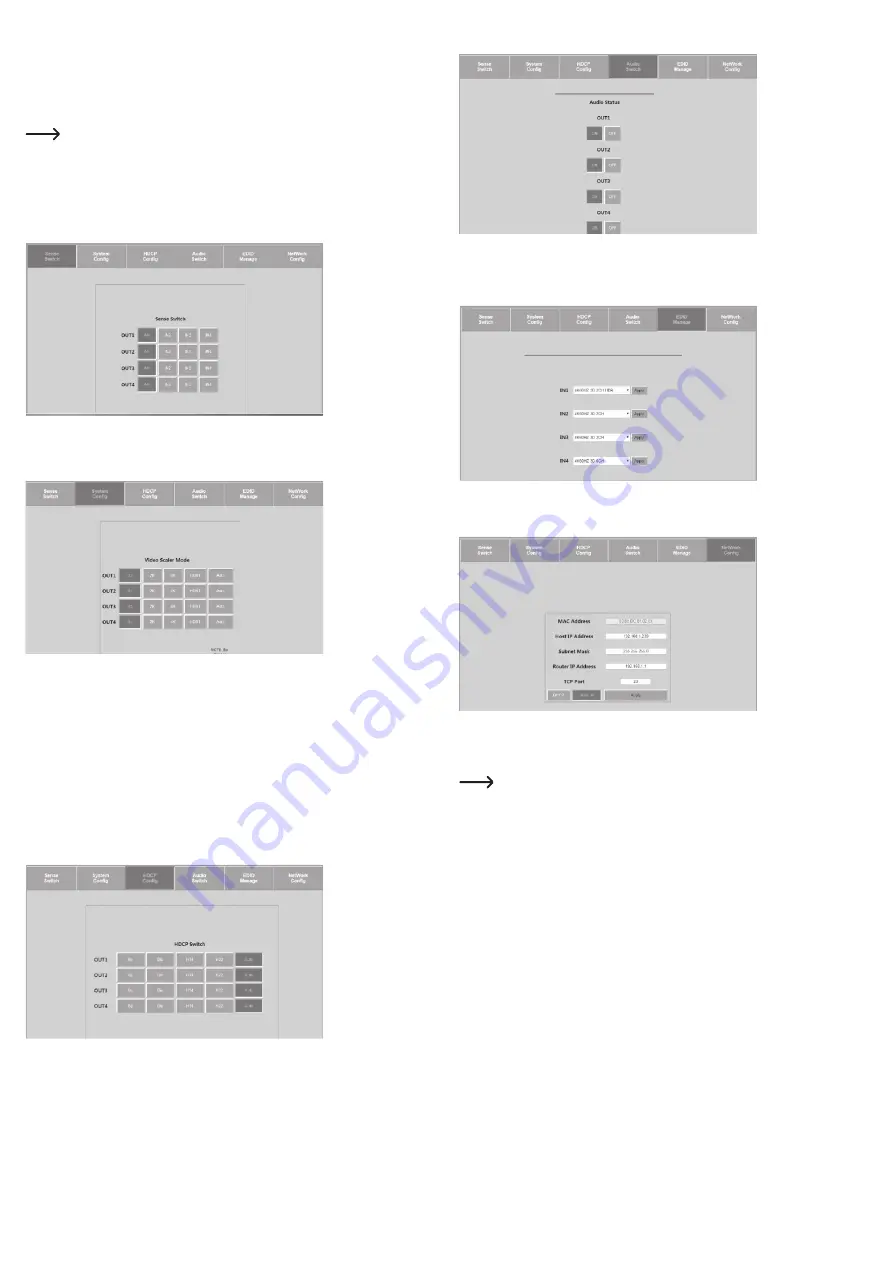
On the ‘Sense Switch’ tab, you can switch the signal path between inputs and outputs by means of the web
interface.
• Click the cursor on the desired combination of
OUTPUT
and
INPUT
buttons on your screen to select a
signal path.
c) Setting scaling
You can switch the scaling of the signal paths between inputs and outputs on the ‘System Config’ tab. Each
signal path can be set individually. Click the cursor on the desired combination of
OUTPUT
and resolution
buttons to select the scaling.
Scaling options
• AUTO = Auto Detection - The scaling is set in accordance with the characteristics of the display device as
per the EDID information. If, e.g. the resolution with 1080p is indicated in the EDID information, scaling
is to 2K.
• BP = Bypass - Scaling is switched off. The video signal is looped unchanged.
• 2K = 4K --> 2K - The 4K input signal is scaled down to HD. Depending on the input format, 1080p or 1900
x 1200 is output.
• 4K = 2K --> 4K - The 1080p input signal is scaled down to 4K.
• HDBT = HDBaseT Compatibility Mode (compatibility mode): if the bandwidth of the 4K signal is over
9 GBit/s is, it is compressed so as to allow it to be transmitted in systems with <18 GBit/s bandwidths.
Transmission of the 4K resolution is possible, but the information contained as required for displaying the
high-contrast image (HDR) is eliminated from the data stream.
d) Managing HDCP options
Switch the various HDCP options on the ‘HDCP Config’ tab.
e) Switching audio
Using the ‘Audio Switch’ tab, switch the audio output for the individual signal paths on or off (
ON/OFF
).
f) EDID management
The various pre-defined and the 3 user-defined EDID settings can be modified on the ‘EDID Manager’ tab.
• Select an option from the drop-down menu by clicking with the cursor.
• Compare the EDID options in section ‘c) Setting and switching EDID’.
g) Setting network parameters
Adjust the network settings on the ‘Network Config’ tab. You can set the following IP parameters:
- Subnet mask, router IP address, TCP port, enable DHCP and static IP
HDMI 4x4 matrix v1.1 software
You can execute the signal path of the HDMI signals, the EDID management, the IP setting as well as scaling
with the control software. To this end, consult the manufacturer’s operating instructions starting on page 20.
Download the program ‘HDMI 4x4 matrix v1.1.exe’ from the Conrad website www.conrad.de.
Start it on your computer by clicking.


