Sparsh Dual Streaming User Manual Download Page 16


- 15 -


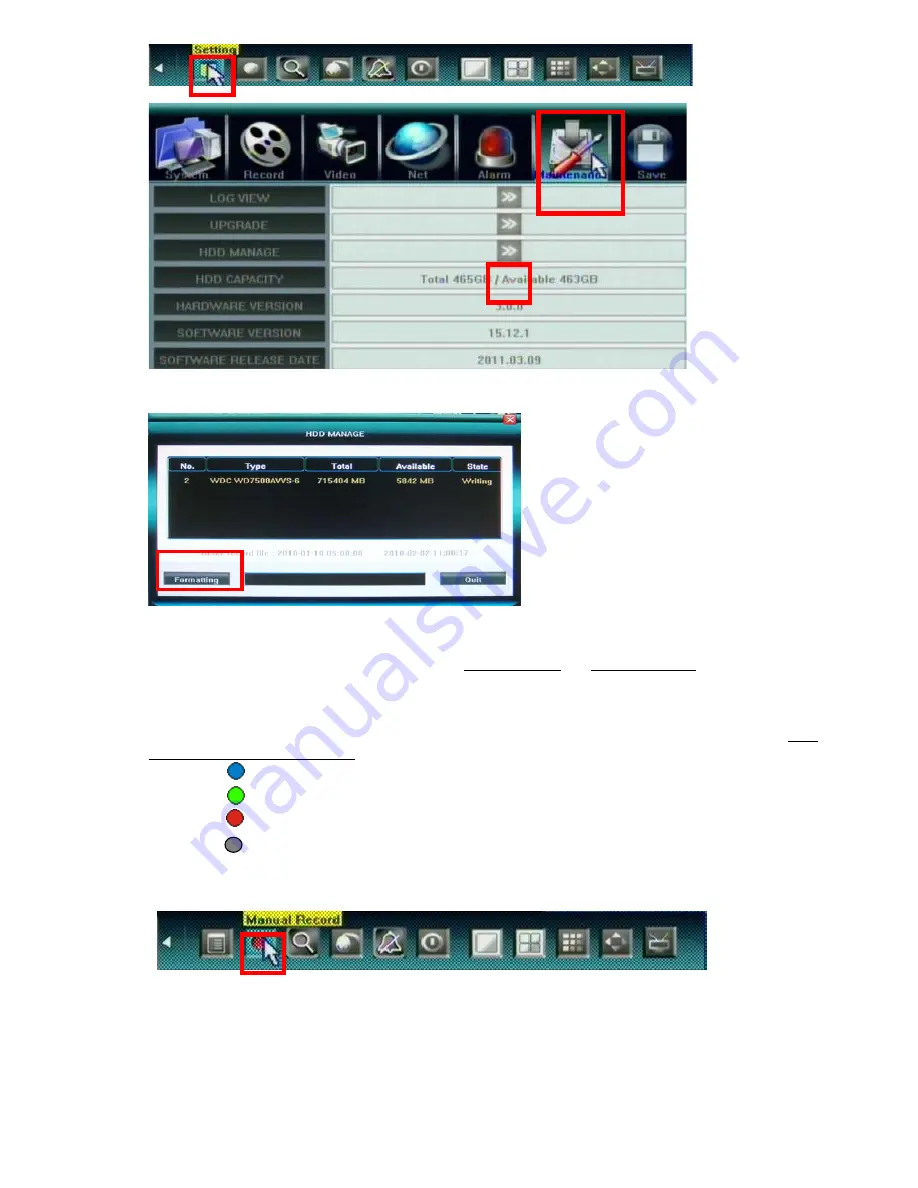
HDD information will display on the windows if DVR detection HDD correctly. Click 

Formatting

to 

start HDD format. 


4.4 Video Record 

There are two methods to precede record in DVR, 

manual record

 and 

schedule record

The priority of manual record is higher than schedule.

 If the record schedule is conflict with manual 

record, the manual record will be processed firstly until the manual record being canceled. Record types 
include “common recording” / “alarm triggered recording” / “motion detection triggered recording” / 
“alarm & motion detection triggered recording”, the following indications will be displayed on the right 
upper corner of each split screen: 

  Blue indicates “common recording”   

  Green indicates “motion detection triggered recording” 

  Red indicates “alarm triggered recording” 

   Grey indicates “manual recording” 

„


Manual Record 

Please select <Tool Bar>

<Manual Record> to let the specific channel record or not. Press


button to start/stop recording manually. 


Summary of Contents for Dual Streaming

Page 1: ...Dual Streaming H 264 Multiplex 4CH 8CH Network DVR Support 3G 3 5G mobile phone PDA Symbian Windows Mobile iPhone iPad Blackberry Android Support 2xSATA User Manual V1 1...

Page 2: ...armful interference in which case the users will be required to correct the interference at their own expense FCC Caution To assure continued compliance use only shielded interface cables when connect...

Page 3: ...any person except for replacement or reasonable maintenance of this product for the cases included but not limited to the following Any damage or loss including but not limited to direct indirect cons...

Page 4: ...that produce heat Protect the power cord from being stepped on or pinched particularly at plugs convenient receptacles and the points where they exit from the apparatus Do not drop metallic parts thro...

Page 5: ...reate Delete User Account assign authorities setup SEQ Display Preview Cruise and Lock Cameras 24 5 2 9 Resource Management 26 5 3 RECORD SETTING 28 5 3 3 Video Quality 29 5 3 6 OSD Setting 29 5 3 7 R...

Page 6: ...is only for reference 1 2What are inside this DVR package Please refer to Appendix E What are inside this DVR inside this manual Change Notice Please refer to Appendix F Change Notice for details 1 3...

Page 7: ...Phone PDA Support for more details Login Logout the System Logout MENU Setting SAVE Logout Login Power on or after Logout 1 2 Setup the System Format HDD MENU Setting Maintenance HDD Manage Click Form...

Page 8: ...5 3 8 Dual Streaming for Network Record Advanced Setting or 6 4 Device Parameters Settings Channel Camera setting Sub Bitstream Subcode from IE for more details 2 Product Overview 2 1 Product Feature...

Page 9: ...ic Philips etc Video Backup AVI MPEG4 or H 264 Raw for USB Flash Disk Power DC12V 3 3A or 5A optional for 2 SATA Operating Temperature O C 40 C Dimension 315 W x 224 D x 52 H mm 315 W x 224 D x 52 H m...

Page 10: ...m operation 10 Power LED 11 HDD LED 12 IR Window 8CH DVR 1 x SATA or 2 x SATA 8CH DVR 2 SATA HDD with DVDRW or HDD removable Rack Key buttons 2 12 are same as 4CH DVR except 1 1 8 Direct switch to sin...

Page 11: ...AUDIO IN 1 4 1 8 4 channel audio input RCA 2Vp p 600 for 4CH H264 DVR or connector for 8CH H264 DVR to connect Audio cable 8CH Audio Input 1CH Audio Output 5 Video Input Connectors 1 4 1 8 4 or 8 cha...

Page 12: ...n the front panel Please refer to the descriptions in Section 2 1 Front Panel 3 Hardware Installation 3 1 Basic Connections Cameras Connect the camera output to video input connector in real panel of...

Page 13: ...panel 4 Power on DVR and Quick Start Power on the DVR and wait for system program loading The DVR will buzz and NO Hard Disk appears when no hard disk installed in DVR This DVR has dual display TV VGA...

Page 14: ...channel by pressing the corresponding Numbers buttons 1 8 When in single split view mode user can enter into 4 9 splits view mode by pressing or button directly or reverse Channel Status Display Indi...

Page 15: ...will pop a message to show the present alarm information Shut down the system before power off good for HDD protection To switch screen display mode Single camera Quad 4 camera 9 camera To switch the...

Page 16: ...til the manual record being canceled Record types include common recording alarm triggered recording motion detection triggered recording alarm motion detection triggered recording the following indic...

Page 17: ...change relevantly Select OK to confirm settings The settings will take effect after being saved For the detailed operations please refer to 5 3 2 Record Schedule 4 5 Video Playback Specify the date ti...

Page 18: ...If the timeline is out of screen please move highlight icon to and press Enter button to display the part out of screen After searching over by remote control press FN button will move to timeline to...

Page 19: ...able speeds are 8X 16X Fast forward the available speeds are 2X 4X 8X 16X 1 8X 1 4X and 1 2X Pause Stop playing Go to next frame Click to switch from single camera to 4 9 camera 4 6 Video Backup Selec...

Page 20: ...ive and portable HDD need external power supply and only MPEG4 can be backed up for USB DVD Burner when backup in MPEG4 types the special video decoder components WMP_MediaFilter rar will also be back...

Page 21: ...on in front panel Press direction key to move highlight and press Enter to set the action Press icon to open more menu and please refer to next page for functions descriptions Mouse operation is quite...

Page 22: ...ion the camera as desired position including direction focus iris and zoom value 3 Click on the set button call preset 1 Select the preset number you want to call 2 Click on the go to button Clear res...

Page 23: ...22 5 DVR Setting 5 1 Menu Tree Operate...

Page 24: ...pper menu Save Exit User can click button on the right upper corner or single right click mouse or press ESC button to enter into the Save Exit screen You can select exit directly or exit after being...

Page 25: ...find the JP17 jumper it is near the SATA connector location and find some jumper cap to make it closed short and hold it until beep sound heard it will return back to default password of Admin and Us...

Page 26: ...User account Enter DEL USER to delete user account Authority Manage Operation authority of DVR for User account can be defined by system There are two conditions to apply restriction Local operation...

Page 27: ...o set up the same ID number with RS422 Keyboard if you want to control DVR from keyboard Lock Cameras Cover Cameras Administrator Admin can cover cameras that user accounts cannot see locally and remo...

Page 28: ...30FPS HD1 CIF PAL 25FPS HD1 CIF can not set up D1 in 5 3 7 Record Resolution Just press OK to finish set up no need click channel no 1 Channel D1 3 Channel CIF 1 Channel D1 Encode 3 Channel CIF Encode...

Page 29: ...ord Playback 25FPS D1 HD1 CIF Playback only one channel Click only one channel to have maximum 30FPS or 25FPS D1 HD1 others are CIF 2 Channel HD1 6 Channel CIF 2 Channel HD1 Encode 6 Channel CIF Encod...

Page 30: ...ter being saved 5 3 3 Video Quality Select quality level for record audio video The pre define selection from Best 768kbps High 640kbps Mid 512kbps Low 384kbps or user define User can manually input b...

Page 31: ...ecord Frame Rate would be reduced automatically even you set up as Full for D1 and Half D1 5 3 8 Dual Streaming for Network Record Advanced Setting SUB CODE By default DVR use recording streaming for...

Page 32: ...n Press on screen to pop up sub windows for region setting There are totally 16 x 12 individual blocks for a camera view Each cell can be turn on Blue or off Clear by single mouse left click or press...

Page 33: ...Name Video Advanced Setting Motion Handling Video Lost handling User can pre define correspond actions while DVR handling the event such as motion detection video lost following is the action list zR...

Page 34: ...utomatic acquire IP address by DHCP client model Manual assign IP address by Static IP model PPPoE for ADSL dial up network are supported please click Next Page 5 5 2 Http Port By default is port 80 u...

Page 35: ...alled behind a Router to share a single public IP address Be sure to configure the Port Forwarding or Virtual Server for those three network port and Mobile surveillance Port 7050 you may surf http po...

Page 36: ...n add this DVR in CMS server manually File Sharing Check to activate files sharing function then able to visit video files in DVR HDD via network neighborhood How to visit shared files Double click ne...

Page 37: ...to make sure that they are communicated please remember the server information and Email From information must be corrected and DVR must be internet connected before TEST 5 5 7 UPnP and Mobile port 3...

Page 38: ...will find the following screen shot if successful in UPnP mapping Mobile PORT By default is port 7050 user can specify different port number please refer to Chapter 7 3G 3 5G Mobile Phone PDA Support...

Page 39: ...ng User can pre define correspond actions while DVR handling the Alarm event zRecord Start record immediately for selected channels zPTZ PRESET set up the PTZ preset position for selected channels zAl...

Page 40: ...3 2 Record Schedule for details Please note Motion Alarm Schedule recording dose not compliant to Motion Alarm event action schedule Alarm Zoom Out Set the time interval seconds for channels pop out...

Page 41: ...ware Upgrade The upgrade modes supported now are USB IE Remote Software USB Please make sure the USB device is connected correctly and the upgrade applications have already being copied into USB root...

Page 42: ...current software release date 5 8 Save Setting 5 8 1 Save Exit Save all setting and exit menu 5 8 2 Exit Exit menu without save setting 5 8 3 Restore defaults Reset all configuration to factory defaul...

Page 43: ...entials of a member of the local Administrators group Important Turning off UAC reduces the security of your computer and may expose you to increased risk from malicious software We do not recommend l...

Page 44: ...set up please refer to 6 5 Device Parameters Settings z Talk back use channel 1 only please open PC microphone and speakers and DVR need to connect active microphone speaker z Playback Search and play...

Page 45: ...X will be displayed in the right up side of the main screen When alarms of video loss with uploading to center occur the alarm notification with the alarm channel number contained such as Device alarm...

Page 46: ...a setting Sub Bitstream Subcode please refer to 5 3 8 Dual Streaming for Network Record Advanced Setting as well For limited upload bandwidth of internet that DVRs connect or limited streaming capabil...

Page 47: ...46 Serial PTZ Setting Alarm alarm input output setting and HDD full action Device Firmware upgrade time synchronize and E mail Notify setup...

Page 48: ...47 User User account and authority setting State HDD capacity Channel and Network status...

Page 49: ...d video files download Video Files Search The file search part is on the right upper side of the screen please set target type start time and end time there Then click to start searching The result wi...

Page 50: ...to previous file Go to next file Prompt file location and is enabled only when multiple record files being selected to play Snapshot the storage directory can be set on the pop up screen by clicking T...

Page 51: ...A Support Another state of the art feature of this DVR device is transmitting live feed from the CCTV cameras to your mobile phone so that you can have an on the go access to your surveillance system...

Page 52: ...data will provide information about current time in the MM DD YYYY HH MM SS format Channel name resolution and status of the camera The menu bar contains the following controls Directional buttons fo...

Page 53: ...line the first tag name Play Stop button Full Mode Displays the camera feed in the full screen mode All menus and buttons will be hidden Snap Allows you to take a snapshot of the camera view Setting B...

Page 54: ...2 Nov 08 Nokia E65 S60 3rd_INIT 09 Feb 07 Nokia E66 S60 3rd_FP1 16 Jun 08 Nokia E70 S60 3rd_INIT 09 Oct 05 Nokia E71 S60 3rd_FP1 16 Jun 08 Nokia E75 S60 3rd_FP2 16 Feb 09 Nokia E90 S60 3rd_FP1 11 Feb...

Page 55: ...nnection to the DVR please first click icon to enter settings menu as below right screenshot Server Info Title Description of this DVR Address DVR IP address or DDNS Port Mobile Port 6003 by default A...

Page 56: ...n with the PC 3 Connect your BlackBerry mobile phone to your computer via the USB cable that came with it or any USB cable that fits Start the DM 4 Before the installation open the BlackBerry Desktop...

Page 57: ...ck open 8 You will now return to the Application Loader screen From here you should see KWeye now listed with Install under the Action column shown as follows if the installation is successful 9 You c...

Page 58: ...m main interface After the installation press KWeye icon in the application it will appear the below picture The Main page System setting To set up the connection to the DVR please first click icon to...

Page 59: ...ftware information Click to choose channel list Control PTZ camera direction Zoom Iris and Focus 7 5 Android Mobile Google Phone compatible 1 Software Installation 1 1 Please go to Andord sofwtare mar...

Page 60: ...888 by default Click after setting to connect or click to choose other DVR that ever connected 2 3 The main display screen As the left photo for last page click icon to connect DVR immediately after l...

Page 61: ...or 12 5 Half D1 7 5 or 6 D1 500GB 15 8 7 9 3 9 High 640Kbps 19 0 9 5 4 8 Middle 512Kbps 23 7 11 9 5 9 Low 384Kbps 31 6 15 8 7 9 Best 768Kbps 750GB 23 7 11 9 5 9 High 640Kbps 28 4 14 2 7 1 Middle 512Kb...

Page 62: ...721010CLA332 1000 SATA HITACHI HDS722020AL330 2000 SATA Maxtor 6V16010 160 SATA Seagate ST3250310SV 250 SATA Seagate ST3500320SV ST3500320AS ST3500418AS 500 SATA Seagate ST31000528AS ST31000520AS 1000...

Page 63: ...118 Sector 10 Noida U P India Tel 91 120 4518 900 20 Lines Works Plot No 75 Sector 7 I I E SIDCUL Haridwar India Tel 91 01334 645 011 239 396 Service Center A 1 15 New Kondli New Delhi India Tel 91 11...

Reviews: