background image

SPACECAM

         SYSTEMS, INC.

MAXIMUS 7 OPERATOR’S MANUAL

August 17, 2016

1.2 Gimbal main operating modes

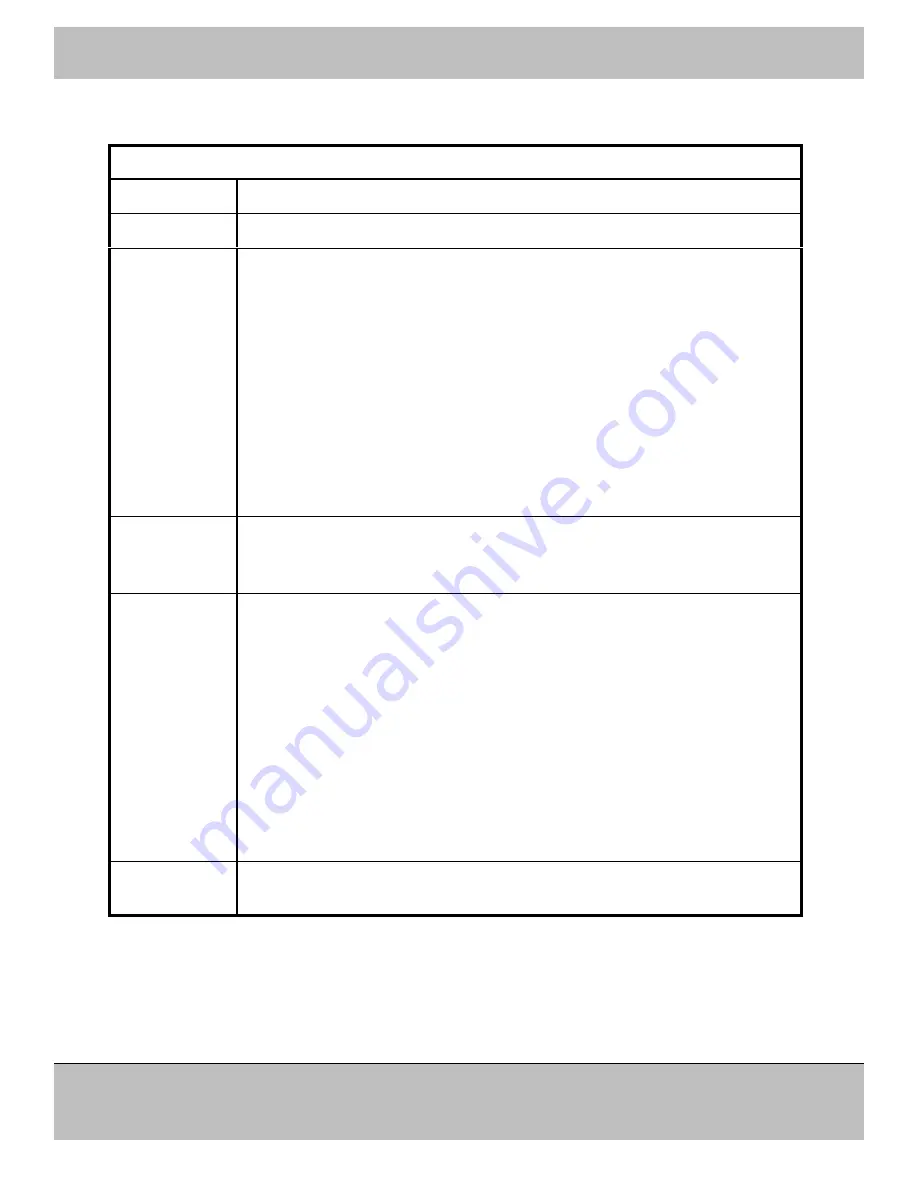
TABLE  1 - Gimbal operating modes

MODE

NOTE

DISABLE

Gimbal servos are disabled

SPACECAM

This mode mimics the way the original SpaceCam  System operated with
the embellishment of being able to allow 360 degree continuous tilting and
rolling of the camera platform.
The camera's tilt axis is always aligned to the horizon.  The camera can tilt
up and down and the top and bottom of the image frame is always parallel
to the horizon.
The camera has full 360 degree of tilt freedom while still keeping the top
and bottom of the image frame parallel to the horizon.
When the camera is pointed straight down or straight up a sideways pan
input on the joystick will result in the image rotating in the viewfinder. 
This effect transitions to a pure pan motion of the camera as it is tilted up to
horizontal.

SPACECAM2

This mode is the same as SpaceCam mode with the additional feature that
control polarity is maintained even when the camera is in an inverted
position.

ZEDIR/PAN

This mode starting with the camera at zero degrees tilt has the horizon level
in the frame.
When the camera is tilted down a transition happens that allows the
operator to pan the camera, in terms of image either left or right.  This will
begin at -30 and transition to full image pan authority at -60 degrees in the
case of tilting the camera down.  Upon tilting up the camera will transition
to a level state in roll between -60 and -30 degrees.  This will happen in
time for the top of frame to be parallel with the horizon by the time it enters
the image frame.  This feature will also be applicable when pointing the
camera above the horizon going to zenith.
In all cases the horizon when in image frame will be level in terms of
picture roll

HARD

In hard mode the gimbal will follow the mounting bracket in all directions
(like welded). The joystick controls still work but there is no stabilization.

Select the desired gimbal mode with the F1 and F3 keys. Press F1 to disable the head and press F3
(repeat if needed) to select one of the 4 operating modes.

31240 La Baya Dr. Ste. A
Westlake Village, CA. 91362                   
818-889-6060

Page 6 of 74

Summary of Contents for Maximus 7

Page 1: ...MAXIMUS 7 OPERATOR S AND MAINTENANCE MANUAL August 17 2016 SPACECAM SYSTEMS INC 31240 La Baya Dr Ste A Westlake Village CA 91362 818 889 6060...

Page 2: ...tion mode 7 Level Roll 7 2 CONFIGURATIONS 8 2 1 Minimum installation 8 2 2 Installation with cable extensions 9 2 3 Wireless installation 10 2 4 Wheel s installation 11 2 5 Analog controls installatio...

Page 3: ...t All 27 3 2 10 Version 28 3 2 11 Motion recording and playback 28 3 2 12 Mark recording and playback 28 3 2 13 Stability and Master Gain 29 3 2 14 Disengage freeze 30 3 2 15 Gimbal drift 30 3 2 16 Jo...

Page 4: ...le 61 6 8 2 The Tilt axis table 62 6 8 3 The Pan axis table 63 6 8 4 The Twist axis table 64 6 9 Maintenance Tool General Parameters tab 65 6 10 Maintenance Tool Err Info tab 66 6 11 Flashing the Gimb...

Page 5: ...ntrol easily transcends competing systems for crane camera car and boat applications As with any system it is highly recommended that technicians study and familiarize themselves with the set up and o...

Page 6: ...maintained even when the camera is in an inverted position ZEDIR PAN This mode starting with the camera at zero degrees tilt has the horizon level in the frame When the camera is tilted down a transi...

Page 7: ...pitch movements in addition to the joystick control Press TILT In follow mode the position limits don t work Roll Modes In the Roll Velocity mode the roll velocity of the platform is proportional to t...

Page 8: ...is reversed The STBY LED indicates that the correct power is present at the power input connector The STBY LED will not light up if the voltage is less than 18VDC or reversed If the system is powered...

Page 9: ...If longer distances required use the wireless configuration The System Power Supply can be connected to a battery with the standard cable that has bare wires on the battery end and the users must ins...

Page 10: ...SPACECAM SYSTEMS INC MAXIMUS 7 OPERATOR S MANUAL August 17 2016 2 3 Wireless installation 31240 La Baya Dr Ste A Westlake Village CA 91362 818 889 6060 Page 10 of 74...

Page 11: ...ack of the console and the roll wheel connects to the ROLL connector All three wheels can be mounted on the console stand or the roll can be mounted individually on it s own stand Pan tilt and roll on...

Page 12: ...ar encoder freeze keys are also connected to this connector See Menu Option 2 3 2 5 See page 38 for definitions of the signals on the connector Contact SpaceCam if you decide to use these functions Ty...

Page 13: ...selected take If a take is selected Go to selected mark If a mark is selected STOP PLAY Delete all takes If a take is selected STOP Stop record or play REC Record selected take If a take is selected...

Page 14: ...ous box Increment or decrement a value SHIFT UP SHIFT DOWN In some setup frames increments or decrements value 10 times faster CENTER KEY Same as ENT CTRL SCALING GROUP WHEEL SCALING Disengage wheels...

Page 15: ...tion of payload Follow mode follows the mounting bracket TILT Tilt hold orientation or follow mode toggle ROLL Roll hold orientation or follow mode toggle SHIFT ROLL Roll stick Velocity or Position co...

Page 16: ...ere is an condition preventing the gimbal from operation BROWN There is a warning but the gimbal still could be operated 3 2 2 Procedure to set a parameter Select Move to desired field with the arrow...

Page 17: ...press ENTER again 3 2 3 Control device s select and setup The control devices move the 3 axes pan tilt and roll in the desired direction There are four type of devices Console s built in joysticks JOY...

Page 18: ...ENU and select 3 2 2 Controls Select the desired axis in the first line then select the control device Direction Set for each individual device on each axis Smoothing Set for each individual device on...

Page 19: ...per value is 2 the maximum is 50 degrees The actual command speed is always under the red speed limit If the taper value is too low and the camera operator slams the axis into the position limit too f...

Page 20: ...on mode See explanation of taper range on page 19 Yaw follow To change the yaw follow mode filter follow dynamics the larger the number the slower the response Pitch follow To change the pitch follow...

Page 21: ...analog devices POT Joystick page 38 for signals on the connector Stick property The sticks pan tilt and roll have a linear standard and a curved operating mode In standard mode the sticks are a lot m...

Page 22: ...operate properly Press the Z PT SENSE key in the CTRL SCALING group on the front panel The setup window will be displayed and the zoom can be operated to help find the required scaling factor Press th...

Page 23: ...cancel function The system master gain is adjusted with the F4 key on the main screen not on this setup screen Setting axes Home Positions The home position P 4 4 is where the axis position shows ZER...

Page 24: ...an be controller from the console Analog POTs Connected to the ANA connector Select Analog in Lens setup Select BAR for control device on zoom Preston analog option If the Preston lens controller is u...

Page 25: ...d communication and the Fujinon or Canon lenses to servo mode To set lens options press MENU and select 3 2 2 Lens Setup Select lens model by moving the focus to the model box and pressing ENT as many...

Page 26: ...will be velocity not position The Init current values are proportional to the initializing torque commanded current of the corresponding function zoom focus and iris At power up each axis will be move...

Page 27: ...d Smoothing Joystick 10 10 10 10 Smoothing Wheel 1 1 1 1 Smoothing External 10 10 10 10 Smoothing Pan Bar 10 10 10 10 Dead band Joystick 4 4 4 4 Dead band Wheel 1 1 1 1 Dead band External 4 4 4 4 Dead...

Page 28: ...ake Take number must be in focus Press RWD Go to end of a take Take number must be in focus Press and hold SHIFT Press RWD Delete a take Take number must be in focus Press and hold STOP Press REC Dele...

Page 29: ...vo loops The parameter also can be observed in the General Parameter table Master Gain using the Maintenance program 5 9 To recall Master Gain The Master Gain of stabilization can be displayed on the...

Page 30: ...scillation vibration the gyro is overwhelmed falls out of range and it is impossible to cancel drift for minutes Do not try to cancel drift this is not drift Restart the system Power down wait a few s...

Page 31: ...dgeVCPDrivers aspx Any PC terminal program to test the connection Tera Term http en osdn jp projects ttssh2 releases Set up communication to 115200 Baud 8 data bits no parity 1 stop bit No flow contro...

Page 32: ...INC MAXIMUS 7 OPERATOR S MANUAL August 17 2016 4 THE GIMBAL 4 1 Gimbal main parts naming SmartBase Train ring Tilt ring Twist ring Pan ring 31240 La Baya Dr Ste A Westlake Village CA 91362 818 889 60...

Page 33: ...cable being utilized Various options and accessories from SpaceCam allow for mounting choices of cameras lenses and lens drive modules In all instances modules or other addition camera equipment mount...

Page 34: ...ight 9 To make further fore aft balance adjustments either loosen 3 x 10 32 set screw on left edge of receiver plate or disengage lever lock on camera base and lens support allowing camera package to...

Page 35: ...the opposite side Align the train ring with the flat part on the SmartBase This is home position for the train and the train position should read 0 00 To set the correct tilt home position start with...

Page 36: ...rays sends basic information of the status of the gimbal The two LEDs indicate gimbal powered disabled enabled and error status The LED Box connects to the gimbal control connector with a special cabl...

Page 37: ...e 10 45 The 5V connection is directly connected to internal circuits and only can supply 50mA 1 GND 2 Digital input active grounded 3 PAN analog input 5VDC 4 TILT analog input 5VDC 5 5V BLOOP See next...

Page 38: ...wires GND is shield Short 5V to ground and the console is dead 1 GND 2 5VDC 3 POT1 FOCUS POT 4 POT2 ROLL JOYSTICK 5 KEY1 Not programmed 6 KEY2 FREEZE BUTTON 7 GND 8 5VDC 9 POT3 IRIS POT 10 POT4 ZOOM P...

Page 39: ...nnection is to supply power to the encoders only Lemo 8 pos size 1B Mates with FGG 1B 308 Catalog Page 10 45 The 24VDC is used for the optional adjustable wheel friction power 1 GND signal 2 5V 3 ENC...

Page 40: ...r permanent errors in performance Please use SpaceCam made cables Bayonet 18 pos Mates with MS27473T14B18P A CONTROL_COM isolated B CONTROL_CMD_N isolated C CONTROL_STA_N isolated D 24VDC for radio on...

Page 41: ...otal current 19A shared with all 13 1V on the System Power supply too XLR 4 pos Qty 2 Mates with male XLR 4 1 GND 2 3 4 13 1VDC out PRESTON ZOOM Connects to Preston FI Z HU3 Zoom connector Downloads N...

Page 42: ...MS3116F10 6P Catalog Pages 18 size 10 19 size 10 10 insert 10 6 A Common Shield B User A C User B D User C E User D F LENS Connection to LimeRock Lens Hand Controller T O C Lemo 8 pos size 1B Mates wi...

Page 43: ...tend or alter this cable The LCD and the console may suffer PERMANENT damage Hirose 20 pos Mates with HR10A 13P 20P 73 Catalog 1 GND 2 3 3V 3 RESERVED DO NOT USE 4 D C 5 WR 6 RD 7 D0 8 D1 9 D2 10 D3 1...

Page 44: ...ber Optic Connection Connecting to Twist ring FIBER IN UMBILICAL Internal System Control Connections Definitely not user accessible Connecting to Twist ring UMBILICAL Lemo 12 pos Mate FGG 2B 312 CLAD9...

Page 45: ...al Shield Video common USER May be used for RS 232 RS 422 and RS 485 or other LOW voltage signals Not for higher than 48V POWER Hirose 5 pos Mate HR10A 7P 5P 73 Catalog 1 Common Shield 2 User A 3 User...

Page 46: ...E 4 Platform Saddle Connectors LABEL FUNCTION SIGNAL ASSIGNMENT PIN SIGNAL CAMERA Camera Run Stop Video sync from camera TO BE DEFINED Hirose 10 pos Mate HR10A 10P 10P 74 1 2 3 4 5 6 7 8 9 10 31240 La...

Page 47: ...er Optic Connection Connecting to Saddle FIBER IN UMBILICAL Internal System Control Connections Definitely not user accessible Connecting to Saddle UMBILICAL Lemo 12 pos Mate FGG 2B 312 CLAD92Z Catalo...

Page 48: ...WER Bayonet 2 pos Internal System Power Connections Improper wiring may cause intermittent errors in performance Permanent damage to the system is also possible IT IS NOT ONLY THE REVERS WIRING Please...

Page 49: ...with two LEDs to signal status of gimbal in case of remote applications The outputs can not drive LEDs directly Ask SpaceCam for the LED box A CONTROL_COM isolated N CONTROL_CMD_P isolated B CONTROL_C...

Page 50: ...ni B USB port for PC connection Standard USB pinout 5 9 5 5 Indicators on the turret TABLE 7 Indicators on the turret LABEL FUNCTION Maintenance LED on the maintenance switch Light up in maintenance m...

Page 51: ...SPACECAM SYSTEMS INC MAXIMUS 7 OPERATOR S MANUAL August 17 2016 5 6 System Power Supply Connectors 31240 La Baya Dr Ste A Westlake Village CA 91362 818 889 6060 Page 51 of 74...

Page 52: ...t damage to the system is also possible Please use SpaceCam made cables Mates with ITT CA3106E20 23SB A GND B POWER 12VDC XLR 4 pos Qty 3 Voltage 13 1V DC Total current 19A shared with the 13 1V conne...

Page 53: ...GIMBAL POWER Bayonet 2 pos Power connection to gimbal Improper wiring may cause intermittent errors in performance Permanent damage to the system is also possible IT IS NOT ONLY THE REVERS WIRING Plea...

Page 54: ...rs TABLE 9 Platform Power Supply Connectors LABEL FUNCTION SIGNAL ASSIGNMENT PIN SIGNAL 12VDC XLR 4 pos Qty 2 Voltage 13 1V DC Total current 19A shared between all 13 1V connectors Mates with male XLR...

Page 55: ...ared between all 13 1V connectors Mates with male mini XLR 4 1 GND 2 3 4 13 1VDC 24VDC XLR 3 pos Qty 1 Voltage 24 0V DC Total current 10A Mates with male XLR 3 1 GND 2 24 0VDC 3 48VDC IN Bayonet 3 pos...

Page 56: ...on the turret with a standard USB cable that has a USB mini B plug Several times someone pulled the USB cable by accident or negligence and the cable torn the mini connector off the PCB behind the tur...

Page 57: ...pt it Select the shortcuts you want to create Definitely need the desktop shortcut Click Install If this is the first time you install on this computer you may want to check Install Gimbal s USB Drive...

Page 58: ...ers that do not belong to a specific axis The Err Info tab displays error counters and other information of the system The Flash tab has tje tools to make quick software updates of the Gimbal Controll...

Page 59: ...rientation The LOS Gyro sub group shows the gyro s inclination in G s and velocity in deg sec in the x y z axes Since the gyro is placed under the camera x would correspond to roll y to pitch and z to...

Page 60: ...to save or reload parameter tables LOAD Loads the current parameter table from the nonvolatile RAM STORE Stores the current parameter table into the nonvolatile RAM use this to make your changes perma...

Page 61: ...entiation Ki integration Since the pan and twist axes are followed by the train in a mixed matter it is important that the PanFlwr and TwstFlwr parameters are balanced The Pan FeedFrwd Gain parameter...

Page 62: ...t axis is a type PID position loop Kp gain Kd differentiation Ki integration All other modes use gyro loops and as the gimbal rotates the loops input references change The Axis Mgain scales all loops...

Page 63: ...axis is a type PID position loop Kp gain Kd differentiation Ki integration All other modes use gyro loops and as the gimbal rotates the loops input references change The Axis Mgain scales all loops f...

Page 64: ...modes use gyro loops and as the gimbal rotates the loops input references change The Axis Mgain scales all loops for the axis The Stiction Current is the amplitude of a current pulse to start from sta...

Page 65: ...s they are not in the code the i1 and i2 parameters are integrators The Master Gain is the overall system servo scaling and can be changed from the console with the F4 key The Yaw Pitch Roll follow sm...

Page 66: ...be analyzed Off line and CRC checksum errors can be a sign of damage to the wiring The communication line connecting the system control modules can not be disconnected from any module and expected to...

Page 67: ...you just saved 7 The file attribute fields should fill up under the button 8 Check that the gimbal is connected on top left the Connected port s status bar is moving 9 Click UP LOAD 10 Wait until fini...

Page 68: ...increase the gain gradually Be very careful and alert If during flashing and error occurs static discharge power failure communication error The program will be corrupted and the DSP Gimbal Controlle...

Page 69: ...If there is only one port available then set the baud rate to 115200 8bits no parity 1 stop 8 If there are more ports available then have to find witch one is the gimbal Close window turn gimbal powe...

Page 70: ...mbal gets flashed 12 Turn gimbal power off 13 On the turret set the boot switch back to 0 14 Turn gimbal power on 15 Start the Maintenance Tool program 16 Do steps 12 to 18 of paragraph Flashing the G...

Page 71: ...o the following 1 Remove carbon fiber cover on tilt pan and train axis 2 Unplug motor connector if necessary to give better access 3 Use soft tissue clean soft cotton cloth or a Q tip to apply alcohol...

Page 72: ...stem power supply OCC SA 713 5 Platform power supply OCC SA 716 6 AC power supply OCC SA 714 7 Gimbal power cable MXW80300 8 Console power cable MXW80301 9 Control cable MXW80302 10a System power cabl...

Page 73: ...minimum at 100VAC 12 AMP AC AC current minimum at 220VAC 6 AMP AC Mechanical UNIT Gimbal weight unloaded 64 lb Gimbal dimensions L W H 23 5 8 0 28 5 inch Gimbal maximum payload width centered 12 inch...

Page 74: ...on yaw pitch roll Number of axes 7 Maximum axis speed all axes 240 deg sec Maximum axis drift all axes average system reference only 20 deg hour Wireless operation maximum distanced omni antenna 1 5 m...

Reviews: