2
3
4
5
6
7
8 9 10
HIGH PASS
INPUT
MONO
MONO
INPUT
HIGH PASS
HIGH PASS
O U T F U T
OUT
GND POWER
2
REMOTE
3
- R E A R
BALANCED X.0
ELECTRONIC CROSSOVER
Handcrafted in
12 13 14 15 16
19 20
21
\
\ \ \
\
0
INPUT 5V
ON OFF
IN
IN
INPUT ON OFF
RI
IT
2w 3w
SUB
RE ARF
SUB
LEVEL
S U B
INPUT
CONTROL DE-EMPHASIS SONIC
CONTROL
LEVEL
REAR
FRONT
INPUT LEVEL
SUBSONIC
LOW PASS
HIGH PASS
TOP VIEW
22
23
24 25 26
27
28
29
30
L
R
R
FREQ
INPUT LEVEL
SUBSONIC
LOW PASS
FREQ MULTI HIGH PASS
FRONT VIEW
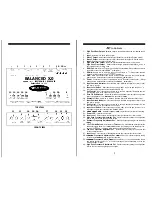
1.
2.
3.
4.
5.
6.
7.
a.
9.
10.
11.
12.
13.
14.
15.
16.
17.
18.
19.
20.
21.
22.
23.
24.
25.
26.
27.
28.
29.
30.
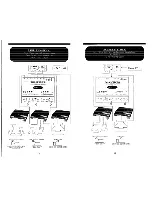
to Cal/outs
High Pass Rear Output-
Balanced output to the amplifier driving the rear satellite speak-
ers.
Input
Balanced rear inputs (left and right).
Mono 1 Output
Balanced subwoofer output (Subwoofer Left output in
Stereo mode).
Mono 2 Output
Balanced subwoofer output (Subwoofer Right
output in Stereo mode).
Input
Balanced front inputs (left and right).
High Pass Front Output
Balanced front tweeter/satellite output in 3-way mode.
High Pass Front Output
Balanced front midrange
output
in
mode, or
front satellite output in
mode.
REM Out-
Remote turn-on output to an amplifier. Passes
(Except when powered via
the Mini-Din connector from a
amplifier.)
REM In-
Remote turn-on input from the head unit. Accepts
(Except when powered
via the Mini-Din connector from a
amplifier.)
GND
Main ground connection. Bolt to a clean chassis ground in the vehicle. (Except
when powered via the Mini-Din connector from a
amplifier.)
Power
Connected to a fuse or circuit breaker, then to the battery’s positive post. (Except
when powered via the Mini-Din connector from a
amplifier.)
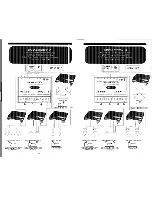
Input Overload Indicator
Rear channels input; Indicates the signal input level or input
gain level is too high.
Input Level Switch
Rear channels input; Select “VARY to use the gain controls, or
to bypass the rear input controls of the BALANCED X.0.
Sub Control
Rear channels input; Select “IN” to send low frequency information from the
rear channels input to the subwoofer mono output.
Rear Fill De-Emphasis
Select “IN” to include de-emphasis in the rear channels high pass
output. (De-emphasis is a 6
low pass filter at
7
Subsonic Filter
Select “IN” to include a subsonic filter in the subwoofer mono output.
Input Overload Indicator
Front channels input; Indicates the signal input level or input
gain level is too high.
Sub Control
Front channels input; Select “IN” to send low frequency information from the
front channels input to the subwoofer mono output.
Input Level Switch
Front channels input; Select “VARI” to use the gain controls, or
to bypass the front input controls of the BALANCED X.0.
Switch
Selectable
or
crossover output for the front channels.
Power LED
Indicates the unit is “ON”.
Input Level
Rear channels; Independent left and right channel input level controls.
High Pass Crossover Adjustment Pot
Crossover frequency setting for the high pass
filter on the rear left and right high pass outputs.
Subsonic Frequency Adjustment Pot
Subsonic frequency setting for the subwoofer
12
24
Button
Selectable 12
or 24
low pass filter for the
subwoofer output. (Note: For 12
use the grey markings on the subwoofer con-
trols. For 24
use the white markings on the subwoofer controls.)
Low Pass Crossover Adjustment Pot
Crossover frequency setting for the low pass filter
for the subwoofer output.
Input Level
Front channels; Independent left and right channel input level controls.
Crossover Adjustment Pot
mode only; Crossover frequency setting
for the internal
filter for the front channels.
Crossover Switch
mode only; Select “xl for use with
drivers
and satellite speakers. Select
for use with midrange drivers and tweeters, and use the
markings written in italics.
High Pass Crossover Adjustment Pot
Crossover frequency setting for the high pass
filter on the front left and right high pass outputs.
Summary of Contents for Balanced X.0
Page 9: ...____ I I...


