Location of Parts and Controls
4
EN
SET
ON
OFF
POWER
GP
CH
BATT
RF
AF
BATT
GP
CH
1
2
3
4
5
6
1
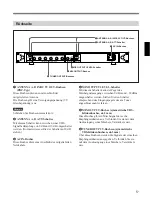
POWER switch
2
Display
6
Blank panels
3
GP button
4
SET button
5
CH button
Front Panel
Location of Parts and Controls
Display
1
BATT (battery) indicator
5
BATT (battery) indication
Indicate the condition of the wireless microphone
transmitter batteries. The indicator and indication start
flashing about one hour before the transmitter batteries
go flat.
1
POWER switch
Turns the power on and off.
2
Display
Displays the status of the tuner and the group and
channel assigned to the unit.
For details, see the following section “Display”.
3
GP (group) button
Press to change the group or to display frequencies.
5
BATT indication
1
BATT indicator
2
RF indicator
3
AF indicator
4
AF indication
6
GP/CH indication
7
RF indications
4
SET button
Press to change the group or channel.
5
CH (channel) button
Press to change the channel in a group.
6
Blank panels
Remove these panels to install optional WRU-801A
UHF Synthesized Tuner Units.
2
RF (radio frequency) indicator
7
RF (radio frequency) indications
The indicator lights and the indications (dots) appear
when the antenna reception is optimal. Depending on
the RF input level, the number of dots changes.
3
AF (audio frequency) indicator
4
AF (audio frequency) indication
The indicator lights and the indication appears when
the audio output level is higher than the reference level.
6
GP/CH (group/channel) indication
Shows the reception channel group and respective
channel number.
Pressing the GP button changes this indication to the
frequency indication.
AF
BATT
GP
CH
BATT
RF
AF
Summary of Contents for WRR-801A
Page 15: ......


