background image

6

EN

1

2

Lever

Bottom Panel

Up to five WRU-801A UHF Synthesized Tuner Units
can be installed.
In building up a system, be sure to combine a WRU-
801A and WRR-801A having the same TV channel
number (62, 64 or 69).

Notes

• Be sure to power this unit off before installing the

WRU-801A.

• The buttons and display on the front panel of the

WRU-801A may be damaged if they are gripped too
strongly. Always hold the WRU-801A by the side.

• Do not touch the connectors on the rear panel of the

WRU-801A.

• Be careful of static electricity.

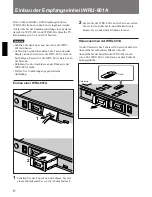
Installing a WRU-801A

1

Power the tuner off and remove the blank panel
with a screwdriver or other tool.

2

Hold the WRU-801A by the side and insert into
the slot. Push in until you hear a click.

Installing a WRU-801A Tuner Unit

Removing a WRU-801A

On the bottom panel of the tuner, locate the lever
corresponding to the slot where the WRU-801A is
installed and pull the lever forward. The WRU-801A
is ejected from the slot.

Summary of Contents for WRR-801A

Page 1: ... 1997 by Sony Corporation CE62 CE64 CE69 UHF Synthesized DiversityTuner 3 860 930 21 1 WRR 801A Operating Instructions EN Bedienungsanleitung D Wireless Channel Lists Übertragungskanallisten ...

Page 2: ...ive As the colours of the wires in the mains lead of this apparatus may not correspond with the coloured markings identifying the terminals in your plug proceed as follows The wire which is coloured green and yellow must be connected to the terminal in the plug which is marked by the letter E or by the safety earth symbol Y or coloured green or green and yellow The wire which is coloured blue must...

Page 3: ...t or power amplifiers Avoid using in very humid or dusty places because such use may shorten the life of the tuner To avoid degradation of the signal to noise ratio do not use the tuner in noisy places or in locations subject to vibration such as the following near electrical equipment such as motors transformers or dimmers near air conditioning equipment or places subject to direct air flow from ...

Page 4: ...ts will enable six channel operation on the tuner At shipping one tuner unit is installed in the tuner and additional tuner units sold separately can be installed with easy operation In building up a UHF wireless microphone system be sure to combine a microphone transmitter and a tuner having the same TV channel number 62 64 or 69 CE62 model A 14 MHz frequency band is assigned to the WRR 801A CE62...

Page 5: ...eliminate interference or noise please note the following Do not use two or more wireless microphones or transmitters whose wireless channels are the same If there is a TV broadcasting station nearby to avoid possible interference from its broadcasting do not use that station s channel The number of wireless microphone channels actually usable in a multi channel system may be smaller than the norm...

Page 6: ...T indication 1 BATT indicator 2 RF indicator 3 AF indicator 4 AF indication 6 GP CH indication 7 RF indications 4 SET button Press to change the group or channel 5 CH channel button Press to change the channel in a group 6 Blank panels Remove these panels to install optional WRU 801A UHF Synthesized Tuner Units 2 RF radio frequency indicator 7 RF radio frequency indications The indicator lights an...

Page 7: ...B or 10 dB Normally set the switches to 0 dB 3 AC IN connector Connects to an AC power source with the supplied AC power cord 4 MIX OUTPUT LEVEL switch Selects the mixed output level as 0 dBm or 38 dBm Set this switch according to the input level of the equipment connected to the tuner 5 MIX OUTPUT connector ø6 3 phone balanced TRS Supplies mixed audio signals of six tuner units You can connect th...

Page 8: ...ed too strongly Always hold the WRU 801A by the side Do not touch the connectors on the rear panel of the WRU 801A Be careful of static electricity Installing a WRU 801A 1 Power the tuner off and remove the blank panel with a screwdriver or other tool 2 Hold the WRU 801A by the side and insert into the slot Push in until you hear a click Installing a WRU 801A Tuner Unit Removing a WRU 801A On the ...

Page 9: ...A ANTENNA B IN ANTENNA A IN TUNER OUTPUT MIX OUTPUT WRR 801A ANTENNA B IN ANTENNA A IN TUNER OUTPUT MIX OUTPUT Connect output A or B to a mixer or an amplifier When using 7 channels or more Note Make the antenna tips point upward To AC power source To AC power source Antenna supplied Antenna supplied Antenna supplied Antenna supplied Antenna supplied Connections Basic Connections Connection for Mu...

Page 10: ...the selected group For group 00 however the channel selected last is displayed Releasing the buttons automatically cancels the group and channel selection mode and the currently displayed group is selected For the CE64 model the indication will cycle from group 00 through 65 For the CE69 model the indication will cycle from group 00 through H Refer to Overview of Channel Plan in the Wireless Chann...

Page 11: ...ual tuner units Notes Do not use group 00 If no channels are available NO CH is displayed and channel setting is aborted When using two tuners When you use two tuners proceed as follows to ensure that the two tuners do not use the same channel settings 1 Follow the procedure explained above to set the group and channel of the first tuner 2 Power on the wireless microphones or transmitters after ad...

Page 12: ...nel under this circumstance turn off the wireless microphone and transmitter Then select a channel at which the RF indicator is off A channel free from noise or radio wave interference is selected Muting Functions This tuner has the following three muting functions which work in combination 1 Muting by RF input level As sufficient S N for the audio output may not be obtained if no RF signal is rec...

Page 13: ...gnal output is muted The transmitter s tone signal or the tuner is in trouble Contact your nearest Sony dealer Operation 2 1 Pin Rack Foot Remove the pins inside the feet with a small screwdriver or similar tool Bottom panel Screws Tuner 1 Remove the feet of the tuner before mounting it on a rack 2 Mount the tuner on the rack using screws that are at least 12 mm long and that match the diameter of...

Page 14: ...z deviation at 1 kHz modulation Distortion 1 or less 40 kHz deviation at 1 kHz modulation Tone signal frequency 32 768 kHz Output level 0 dBm2 16 kHz deviation at 1 kHz modulation 20 dBm 5 kHz deviation at 1 kHz modulation Specifications Mix output level LINE 0 dBm 16 kHz deviation at 1 kHz modulation 20 dBm 5 kHz deviation at 1 kHz modulation MIC 38 dBm 16 kHz deviation at 1 kHz modulation 58 dBm...

Page 15: ......

Page 16: ...einen elektrischen Schlag zu vermeiden darf das Gehäuse nicht geöffnet werden Überlassen Sie Wartungsarbeiten stets nur einem Fachmann Für Kunden in Deutschland Dieses Produkt kann im kommerziellen und in begrenztem Maße auch im industriellen Bereich eingesetzt werden Dies ist eine Einrichtung welche die Funk Entstörung nach Klasse B besitzt Deutsch ...

Page 17: ...r oder anderen wärmeabstrahlenden Geräten Halten Sie das Gerät von Feuchtigkeit und Staub fern um eine lange Lebensdauer sicherzustellen Achten Sie darauf daß das Gerät keinen Vibrationen ausgesetzt ist Stellen Sie es nicht an folgende Plätze da sonst Störgeräusche auftreten können Nähe von Motoren Transformatoren Dimmern oder anderen elektrischen Komponenten Nähe von Klimaanlagen und Luftauslässe...

Page 18: ...önnen sechs UHF Empfangseinheiten WRU 801A eingebaut werden Es ist dann ein Betrieb auf sechs Kanälen möglich Werksseitig ist bereits eine Empfangseinheit in den Tuner eingebaut weitere Empfangseinheiten sind als Sonderzubehör erhältlich Achten Sie bei der Zusammenstellung eines UHF Mikrofonsystems darauf daß Mikrofon Sender und Tuner dieselbe TV Kanalnummer 62 64 oder 69 besitzen Modell CE62 Die ...

Page 19: ... Es können mehrere Kanalgruppen gespeichert werden Siehe Überblick über die Kanäle in Abschnitt Übertragungskanallisten Bei den Gruppen 01 L und H sind die Abstände zwischen den Kanälen so groß daß auf allen Kanälen ein simultaner Betrieb von UHF Mikrofonen möglich ist ohne daß es zu Interferenzstörungen kommt Die Gruppe 00 bietet zwar die größte Anzahl an Kanälen sie sollte jedoch nur dann verwen...

Page 20: ...tzliche UHF Empfangseinheiten WRU 801A eingebaut werden Display 1 BATT LED 5 BATT Anzeige An der LED und der Anzeige kann der Zustand der Batterie des Mikrofonsenders erkannt werden Etwa eine Stunde bevor die Batterie leer ist beginnt die Anzeige zu blinken 2 RF LED 7 RF Anzeige Bei gutem Empfang leuchten die LED und die Punkte der Anzeige auf Die Anzahl der leuchtenden Punkte ist ein Maß für die ...

Page 21: ... dB und 10 dB umgeschaltet werden Normalerweise sollte der Schalter auf 0 dB stehen 3 AC IN Buchse Diese Buchse dient zum Anschluß des mitgelieferten Netzkabels 4 MIX OUTPUT LEVEL Schalter Mit diesem Schalter kann der Pegel des Mischsignalsausgangs zwischen 0 dBm und 38 dBm umgeschaltet werden Stellen Sie den Schalter entsprechend des Eingangspegels des am Tuner angeschlossenen Geräts an 5 MIX OUT...

Page 22: ...chädigen Fassen Sie die WRU 801A stets nur an der Seite an Berühren Sie die Anschlüsse an der Rückseite der WRU 801A nicht Treffen Sie Vorkehrungen gegen statische Aufladung Einbau einer WRU 801A 1 Schalten Sie den Tuner aus und nehmen Sie mit einem Schraubenzieher o ä die Abdeckplatte ab 2 Fassen Sie die WRU 801A an der Seite an setzen Sie sie in den Schacht ein und drücken Sie sie hinein bis sie...

Page 23: ... IN TUNER OUTPUT MIX OUTPUT WRR 801A ANTENNA B IN ANTENNA A IN TUNER OUTPUT MIX OUTPUT Für 7 und mehr Kanal Betrieb Hinweis Achten Sie darauf daß die Spitzen der Antennen nach oben gerichtet sind an Netzsteckdose an Netzsteckdose Ausgang A oder B an einen Mischer oder Verstärker anschließen Antenne mitgeliefert Antenne mitgeliefert Antenne mitgeliefert Antenne mitgeliefert Antenne mitgeliefert Ans...

Page 24: ...Zum kontinuierlichen Umschalten der Gruppe halten Sie die GP Taste gedrückt Im CH Anzeigefeld erscheint die niedrigste Kanalnummer der gewählten Gruppe Bei Gruppe 00 erscheint jedoch der zuletzt gewählte Kanal Beim Loslassen der Tasten wird der Gruppenwahl Modus automatisch verlassen die Gruppe ist damit eingestellt Bei Modell CE64 können die Gruppen 00 bis 65 zyklisch gewählt werden Bei Modell CE...

Page 25: ...inweis Verwenden Sie die Gruppe 00 nicht Wenn keine Kanäle verfügbar sind erscheint die Anzeige NO CH und der Kanaleinstellbetrieb wird verlassen Bei Verwendung von zwei Tunern Führen Sie bei Verwendung von zwei Tunern die folgenden Schritte aus um sicherzustellen daß die beiden Tuner nicht dieselben Kanaleinstellungen verwenden 1 Stellen Sie die Gruppe und die Kanäle am ersten Tuner ein wie im vo...

Page 26: ...usche oder Interferenzen zu hören sind Bei einem solchen Kanal ist die RF LED erloschen Stellen Sie dann am Mikrofon bzw Sender denselben Kanal ein Rauschsperre Zum Vermeidung von Störgeräuschen ist der Tuner mit drei verschiedenen gleichzeitig arbeitenden Stummschaltfunktionen ausgestattet 1 Stummschaltung auf der Basis des HF Pegels Wenn der Pegel des HF Signals unter die Mutingschwelle abfällt ...

Page 27: ... anderen Frequenz empfangen wurde Operation 2 1 Stift Gestell Fuß Die Stifte in den Füßen mit einem kleinen Schraubenzieher o ä heraushebeln Unterseite Schrauben Tuner 1 Entfernen Sie die Füße vom Tuner bevor Sie ihn in das Gestell einbauen 2 Schrauben Sie den Tuner im Gestell fest Verwenden Sie Schrauben mit einer Länge von mindesten 12 mm und passendem Durchmesser Einbau in ein Gestell Störung d...

Page 28: ...Hz Modulation Verzerrungen Max 1 40 kHz Abweichung 1 kHz Modulation Tonträgerfrequenz 32 768 kHz Ausgangspegel 0 dBm2 16 kHz Abweichung 1 kHz Modulation 20 dBm 5 kHz Abweichung 1 kHz Modulation Technische Daten Mischausgangspegel LINE 0 dBm 16 kHz Abweichung 1 kHz Modulation 20 dBm 5 kHz Abweichung 1 kHz Modulation MIC 38 dBm 16 kHz Abweichung 1 kHz Modulation 58 dBm 5 kHz Abweichung 1 kHz Modulat...

Page 29: ...ruppe No of simultaneously selectable channels Anzahl der Simultankanäle CE62 Sony original channel groups Sony Kanalgruppen 125 kHz 25 kHz German 3 Deutsch 3 German 4 Deutsch 4 German 3 Deutsch 3 German 4 Deutsch 4 German Deutsch CE64 Sony original channel groups Sony Kanalgruppen 125 kHz German 3 Deutsch 3 German 4 Deutsch 4 German 3 Deutsch 3 German 4 Deutsch 4 German Deutsch 25 kHz 125 kHz Son...

Page 30: ...63 57 63 58 63 59 63 60 63 61 63 62 63 63 806 000 806 125 806 250 806 375 806 500 806 625 806 750 806 875 807 000 807 125 807 250 807 375 807 500 807 625 807 750 807 875 808 000 808 125 808 250 808 375 808 500 808 625 808 750 808 875 809 000 809 125 809 250 809 375 809 500 809 625 809 750 809 875 810 000 810 125 810 250 810 375 810 500 810 625 810 750 810 875 811 000 811 125 811 250 811 375 811 50...

Page 31: ...62 D04 800 475 62 D05 801 050 62 D06 801 875 62 D07 802 975 62 D08 803 500 62 D09 804 725 62 D10 805 700 WL Channel WL Kanal Frequency Frequenz MHz 63 A01 806 250 63 A02 807 200 63 A03 807 900 63 A04 808 325 63 A05 808 900 63 A06 809 725 63 A07 810 825 63 A08 811 350 63 A09 812 100 63 A10 812 575 Frequency Frequenz MHz 63 B01 806 300 63 B02 806 700 63 B03 807 250 63 B04 807 950 63 B05 808 375 63 B...

Page 32: ...quency Frequenz MHz 62 E02 800 525 62 E03 801 100 62 E04 801 425 62 E05 801 975 62 E06 802 575 62 E07 803 050 62 E08 803 700 62 E09 804 800 62 E10 805 050 62 E11 805 775 WL Channel WL Kanal Frequency Frequenz MHz 63 E01 806 850 63 E02 808 525 63 E03 809 100 63 E04 809 425 63 E05 809 975 63 E06 810 575 63 E07 811 050 63 E08 811 700 63 E09 812 800 63 E10 813 050 63 E11 813 775 Group 63E Gruppe 63E 1...

Page 33: ...425 62 177 802 425 62 217 803 425 62 098 800 450 62 138 801 450 62 178 802 450 62 218 803 450 62 099 800 475 62 139 801 475 62 179 802 475 62 219 803 475 62 100 800 500 62 140 801 500 62 180 802 500 62 220 803 500 62 101 800 525 62 141 801 525 62 181 802 525 62 221 803 525 62 102 800 550 62 142 801 550 62 182 802 550 62 222 803 550 62 103 800 575 62 143 801 575 62 183 802 575 62 223 803 575 62 104...

Page 34: ... 62 297 805 425 62 258 804 450 62 298 805 450 62 259 804 475 62 299 805 475 62 260 804 500 62 300 805 500 62 261 804 525 62 301 805 525 62 262 804 550 62 302 805 550 62 263 804 575 62 303 805 575 62 264 804 600 62 304 805 600 62 265 804 625 62 305 805 625 62 266 804 650 62 306 805 650 62 267 804 675 62 307 805 675 62 268 804 700 62 308 805 700 62 269 804 725 62 309 805 725 62 270 804 750 62 310 80...

Page 35: ...500 63 061 807 525 63 062 807 550 63 063 807 575 63 064 807 600 63 065 807 625 63 066 807 650 63 067 807 675 63 068 807 700 63 069 807 725 63 070 807 750 63 071 807 775 63 072 807 800 63 073 807 825 63 074 807 850 63 075 807 875 63 076 807 900 63 077 807 925 63 078 807 950 63 079 807 975 63 080 808 000 63 081 808 025 63 082 808 050 63 083 808 075 63 084 808 100 63 085 808 125 63 086 808 150 63 087...

Page 36: ...50 63 227 811 675 63 228 811 700 63 229 811 725 63 230 811 750 63 231 811 775 63 232 811 800 63 233 811 825 63 234 811 850 63 235 811 875 63 236 811 900 63 237 811 925 63 238 811 950 63 239 811 975 63 240 812 000 63 241 812 025 63 242 812 050 63 243 812 075 63 244 812 100 63 245 812 125 63 246 812 150 63 247 812 175 63 248 812 200 63 249 812 225 63 250 812 250 63 251 812 275 63 252 812 300 63 253 ...

Page 37: ...65 58 65 59 65 60 65 61 65 62 65 63 822 000 822 125 822 250 822 375 822 500 822 625 822 750 822 875 823 000 823 125 823 250 823 375 823 500 823 625 823 750 823 875 824 000 824 125 824 250 824 375 824 500 824 625 824 750 824 875 825 000 825 125 825 250 825 375 825 500 825 625 825 750 825 875 826 000 826 125 826 250 826 375 826 500 826 625 826 750 826 875 827 000 827 125 827 250 827 375 827 500 827 ...

Page 38: ...WL Kanal Frequency Frequenz MHz 64 D04 816 475 64 D05 817 050 64 D06 817 875 64 D07 818 975 64 D08 819 500 64 D09 820 725 64 D10 821 700 WL Channel WL Kanal Frequency Frequenz MHz 65 A01 822 250 65 A02 823 200 65 A03 823 900 65 A04 824 325 65 A05 824 900 65 A06 825 725 65 A07 826 825 65 A08 827 350 65 A09 828 100 65 A10 828 575 WL Channel WL Kanal Frequency Frequenz MHz 65 B01 822 300 65 B02 822 7...

Page 39: ... Gruppe WL Channel WL Kanal Frequency Frequenz MHz 64 E02 816 525 64 E03 817 100 64 E04 817 425 64 E05 817 975 64 E06 818 575 64 E07 819 050 64 E08 819 700 64 E09 820 800 64 E10 821 050 64 E11 821 775 WL Channel WL Kanal Frequency Frequenz MHz 65 E01 822 850 65 E02 824 525 65 E03 825 100 65 E04 825 425 65 E05 825 975 65 E06 826 575 65 E07 827 050 65 E08 827 700 65 E09 828 800 65 E10 829 050 65 E11...

Page 40: ... 097 816 425 64 137 817 425 64 177 818 425 64 217 819 425 64 098 816 450 64 138 817 450 64 178 818 450 64 218 819 450 64 099 816 475 64 139 817 475 64 179 818 475 64 219 819 475 64 100 816 500 64 140 817 500 64 180 818 500 64 220 819 500 64 101 816 525 64 141 817 525 64 181 818 525 64 221 819 525 64 102 816 550 64 142 817 550 64 182 818 550 64 222 819 550 64 103 816 575 64 143 817 575 64 183 818 5...

Page 41: ...375 64 295 821 375 64 256 820 400 64 296 821 400 64 257 820 425 64 297 821 425 64 258 820 450 64 298 821 450 64 259 820 475 64 299 821 475 64 260 820 500 64 300 821 500 64 261 820 525 64 301 821 525 64 262 820 550 64 302 821 550 64 263 820 575 64 303 821 575 64 264 820 600 64 304 821 600 64 265 820 625 64 305 821 625 64 266 820 650 64 306 821 650 64 267 820 675 64 307 821 675 64 268 820 700 64 308...

Page 42: ... 059 823 475 65 060 823 500 65 061 823 525 65 062 823 550 65 063 823 575 65 064 823 600 65 065 823 625 65 066 823 650 65 067 823 675 65 068 823 700 65 069 823 725 65 070 823 750 65 071 823 775 65 072 823 800 65 073 823 825 65 074 823 850 65 075 823 875 65 076 823 900 65 077 823 925 65 078 823 950 65 079 823 975 65 080 824 000 65 081 824 025 65 082 824 050 65 083 824 075 65 084 824 100 65 085 824 1...

Page 43: ...8 827 700 65 229 827 725 65 230 827 750 65 231 827 775 65 232 827 800 65 233 827 825 65 234 827 850 65 235 827 875 65 236 827 900 65 237 827 925 65 238 827 950 65 239 827 975 65 240 828 000 65 241 828 025 65 242 828 050 65 243 828 075 65 244 828 100 65 245 828 125 65 246 828 150 65 247 828 175 65 248 828 200 65 249 828 225 65 250 828 250 65 251 828 275 65 252 828 300 65 253 828 325 65 254 828 350 ...

Page 44: ...855 500 69 44 859 500 69 13 855 625 69 45 859 625 69 14 855 750 69 46 859 750 69 15 855 875 69 47 859 875 69 16 856 000 69 48 860 000 69 17 856 125 69 49 860 125 69 18 856 250 69 50 860 250 69 19 856 375 69 51 860 375 69 20 856 500 69 52 860 500 69 21 856 625 69 53 860 625 69 22 856 750 69 54 860 750 69 23 856 875 69 55 860 875 69 24 857 000 69 56 861 000 69 25 857 125 69 57 861 125 69 26 857 250 ...

Reviews: