– 9 –
XS1
RM-Y1010
The Picture Adjustment Menu
The
“Picture Adjustment
”
menu allows you to
alte
r the pic
tur
e se
tt
ings.
To do
this:
Press the
ME
NU
button
and then
pr
ess
OK
to
enter
this menu. Next, press
v
or
V
t
o
select the
desired
option and press
OK
. Finally,
read below
how to oper
ate
into each option.
P
ict
ur
e Mod
e
This op
tion
allows y
ou to customise
the Picture Mode based
on
the prog
ramme
you
are watching. After
selecting
this
optio
n pr
ess
OK
. Next, p
ress repeatedly
v
or
V
to sele
ct
:
Live
(for
live broadcast
p
rogrammes,
DVD and
Digital Set Top Box
receivers).
Movie
(for
films).
Personal
(for
in
divid
ual
set
ting
s).
Once
you
have selected y
our desired op
tion,
press
OK
to st
ore
.
"Brigh
tness", "Colo
u
r"
and "Sharpness" level of
"Live"
and "
M
ovie" mod
e are fixed
o
n
the
factory to get the best
picture quality.
Contrast
Press
B
or
b
to reduce
or enhance pict
ure
contr
ast.
Next,
press
OK
to store
.
Brightness
Press
B
or
b
to darken or brighten the
p
icture. Next,
p
ress
OK
to st
ore.
This option
o
nly appears and can only be ad
just
ed
if
“P
ic
ture
Mode
” is se
t to
“P
ersonal
”.
Colour
Press
B
or
b
to decrease or to increase
colo
r
in
ten
si
ty.
Next press
OK
to store.
This option
o
nly appears and can only be ad
just
ed
if
“P
ic
ture
Mode
” is se
t to
“P
ersonal
”.
Hu
e
Press
B
or
b
to decrease or to increase
the green tones. Next
press
OK
to store
.
This option
only
appears for
NTSC
signal (
e.g.
USA
video tapes).
Sharpness
Press
B
or
b
to
soften or to sh
arpen
the picture. Next
pr
ess
OK
to st
ore.
This option
only
appears and can
only be adju
sted
if
“Pic
ture
Mode
” is se
t to
“Per
son
al
”.
,
Picture
Adjustment
Picture
Mode:
Liv
e
Contr
ast:
Reset: Noise
Reduction:
Auto
Colour
Tone:
Cold
Select:
Enter
:
OK
Exit:
MENU
Picture
Adjustment
Select:
Bac
k:
Enter
:
OK
Picture
Mode:
Liv
e
Contr
ast:
Reset: Noise
Reduction:
Auto
Colour
Tone:
Cold
MENU
continued...
Reset
Press
OK
to re
se
t the
pi
ctu
re to the
fa
ct
ory prese
t
le
ve
ls.
Noise
T
h
is op
tion is set to
Au
to
to
autom
ati
call
y
reduce the snowy p
ict
ure visible in
th
e weak
broadcast
Reduction
signal. However
, it can be modified
. After selectin
g this option press
b
.
Next
,
press
v
or
V
to
se
le
ct
Hi
gh
,
Mi
d
,
Lo
w
or
Off
.
Finally
,
press
OK
to
st
ore.
Colou
r Tone
This op
tion
allows y
o
u to alter
the tint
of the pictu
re. After
selecting
this
option p
ress
b
. Next, press
repe
at
edl
y
v
or
V
to se
le
ct
:
Warm
(give
s th
e whi
te
c
o
lour
s a red
ti
nt),
Normal
(gi
v
es
the whit
e
colo
urs a neutral
tin
t),
Cold
(give
s
th
e wh
ite
c
o
lour
s a blue
tint
). Fina
lly pre
ss
OK
to
store
.
DRC
Mode
This
option
allows
you
to
select
the
h
igh
resolution
picture
with
4x
density
for
high
q
u
ality
sources
(i.e.
DVD
player
,
sat
ell
it
e
receiver).
T
hi
s
opti
on
is
set
to
High
Density
(
reco
mmended
for
moving
pictures). However
it ca
n be modified. After sele
cting this option, press
b
. Next pr
ess
v
or
V
to
se
le
ct
Pr
ogr
essive
(recommended for still imag
es and tex
t).
This o
p
tion
only appears and
can only b
e
adjusted
if
“Pic
tur
e Mo
de
”
is
set to
“Pe
rso
nal
”.
DRC Palette
This option allows you to customise th
e level of detail (Reality)
and smoo
thness (Clarity) for up
to
three input
sources.
After
selecting this option
pr
ess
b
. Next, press
v
or
V
, to adjust
Rea
lity
(as
higher as the mar
k
is along the
Reality axis
,
the picture
b
ecomes more
d
etailed) and
press
B
or
b
to adjust
Clarity
(as you move
to the right,
along the
Clarit
y axis, the
pictur
e becomes
smoother). Finally,
press
OK
to store.
This o
p
tion
only appears and
can only b
e
adjusted
if
“Pic
tur
e Mo
de
”
is
set to
“Pe
rso
nal
”.
Summary of Contents for Wega KE-P37XS1
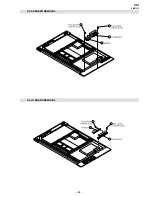
Page 22: ... 22 XS1 RM Y1010 2 3 SPEAKER REMOVAL 2 4 H1 BOARD REMOVAL 1 2 3 4 1 3 2 4 ...
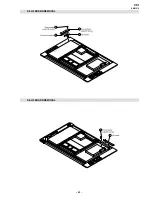
Page 23: ... 23 XS1 RM Y1010 2 5 H2 BOARD REMOVAL 2 6 H3 BOARD REMOVAL 4 1 3 2 2 1 ...
Page 24: ... 24 XS1 RM Y1010 2 7 H4 BOARD REMOVAL 2 8 HMP BOARD COVER REMOVAL 2 1 2 1 ...
Page 25: ... 25 XS1 RM Y1010 2 9 U1 BOARD REMOVAL 2 10 APS 202 BOARD REMOVAL 2 1 2 1 ...


