


– 8 –
XS1
RM-Y1010
5
A
d
iag
ram appears showing you
h
ow to conn
ect a wid
e range of
equipment to
yo
ur TV set. Follow the
instructio
ns and press the
OK
button to remove
the picture
and continue
the automatic
process.
The conn
ection
diagram should b
e
used as a guide only as
most equipment can be connected
to more
than
one type
of
TV
socke
t.
Onc
e
the
TV ha
s
comple
te
d
the
automa
tic
tuning
pr
ocess, refer to the
‘Connection Guide
’ section on
p
age
2
3
for furth
er inf
ormatio
n
o
n
getting the best set up for
y
our equip
m
en
t.
6
The
Auto Tuning
men
u appears on
th
e
screen. Press the
OK
button to select
Yes
.
7
T
h
e
TV
star
ts t
o
a
u
tom
at
ica
ll
y sea
rc
h a
nd st
ore
al
l
available broadcast
channels for
you.
This procedu
re
could take some
minutes. Please be
patient
and do not press any buttons, otherwise au
tomatic tuning
will not be completed.
In
some countries the
TV Broa
d
caster installs
the channels
aut
oma
tic
al
ly (ACI syste
m)
. In
th
is
ca
se
, the
T
V
Broadcaster sends a menu
in which you
can select your city
by pressing the
v
or
V
button
and
OK
to store
the
channels.
If no
chan
nels were
fo
und
du
ring the
auto tune process,
a
message appear
s automatically on
the screen askin
g
you to
conn
ect
the aerial.
Ch
eck
the aerial connection (ref
er to
page 1
4
).
Press the
OK
button to restart
th
e auto
tuning
process.
8
Aft
er al
l avail
able channel
s ar
e captured
and stored
,
the
Programme Sorting
m
enu
a
u
tom
ati
ca
lly
a
ppea
rs
on the
screen
enabling yo
u to chang
e
the order
in
which the
channels are stored.
a)
If
yo
u
wish to keep the
bro
adcast channels
in
the tuned order
,
go to step
9.
b)
If
you
wish to store
th
e channels in a dif
ferent order:
1
Pr
es
s the
v
or
V
button to select
the programme
number with the
chan
nel (TV Broadcast) you wish
to move. Press
th
e
b
bu
tt
o
n.
2
Pr
es
s the
v
or
V
button to select
the new
programme
number
position fo
r you
r selected
channel (
T
V Br
oadcast).
Press
the
OK
button to store.
3
Repeat steps b)1
and b)
2 if you
wish
to
change
the
ord
er of
the oth
er channels.
9
Press the
MENU
button to remov
e
the menu
from the
screen
Auto T
uning
P
rogrammes found:
4
No c
hannel found.
Please connect aerial
Confirm
P
rogramme Sorting
01
02
03
04
05
06
07
08
TVE
TVE2
TV3
C33
C2
7
C58
S02
S06
P
rogramme Sorting
0
1
TVE
01
02
03
0
4
05
06
07
08
TVE
TVE2
TV3
C33
C2
7
C58
S02
S06
Do you want to st
art
automatic tuning?
Ye
s
No
OK
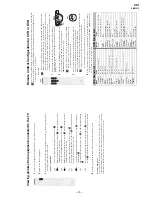
Please connect your equipment
accor
ding to this c
hart
DV
D
Your
TV set is now
ready for use
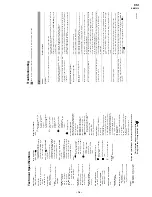
Introducing and Using the Menu System
You
r
TV
set
uses an On-Screen menu system
to
guide you throug
h
the operations. Use
the following buttons
on
th
e Remote
Control
t
o
op
era
te the
men
u
syste
m:
1
To switch on
th
e me
nu sc
re
ens
:
P
ress
t
h
e
MENU
bu
tton
to
switch t
h
e
fir
st
l
evel
me
nu on.
Picture
Adjustment
Picture
Mode:
Liv
e
Contr
ast:
Reset: Noise
Reduction:
Auto
Colour
Tone:
Cold
Select:
Enter
:
OK
Exit:
MENU
Picture
Adjustment
Picture
Mode:
Liv
e
Contr
ast:
Reset: Noise
Reduction:
Auto
Colour
Tone:
Cold
Select:
Enter
:
OK
Exit:
MENU
2
To nav
igate
thr
o
ug
h the menus:
•
To highlight
and
select the
desired
menu o
r option, p
ress
v
or
V
.
• To
enter
the selected menu or
option, press
OK
or
b
.
• T
o
return to the last menu or
o
p
tion
, press
OK
or
B
.
• To
alter the setting
s of your selected option, press
v
/
V
/
B
or
b
.
• To
confirm
and store your selection, press
OK
.
3
To
switch o
ff the menu
screens:
Press the
MENU
button to remo
ve
the menu
from the
scr
een.
Summary of Contents for Wega KE-P37XS1
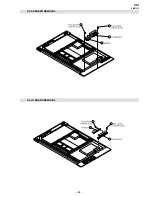
Page 22: ... 22 XS1 RM Y1010 2 3 SPEAKER REMOVAL 2 4 H1 BOARD REMOVAL 1 2 3 4 1 3 2 4 ...
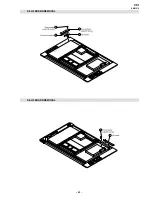
Page 23: ... 23 XS1 RM Y1010 2 5 H2 BOARD REMOVAL 2 6 H3 BOARD REMOVAL 4 1 3 2 2 1 ...
Page 24: ... 24 XS1 RM Y1010 2 7 H4 BOARD REMOVAL 2 8 HMP BOARD COVER REMOVAL 2 1 2 1 ...
Page 25: ... 25 XS1 RM Y1010 2 9 U1 BOARD REMOVAL 2 10 APS 202 BOARD REMOVAL 2 1 2 1 ...