


– 16 –
XS1
RM-Y1010
*
“
P
layStatio
n
”
is
a p
ro
duct of Sony
Com
puter
Ent
ert
ai
n
m
ent,
In
c.
*
“
P
layStatio
n
”
is
a tr
ad
em
ar
k
of
So
ny C
o
m
put
er
Ent
ert
ai
n
m
ent,
In
c.
Connecting Equipment to the TV
•
Using
the f
o
llo
wing instructio
ns
you
can connect a wide r
ange
of
optional
equipment
to
yo
ur TV set.
•
Con
necting
cables
are
not supplied.
Co
nnec
ting a VCR
To connect a VCR,
please refer
to th
e section
“Con
necting
the aerial an
d VCR
” of
this in
struction manual on
page 14.
Co
nnec
ting a VCR or
a
DVD
reco
rder
t
h
at
supp
ort
s Sm
a
rt
L
in
k
SmartL
ink is a direct li
nk between the
T
V
set
and a Sm
ar
tLi
nk
comp
ati
ble
VCR/
D
V
D recorder. For
m
o
re
information o
n
SmartLink, p
lease
refer
to
the in
struction
manual of your
SmartLink
VCR/D
VD recor
der.
If you use a VCR o
r a DVD recorder th
at
supp
orts SmartLink, please
connect the VCR or the DVD recorder to
the
TV u
si
ng a
Sc
art
le
ad
to
th
e
Sc
art
2/
J
or
3/
K
.
Both Scar
t
connectors
2
/
J
and
3/
K
cannot support SmartLink
at
the
same
time. I
f you
con
nect a VC
R
or a DVD
recorder to both Scart connectors, select
which Scar
t
suppo
rts
SmartLink thr
ough
the
“SmartLink
”
option in the
“F
eatures
”
menu. For details
see page
2
3
.
If
y
ou ha
ve co
nnec
te
d a dec
ode
r
o
r a Se
t To
p
Box
t
o
th
e Scar
t
3/
K
or
throu
gh a
VCR conn
ect
ed
t
o
this Sca
rt
Se
le
ct the
“
Manu
al Progra
mme
Pre
set
” o
p
tion
in
th
e
“Set
Up
” m
enu
an
d a
fte
r e
n
te
ring
in
the
“
Dec
oder
**
” opti
on,
select
“On
” (refer to page
29)
. Repeat
this
op
tion
for each scrambled signal.
**This option is
only
ava
ilable
depen
ding on the country you ha
v
e selected in the
“Country
” menu.
(MONO)
L/G/S/I
R/D/D/D
To
avo
id
snowy
pic
ture,
d
o
n
o
t
conn
ect external
eq
uip
m
en
t to
conn
ecto
rs
A
and
B
at
t
h
e
same tim
e.
8m
m/
Hi8/
DVC
cam
corder
S VHS/Hi8
/
DVC
ca
mc
or
de
r
A
B
C
K
DV
D
J
Hi-
fi
DVD recorder with
component signal format
I
D
G
H
E
Compact AV
System/Amplifier
VCR
D
ecoder
Pl
ay
St
at
io
n
2
“PlayStation
”*
Su
b woofer
F
S
S
S
continued...
Co
nnec
ting a DVD or
DVD
recor
der
Connect
the D
VD o
r the
D
V
D
recorder to the
Scart
connector
2/
J
.
Co
nnec
ting a DVD re
cor
der wit
h
576
p signal fo
rmat
Some DVD recorder may
have 576p signal
format.
In this
case,
connect
th
e DVD recorder
to
the Scar
t connector
2/
J
, to
th
e audio
input jacks
4
G
and to the
video component jacks Y
, P
B
/C
B
, P
R
/C
R
4
H
.
Using this
connection, the
TV
will record from th
e
AV
2
input
( Scart connector
2/
J
).
T
o
w
atch the
input signa
l, you
can chose fr
om
AV
2
(Scart con
nector
2/
J
) or
AV
4
(audio
input jack
s
4
G
and
video compo
nent jacks
4
H
). T
o
w
atch th
e best pict
ure
we
recommend you
select
AV
4
.
Co
nnec
ting Audio Equipmen
t to
t
h
e TV
T
o
listen
to
th
e so
un
d from
T
V
o
n
Hi-fi eq
uipm
ent.
Connect
your audio
equ
ipment
to
the aud
io ou
tput sockets
E
if
you wish
to amplify
the audio
output from the TV.
Next, using the
menu
system,
select th
e
“Sound Adju
stment
” menu and set the
“TV Speaker
s”
to "Of
f"
(see pag
e 21).
•
T
o
cont
rol the
ex
ternal speak
er
s using thi
s rem
o
te
contr
ol,
set
“Audio Output
” option
to
“V
ariable
” in
the
“Sound
Adjustment
” menu (see
page 21).
•
The
v
o
lume
of
th
e e
x
tern
al speak
ers
can be
altered
by pressing
the v
o
lu
me
b
u
ttons
on
the TV remote
control.
Th
e treble and
bass setting
can also be altered thro
ugh
the
“Sound Adjustment
” menu
(see
page 20).
Fo
r a
su
b w
o
o
fer
Connect your sub
woofer to the
5
W/G/W/G
ou
tput jack
D
using a monaural audio
cable.
T
o
e
n
joy
“
Dolby
Virtua
l”
s
o
u
n
d
e
ffect
thro
ug
h
yo
ur
a
u
d
io eq
uip
men
t
Place the
speakers of your equipment in
front
of your listening
p
o
sitio
n
and
beside
the TV set.
Then by
using
the men
u
system, select
the menu
“Sound Adjustmen
t”
. Next
set the option "
A
udio Output"
to "
V
ariable"
and the optio
n
"Sound Effect" to
"D
olby
Virtual"
(see pages 2
0
and 2
1
).
To cont
rol
the volume
level of an ext
ernal
amplifi
er
When you
connect the AV mouse and install it in an
external amplifier, you
can use
the
external amp
lifier
’s r
emo
te
control toward
the TV for
controlling
the
volume level of
the external amp
lifier. Connect the AV mo
use to
the AV
M
OUSE IN
jack
F
,
and
install it r
ight above
the external amp
lifier
’s
remote contro
l sensor.
AV
mou
se
(sup
plied)
Amplif
ier
Remote
control
sensor
Y
our si
tti
ng p
o
si
tio
n
~50
°
Hi-F
i s
p
eakers
Summary of Contents for Wega KE-P37XS1
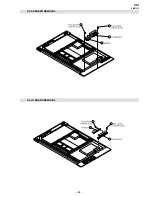
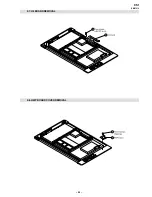
Page 22: ... 22 XS1 RM Y1010 2 3 SPEAKER REMOVAL 2 4 H1 BOARD REMOVAL 1 2 3 4 1 3 2 4 ...
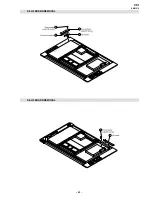
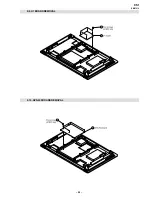
Page 23: ... 23 XS1 RM Y1010 2 5 H2 BOARD REMOVAL 2 6 H3 BOARD REMOVAL 4 1 3 2 2 1 ...
Page 24: ... 24 XS1 RM Y1010 2 7 H4 BOARD REMOVAL 2 8 HMP BOARD COVER REMOVAL 2 1 2 1 ...
Page 25: ... 25 XS1 RM Y1010 2 9 U1 BOARD REMOVAL 2 10 APS 202 BOARD REMOVAL 2 1 2 1 ...