background image

Sony Pen Tablet Overview

21

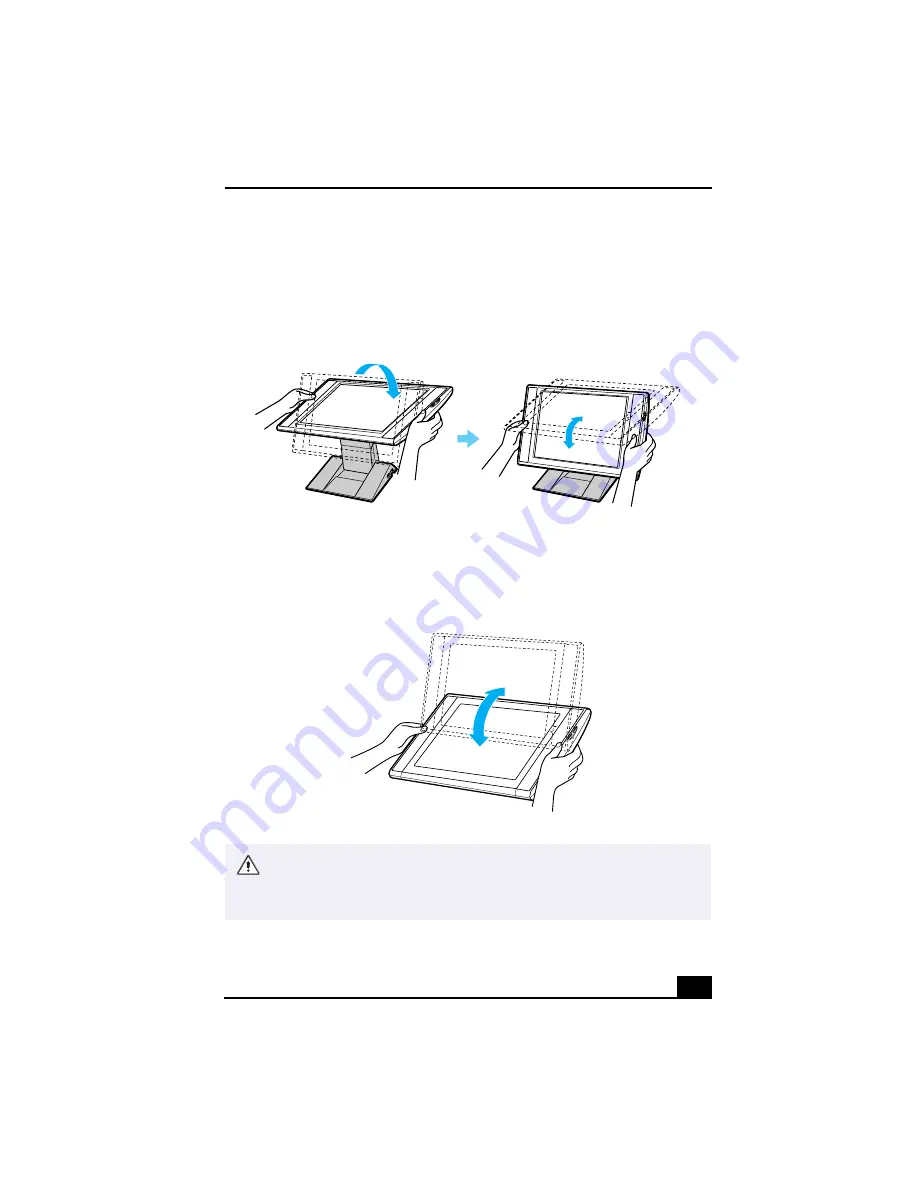
 Adjusting the Sony Pen Tablet display (TA-15A)

1

Holding both sides of the display, push the display panel out and up.

2

Set the display height so that it covers the keyboard, and adjust the screen for 
a viewing angle that allows you to work with the tablet and VAIO pen 
comfortably.

Adjusting the height and viewing angle of the display

Adjusting viewing angle

The Sony Pen Tablet operates with radio-frequency energy. This may cause 
interference with radio and television reception, if the display is not installed 
and used correctly. If your tablet is interfering in this manner, move the 
equipment away from the radio or television.

Summary of Contents for VAIO Slimtop PCV-LX900

Page 1: ...VAIO Slimtop LCD Computer User Guide PCV LX900 ...

Page 2: ...d licensed by third parties Use of such software is subject to the terms and conditions of license agreements enclosed with this product Some of the software may not be transported or used outside the United States Software specifications are subject to change without notice and may not necessarily be identical to current retail versions Updates and additions to software may require an additional ...

Page 3: ...cessible Pour prévenir tout risque d incendie ou d électrocution garder cet appareil à l abri de la pluie et de l humidité Pour prévenir tout risque d électrocution ne pas ouvrir le châssis de cet appareil et ne confier son entretien qu à une personne qualifiée Ne jamais effectuer l installation de fil modem ou téléphone durant un orage électrique Laser Output 1 0mW Read 35mW Write Wave Length 777...

Page 4: ... the Sony Service Center nearest you call 1 888 476 6972 in the United States or 1 800 961 7669 in Canada Sony Customer Support can be reached at http www sony com pcsupport Pour changer la pile de rechange veuillez contacter votre centre de service Sony le plus près Danger Radiation laser visible et invisible si ouvert Évitez l exposition directe au faisceau Avertissement L utilisation d instrume...

Page 5: ...the receiver is connected Consult the dealer or an experienced radio TV technician for help You are cautioned that any changes or modifications not expressly approved in this manual could void your authority to operate this equipment Only peripherals computer input output devices terminals printers etc that comply with FCC Class B limits may be attached to this computer product Operation with nonc...

Page 6: ... its facilities equipment operations or procedures that could affect the operations of the equipment If this happens the telephone company will provide advance notice in order for you to make the necessary modifications in order to maintain uninterrupted service If trouble is experienced with this modem for repair or warranty information please contact 1 888 4SONY PC or write to the Sony Customer ...

Page 7: ...ic device to send any message via a telephone facsimile machine unless such message clearly contains in a margin at the top or bottom of each transmitted page or on the first page of the transmission the date and time it is sent and an identification of the business other entity or individual sending the message and the telephone number of the sending machine or such business other entity or indiv...

Page 8: ...ng to the manufacturer s instructions The battery pack used in this device may present a fire or chemical burn hazard if mistreated Do not disassemble heat above 212 F 100 C or incinerate Dispose of used battery promptly Keep away from children Ne pas manipuler les batteries au lithium qui fuient ou sont endommagées Une batterie non conforme présente un danger d explosion La remplacer seulement pa...

Page 9: ... telephone interface The termination on an interface may consist of any combination of devices subject only to the requirement that the sum of the Ringer Equivalence Numbers of all the devices does not exceed 5 The Ringer Equivalence Number for this equipment is 0 7 AVIS DE L INDUSTRIE CANADA AVIS L étiquette d Industrie Canada identifie le matériel homologué Cette étiquette certifie que le matéri...

Page 10: ...signé à chaque dispositif terminal indique le nombre maximal de terminaux qui peuvent être raccordés à une interface La terminaison d une interface téléphonique peut consister en une combination de quelques dispositifs à la seule condition que la somme d indices d équivalence de la sonnerie de tous les dispositifs n excède pas 5 L indice d équivalence de la sonnerie de ce matériel est de 0 7 ...

Page 11: ...ing Memory Stick Media 31 Using PC Cards 33 VAIO Action Setup 37 Programmable Power Keys 37 Presetting i LINK devices 39 Changing the Window Design of Sony Software 40 AutoAlert E mail Notification System 41 Configuring your VAIO Slimtop LCD Computer 43 Hard Disk Drive Partition 43 Defragmenting your Hard Disk Drive 43 i LINK IEEE1394 Compatibility 44 Enabling Ethernet 46 ...

Page 12: ...s 77 Using the System Recovery CD s 77 Using the Application Recovery CD s 78 Using the Driver Recovery CD 79 Using the VAIO Support Agent 81 Using the Quick Fix Wizard 82 Using Common Solutions 83 Using Support Central 84 Software Applications protected by VAIO Support Agent 88 Troubleshooting 89 Topics 89 Notes on Use 100 For Answers to Your Software Questions 105 Resources 108 Specifications 11...

Page 13: ...es so that your arms and hands are in a relaxed comfortable position The keyboard should be directly in front of you Adjust the level of the keyboard so that your lower arms are parallel to the floor Keep your wrists in a relaxed position when you are using the keyboard not angled up or down Use the palmrest only briefly for resting While typing never use the palmrest or rest your hands on the tab...

Page 14: ...ws for access to the CD RW drive It also contains Universal Serial Bus USB and i LINK ports to connect USB devices digital equipment or other components i LINK is a trademark of Sony used only to designate that a product contains an IEEE1394 connection The i LINK connection may vary depending on the software applications operating system and i LINK compatible devices All products with an i LINK co...

Page 15: ...k drive access indicator light Lights in amber while reading and writing data from and to the hard disk 5 CD RW drive access indicator light Lights in amber while reading and writing data from and to a CD R or CD RW disc 6 Power switch and indicator light Turns on off the computer and the display The indicator light is green while the power is on and amber when the computer is in standby mode 7 Fr...

Page 16: ...o add functionality to your system 9 MEMORY STICK media slot Insert a Sony MEMORY STICK media into this slot 10 Universal Serial Bus USB port Connection for a USB device 11 i LINK 4 pin port IEEE1394 Connection for an i LINK compatible digital device such as a Sony Digital Handycam Camcorder OPEN CLOSE MEMORY STICK MEMORY STICK USB i LINK S400 HD PC CARD DISC ...

Page 17: ...icons on the back panel help locate and identify the ports on your computer Locating Ports Back Panel 1 AC Input port Connection for the supplied power cord 2 T Lever A handle that is used to remove the unit s cover 3 Monitor port Connection for a standard CRT display MONITOR MIC PHONES NETWORK USB LINE IN i LINK S400 LCD LINE PHONE USB ...

Page 18: ... Pen Tablet Note Do not connect any other display to this port 11 Line jack Connection for the supplied modem cable to the wall jack 12 Telephone cable jack Connection for the phone cable to the computer 13 Universal Serial Bus USB port Connection for a USB device i LINK is a trademark of Sony used only to designate that a product contains an IEEE1394 connection The i LINK connection may vary depe...

Page 19: ... that controls the movement of the cursor on the surface of the tablet screen The pen stand pen tip replacements and pen tip removing tool help you protect and care for your VAIO Pen Place the VAIO Pen in the supplied pen stand when it is not in use to maintain the sensitivity of the pen tip and to avoid interference with other pointing devices such as your mouse Sony Pen Tablet and accessories So...

Page 20: ...light Light turns red to alert the user to activities such as the arrival of e mail See AutoAlert E mail Notification System 3 Brightness control Adjusts the brightness of the screen 4 Volume control Adjusts the volume of the integrated speakers on the LCD display 5 PS 2 mouse port Connection for a mouse 6 Universal Serial Bus USB port Connection for a USB device 7 PS 2 keyboard port Connection fo...

Page 21: ... viewing angle that allows you to work with the tablet and VAIO pen comfortably Adjusting the height and viewing angle of the display Adjusting viewing angle The Sony Pen Tablet operates with radio frequency energy This may cause interference with radio and television reception if the display is not installed and used correctly If your tablet is interfering in this manner move the equipment away f...

Page 22: ...without touching the pen tip to the tablet surface The upper lower switch positions and eraser can be programmed to perform different functions See the Sony Pen Tablet online help for more information on VAIO Pen settings VAIO Pen 1 Eraser Delete unwanted portions of your work depending on the application in use 2 Upper switch position The upper side of the rocker switch is set to deliver a double...

Page 23: ... position of the pen s rocker switch Dragging Point to and select an object by pressing the pen to the pen tablet screen Slide the pen tip across the tablet to move the object to the desired location To select text point to the beginning of the text and then drag the pen across the tablet until all of the desired text is highlighted To replace the Pen tip Your VAIO Pen is supplied with pen tip rep...

Page 24: ...tons tab click the drop down list for the pen function you wish to change Select the desired function for the pen tip eraser or the upper lower switch positions Sony Tablet Properties main window Function Description Left Click Single click of the left mouse button Left Double Click Double click of the left mouse button Right Click Single click of the right mouse button Middle Click Clicking the c...

Page 25: ...rms a programmed keystroke Modifier Operates as the Shift Alt or Ctrl key as programmed Ignored No function is assigned The Left Click function is assigned by default to the pen tip Before you change the pen tip setting to perform a different function assign the Left Click function to another switch Sony suggests assigning the Left Click function to the pen tip when using the pen with drawing appl...

Page 26: ...efully than the pen s current settings the Click button changes color 4 Adjust the pen tip pressure feel by sliding the measurement to a desired level The pressure settings range from Soft which requires light pressure to Firm which requires more forceful pressure 5 Click on the More Options button if you wish to make a more in depth adjustment to the pen tip pressure feel 6 Click Apply The new ti...

Page 27: ... You can also manually change Set Double Click Speed by moving the measurement to a desired speed 5 You may test your double click speed and distance settings by tapping twice on in the Test area If your tapping matches the current double click settings the button icon changes to indicate a successful test If the icon does not change after several tests review your double click speed and distance ...

Page 28: ...n the Erase here Test area The erased area changes color when you are erasing more forcefully than the current setting 4 Adjust the eraser pressure feel by sliding the measurement to a desired position The pressure settings range from Soft which requires light pressure to Firm which requires more forceful pressure 5 Click on the More Options button if you wish to make a more in depth adjustment to...

Page 29: ...the onscreen cursor position You can execute a predetermined operation by selecting settings from the pop up menu For more information on configuring Pop up menus see the Sony Tablet online help You can reset your eraser pressure feel to the factory default settings by using the Reset Tab to Default button You can revert to previously saved eraser pressure feel levels by using the Revert tab Pop u...

Page 30: ...g box appears 2 Click OK To create custom settings for an application 1 Select a software application from the Applications with Customized Tool Settings list 2 Customize the pen settings for each software application according to the software s features The settings apply only to the selected application 3 Click Apply To remove an application from the custom settings list 1 Click on the Remove me...

Page 31: ...changes Memory Stick media contains a write protect tab The write protect tab prevents accidental changes to information recorded on your Memory Stick media When you slide the write protect tab to the LOCK position your Memory Stick media is write protected This means that you cannot delete copy or save information on the media When you slide the tab to the un LOCK position you can write to or mod...

Page 32: ...e the way the computer responds when a Memory Stick media is inserted You can change the way your system responds by changing the options on the Memory Stick tab in the PPK Setup utility Locking the Memory Stick Media LOCK LOCK LOCK To unlock To lock ...

Page 33: ...nsert a PC card 1 Slide front panel cover in the direction of arrow as shown in picture to open it 2 Insert the PC card into the PC card slot until it clicks into position You do not need to shut down your computer when inserting a PC card Opening the front panel Inserting a PC card Insert with card facing this direction ...

Page 34: ...ck OK When the PC card is inserted correctly the eject button pops out If the card does not insert easily make sure the card is not being inserted upside down or backwards Carefully reinsert the card into the slot but do not force it in See the manual that came with the PC card for details on using it If the eject button is extended fold the button down onto the computer before closing the front p...

Page 35: ...button on the front panel of the system unit You may need to extend the eject button out from the computer before you can eject the card 5 When the PC card ejects from the PC card slot remove it by holding the edges and pulling it out carefully ...

Page 36: ...VAIO Slimtop LCD Computer User Guide 36 ...

Page 37: ...ications quickly Each Programmable Power Key PPK on your VAIO Convertible keyboard is programmed to launch a preset application with a single press of the key If you wish you can use VAIO Action Setup to change the PPK functions The Programmable Power Keys are located at the right side of your keyboard and are numbered P1 through P4 The keys work even when the computer is turned off Pressing one o...

Page 38: ...splays the application you have selected Click Next 5 The Input Application Name window appears You can type a new name and description if desired Click Finish Internal Timer The VAIO Action Setup software allows you to set your computer s internal timer to launch certain applications automatically You can also double click in the Windows taskbar to open VAIO Action Setup You may also use the drag...

Page 39: ...he device name click the current device name in the list box and click Modify device name 9 Type the desired name and click Apply 10 To assign an application click Modify The Select Application dialog box appears 11 Select the desired application and click Next i LINK is a trademark of Sony used only to designate that a product contains an IEEE1394 connection The i LINK connection may vary dependi...

Page 40: ...nging the Window Design of Sony Software To change the window design 1 From the Start menu point to Settings and then click on Control Panel 2 Click UI Design Selector 3 Click or and select the desired design 4 Click Apply 5 The UI Design Selector window design changes The window design for your Sony software will match the UI Design Selector window 6 To try another selection click or and then cli...

Page 41: ...pported by the preconfigured e mail applications listed in the VAIO Action Setup utility AutoAlert E mail Notification System Software Restrictions If you use software that requires use of a phone line The computer may not be able to disconnect the phone line due to communication and server conditions Monitor the status of the software when running the AutoAlert E mail Notification System and manu...

Page 42: ...ess select the Dial automatically setting in your Microsoft Outlook Express software To adjust this setting 1 Start Outlook Express 2 Click Tools and then select Options 3 From the drop down box select Connect even when working offline 4 Click OK 5 Click Send Receive A dial up connection window appears Select the desired ISP and then click Connect Automatically ...

Page 43: ...in optimum DVgate performance you should defragment your D partition regularly Defragmenting your Hard Disk Drive If you encounter frame dropping while recording digital video onto your hard disk drive defragmentation may be necessary To defragment your hard disk drive 1 Deactivate your screen saver if applicable 2 From the Start menu point to Programs point to Accessories point to System Tools an...

Page 44: ...n be purchased from your local retailer or by contacting Sony VAIO Direct Web site http vaio sonystyle com or by calling 1 888 315 7669 toll free i LINK is a trademark of Sony used only to designate that a product contains an IEEE1394 connection The i LINK connection may vary depending on the software applications operating system and i LINK compatible devices All products with an i LINK connectio...

Page 45: ...LINK cable into this port Connecting an i LINK IEEE1394 device The i LINK communication standard that is available in the Windows Me operating system is not compatible with the Sony VX1000 camcorder See the manual that came with your i LINK equipped device for more information on installation and use i LINK cable optional ...

Page 46: ...k the Device Manager tab 3 Select SiS 900 PCI Fast Ethernet Adapter under the Network Adapters category 4 Click Properties 5 Click Enable Device and then click OK 6 Click Close Warning Your computer has a protective sticker next to the Ethernet port located on the rear panel Connect only 10Base T and 100Base TX cables to the Ethernet port Using other cables or a telephone cable may result in an el...

Page 47: ...for audio video playback Media Bar software handles all common computer multimedia formats and controls certain Sony devices Media Bar software encompasses audio video library cataloging and playlist management in addition to digital video quality control and effects features Media Bar seamlessly integrates a variety of new media formats with an easy to use software interface MovieShaker Sony Elec...

Page 48: ...aptures use DVgate VisualFlow Sony Electronics Inc VisualFlow is a state of the art Sony multimedia browser designed specifically for Memory Stick media It displays any still picture movie or sound files stored in a Memory Stick media in a visually pleasing artistic manner VisualFlow not only plays a selected movie or sound file but also enables playback of files by other applications like Picture...

Page 49: ...till images and music files and then saved in a format compatible with most computers Importing Images and Sound Clips 1 Click File Import or DV Import 2 Find the file you want to add 3 Select the file 4 Click Open The file is added to the Clip tray Main Window Importing lengthy image or sound files may cause the MovieShaker software to stop responding Clip tray Working Panel Product tray Editing ...

Page 50: ...g a face in the Shaker tray 3 Click A thirty second scene is automatically generated and saved to the Product tray 4 To preview switch the Work Panel to Product tray mode and press play Shaker tray Scenes created with Shaker begin with a black frame and after processing are placed in the first available slot on the Product tray Limit the number of scenes placed on the Product tray to 5 or less Mov...

Page 51: ...ing Panel 2 Select the Effects tab from the Editing tray 3 Drag the Effect you want to add from the Effects tray to the Effects palette on the Working Panel 4 See Help for instructions on adjusting effect duration and replaying clips and scenes Working Panel To preview an Effect click the Play button on the Working panel window Your clip plays the new effect on the Effect tray monitor Sound Color ...

Page 52: ... 2 Click Export 3 Select the format in which you want the document to be saved 4 Click Next 5 Locate the folder to which you want the file saved 6 Name the file 7 Click Save Exporting movies may take a long time to complete Save movie as DV Digital Video takes the longest and Quick Save is the fastest MovieShaker software can play AVI files up to 65 MB in length ...

Page 53: ...r tab and browse to locate your pictures 2 Select the pictures you want to have in a collection 3 From Collection menu select Create New Collection 4 Enter a name for the collection and then click OK Creating a Photo Album 1 Select the pictures you want to use to make an album 2 From the Utilities menu select Album Maker 3 Choose the type of Album you want and click OK 4 Now add more pictures fram...

Page 54: ... 3 From the Utilities menu select Panorama Maker 4 Select the correct lens and click Okay If 35mm lens is selected the prompt does not appear To select a different lens click on the lens icon 5 Click the panoramic icon near the bottom of the window 6 Click Full Stitch Making Still Images and Panoramic from MPEG 1 Select the MPEG file 2 From the Movie Sound menu select Scene Break Down 3 Then selec...

Page 55: ...c Distribution EMD Services EMD allows you to download music files via the Internet To use Internet services that are compatible with OpenMG Jukebox you need Access to the Internet from your computer Sign up with an Internet Service Provider ISP and configure your computer for Internet access before using EMD services An EMD service provider Consult the provider for information about service Your ...

Page 56: ... onscreen instructions to complete registration 2 When you have registered with CDDB the Set OpenMG Jukebox as the Application for playing Audio CD dialog box appears You can set OpenMG Jukebox as the default application for playing audio CDs by selecting the appropriate checkbox 3 Click OK The OpenMG Jukebox window appears To register with CDDB you need Internet access from your computer For more...

Page 57: ...ly connect to Web site 2 Player control buttons Controls playback functions such as play pause stop fast forward and reverse 6 File list view Displays the contents of the folder selected in the file tree view 3 Playlist drop down list Displays available playlists and audio files of the current feature tab 7 Tutorial tab Opens and closes the Tutorial feature 4 File tree view Displays the folders av...

Page 58: ... want to record You can clear all selected tracks by clicking in the empty checkbox next to Select All and then select the tracks you want to record 5 Click Rec to Jukebox to begin recording When the recording is finished the new playlist appears in the File tree view of the Playlist window You can change to this feature view by clicking on the Playlist tab When you record from an audio CD on your...

Page 59: ... information on using 2 step mode see Changing the check in check out settings in the OpenMG Jukebox Help menu Check out 1 Connect the external device or insert the media into your computer 2 Click on the Check in Out tab to display the Check in Out tab window Your computer automatically recognizes the connected external device or media and lists the content information in a new panel on the right...

Page 60: ...gnizes the connected external device or media and lists the content information in a new panel on the right side of the Check in Out tab window 3 Select the song to be checked in from the song list of the external device or media To check in more than one song at a time hold down the Ctrl key and click on the additional songs 4 Click In or drag the song s to the Playlist view panel If you want to ...

Page 61: ... with the Microsoft Windows Media Technologies WMT standard identified by asf or wma extensions Manage your audio files through the Playlist feature of OpenMG Jukebox 2 0 Manage imported songs on the Playlist Additional features are available when you register your imported songs through the Playlist feature of OpenMG Jukebox You can manage your music by creating your own list of songs categorized...

Page 62: ...product contains an IEEE1394 connection The i LINK connection may vary depending on the software applications operating system and i LINK compatible devices All products with an i LINK connection may not communicate with each other Please refer to the documentation that came with your i LINK compatible device for information on operating conditions and proper connection Before connecting i LINK co...

Page 63: ...n select different characteristics for the Capture button when capturing a Net Movie 3 Options button Displays the configuration options available for either Still or Net Movie mode 7 Application Switch drop down list Switches between the Still image and Net movie modes using a drop down list 4 Effects button Displays the special effects that you can apply to your pictures or video clips 8 Image w...

Page 64: ...imer or Panorama Capture modes Image Size Select the image size horizontal by vertical in pixels Image Quality Set the quality of your pictures as they are being saved by selecting Fine Standard or Economy image quality Destination Select a file destination for your pictures 5 Click on the Effects button to select a special image effect The Effect Setting window appears Use the drop down list to v...

Page 65: ...VAIO AV Applications 65 Effect Setting window You can use a different special effect for each picture or you can remove all special effects by clicking on the No Effects button ...

Page 66: ...ime 2 Click on the arrows or drag the scroll bar to view the pictures As each image is captured it displays in the Still Viewer window with a balloon for your comments and an identifying number in the viewer s queue Managing pictures in Still mode From the Still Viewer window you can perform various functions using the task buttons Delete Discard any or all of your still images by clicking on the ...

Page 67: ...ave button to save your still image in a variety of formats to a location of your choice Using Net Movie mode 1 From the Start button on the Windows taskbar point to Programs point to Smart Capture and then click on Smart Capture The Smart Capture main window appears 2 Connect your i LINK compatible digital camcorder to your computer with an i LINK cable An image appears in the Smart Capture main ...

Page 68: ...tion for your movies when recording video clips Capture Button Set the characteristics of the Capture button You can start and stop recording by pressing the Capture button this is the default characteristic You can select Anti Ground Shooting which allows recording to occur only while the Capture button is pressed Recording will stop when you release the button 5 Click on the Effects button to se...

Page 69: ...nd the first frame of your movie appears in the Movie Player window You can record a movie for approximately thirty seconds The Movie Player feature will automatically stop recording when this time limit is reached 3 You can review your movie from the Movie Player window by using the play pause and stop buttons Click on the arrows or drag the scroll bar to view your movie Each frame is displayed w...

Page 70: ...es with a new message window containing the movie Save Click on the Save button to compress and save your movie in a variety of formats to a location of your choice Using ImageStation ImageStation is a free online service that allows you to store your pictures and movies on the Internet to share with family and friends ImageStation requires an Internet connection and registration for the Web based...

Page 71: ...Station Login window appears See steps 2 4 in the next section Uploading with Still Viewer for further uploading information Uploading with Still Viewer 1 Click on the Upload button in Still Viewer The ImageStation Login window appears Compression Settings when Uploading window ImageStation Login window ...

Page 72: ...ovies to the ImageStation Web site The Image Uploader windows displays your Internet connection and upload status Click on to see thumbnail previews of your pictures or movies 4 Go to http www imagestation com to view your uploaded pictures or movies Follow the onscreen instructions to access your ImageStation account The ImageStation Web site may ask you to complete a full login again if your cur...

Page 73: ...he main toolbar to select a sorting method 4 Placing your cursor on the left end of the main toolbar activates the current Memory Stick properties 5 Placing your cursor on the right end of the main toolbar activates a secondary toolbar with more functions 6 Click on an image to show a normal view centered on the screen Double clicking an image shows an enlarged view 7 The movie file starts playbac...

Page 74: ... modes on the same tape You should perform a separate capture for each audio mode you wish to use DVgate software does not support hard disk compression You should not use disk compression if you are planning to work with DVgate Title data is saved in the flash memory of a digital video camera and is not transferred to tape by DVgate software To avoid interruption of capture sessions you should di...

Page 75: ... you have AVI files that use different audio modes they cannot be recorded at the same time but must be recorded separately Do not attempt to work with AVI files that are smaller than 4 MB DVgate software does not support hard disk compression Do not use disk compression if you are planning to work with DVgate In order to maximize recording capabilities video and audio data are not available while...

Page 76: ...VAIO Slimtop LCD Computer User Guide 76 ...

Page 77: ...ram allows you to reinstall individual device drivers Use it to restore corrupted or erased files Using the System Recovery CD s You can reinstall software titles that shipped with your computer if they become corrupted or are erased You may not need to recover the entire contents of your hard drive If you experience a problem with your computer reinstalling a software title may correct the proble...

Page 78: ...ith your computer or software application You may not need to reinstall the entire contents of your hard drive You need to complete the Windows registration process when you use the System Recovery CD s The System Recovery utility boots from the CD RW drive It must be in the drive when you turn on the computer Your system may include one or more System Recovery CDs If you have more than one System...

Page 79: ...ased You can reinstall an individual driver to correct a problem that you are experiencing with your computer hardware or software application VAIO Support Agent an application repair utility uses a vault feature on the Driver Recovery CD during its software healing process You must be in Windows to run the Driver Recovery CD utility If you need to reinstall all the software titles that shipped wi...

Page 80: ... drive Use My Computer or Windows Explorer to view the contents of the Driver Recovery CD Select the appropriate driver To repair software applications using VAIO Support Agent The Driver Recovery CD utility has an information vault that contains the original characteristics for the preinstalled software applications that are protected by VAIO Support Agent See Using the VAIO Support Agent for ins...

Page 81: ...tion and operating system components These diagnostics protect and store information in a retrievable format that allows you to restore your software to a previous working state The software and operating system items you can fix are those identified by Sony as protected by VAIO Support Agent VAIO Support Agent has three features to help you fix your software problems Quick Fix Wizard Common Solut...

Page 82: ...izard button 2 When the Welcome screen appears click Next 3 If you know which software is causing the problem click Diagnose and fix my software If you are unsure of what is causing the problem click Diagnose and fix problems in the following area and select the items you want VAIO Support Agent to examine 4 Click Next to continue 5 Follow the instructions on the screen Quick Fix Wizard Begin Supp...

Page 83: ...nd Frequently Asked Questions FAQs You can run One Click Fixes directly from VAIO Support Agent or from a web browser 1 Click the Common Solutions button 2 Click the arrows next to the SupportAction categories to expand and collapse the list 3 Select a SupportAction from the list 4 Click Run or double click the selected SupportAction Common Solutions Browse for SupportActions screen You cannot und...

Page 84: ...ntral also lets you contact live support agents for additional information and interaction 1 Connect to the Internet 2 Click Support Central The Support Central Welcome page appears 3 The Welcome page displays the available security levels for your current Support Central session Select the desired security option and then click Enter Portal 4 First time users will be asked to register with Suppor...

Page 85: ...plays allowing you to continue working on your open issues or to close them if you are finished Support Central retains your registration information so you are only required to register once If you log on to your computer with a different user name or have recovered your system using the System Recovery CDs Support Central may require another registration Support Central Registration ...

Page 86: ...CD Computer User Guide 86 6 When you log on to Support Central with a new issue or if you do not have any open issues the Support Wizard appears You can begin searching on the new issue Support Central Current Issues ...

Page 87: ...Using the VAIO Support Agent 87 Support Central Support Wizard For more information on using VAIO Support Agent see the online help ...

Page 88: ...work settings and modem settings are protected by the VAIO Support Agent utility Utilities VAIO Action Setup Applications Adobe PhotoDeluxe Home Edition Adobe Premiere LE DVgate PictureGear MovieShaker Media Bar OpenMG Jukebox Sound Forge XP Direct CD Easy CD Creator The VAIO Support Agent utility may ask you to use the Driver Recovery CD during the healing process ...

Page 89: ...ke sure the power strip or UPS is turned on and working Check that the display is plugged into a power source and turned on Check that the brightness and contrast controls are adjusted correctly See the manual that came with your display for details Check that the computer is not in standby mode Topic My computer or software program stops responding 1 Press Ctrl Alt Delete to close the application...

Page 90: ...operating system may not shut down properly for many reasons including incompatible or conflicting drivers damaged files or non responsive hardware For troubleshooting information you can search Windows Help 1 From the Start menu select Help Microsoft Help and Support appears 2 Click on Troubleshooting and continue clicking on the subject s for which you want information 3 When you find the approp...

Page 91: ...an appropriate cleaner Topic I want to play a CD with my Microsoft CD Player When you insert a music CD the Sony Media Bar automatically launches to play your CD When the Sony Media Bar is running the Microsoft CD Player does not have access to the CD Close Media Bar to use the Microsoft CD Player If you do not hear any music check all your volume controls Topic When I click an application icon a ...

Page 92: ...CD Drive Properties The CD Drive Properties dialog box appears 4 At the Write Speed drop down list select 2x or 4 x 5 Click Close Topic How do I change the video resolution of my display 1 From the Start menu select Settings Control Panel 2 Click the Display icon and select the Settings tab 3 Move the Display area slider to change the resolution 4 Click OK Topic The cursor on my Sony Pen Tablet di...

Page 93: ...ndby or Suspend modes your VAIO Pen or Sony Pen Tablet settings may change These symptoms and their solutions are listed as follows If the VAIO Pen does not move the cursor or the Rocker switch does not work you must restart your computer Save all open documents and close all open applications with your mouse before you restart your computer If the tablet mouse UD cursor appears to be the default ...

Page 94: ...our phone company check that your phone line is free from any line noise If your problem is fax related check that there are no problems with the fax machine you are calling and that it is compatible with fax modems For optimum performance ensure you are calling an Internet Service Provider number that is V 90 compliant If you are having a problem connecting with your Internet Service Provider che...

Page 95: ...r icon on your desktop 2 Click Control Panel and then click Modems 3 Click Dialing Properties 4 Select the Tone dial or Pulse dial option next to Dial using 5 Click OK Topic My microphone does not work Check that the microphone is plugged into the MIC jack Topic My microphone is too sensitive to background noise If you find there is too much background noise when you record sound you should adjust...

Page 96: ...Turn off your computer and turn the mouse upside down 2 Remove the mouse ball cover on the back of the mouse by turning clockwise the ring that covers the mouse ball 3 Turn the mouse upright and drop the mouse ball into your hand 4 Using a piece of tape remove any dust or dirt on the mouse ball and inside the mouse ball socket 5 Return the mouse ball to the socket and replace the mouse ball cover ...

Page 97: ... please see the online manual Upgrading and Maintaining Your Slimtop LCD Computer Topic My i LINK device does not appear on the desktop 1 Turn off and disconnect your device 2 Reconnect your device 3 Then turn on the power Topic My connected printer doesn t function after the computer resumes from a power saving mode When this occurs follow the procedures below to reset the printer connection 1 Ri...

Page 98: ...manufacturer s website for the latest drivers for Windows Me before proceeding Some printers do not function properly without updated drivers for Windows Me If the printer has a USB connection do not follow the steps below Contact the manufacturer of your printer for updates or other information that will resolve the problem If the printer is not included in the list and the printer manufacturer i...

Page 99: ... as the default printer 8 Click Next 9 Click No and then click Finish To Reach Sony For Sony PC Support call 1 888 4SONYPC 1 888 476 6972 or access the Web site at http www sony com pcsupport If prompted for a path to the windows files use C Windows Options Cabs ...

Page 100: ...t the time of connection Do not share the AC outlet with any other power consuming equipment such as copying machines or shredders You can purchase a power strip with a surge protector This device prevents damage to your computer caused by sudden power surges such as those that may occur during an electrical storm If you live in an area that experiences frequent power fluctuations you may want to ...

Page 101: ...ed lithium batteries to your nearest Sony Service Center or Factory Service Center For the Sony Service Center nearest you call 1 888 4SONY PC 1 888 476 6972 On Handling the Computer System Do not place your Sony computer in a location subject to Heat sources such as radiators or air ducts Direct sunlight Excessive dust Mechanical vibration or shock Strong magnets or speakers that are not magnetic...

Page 102: ...er uses high frequency radio signals and may cause interference to radio or TV reception Should this occur relocate the computer a suitable distance away from the set Use only specified peripheral equipment and interface cables otherwise problems may result Do not use cut or damaged connection cables Always switch the power off before connecting your computer to peripheral equipment otherwise dama...

Page 103: ...limtop LCD Computer Failure to do so may result in personal injury or equipment damage Electrostatic discharge ESD can damage disk drives add in cards and other components Follow the procedures described in the online manual Upgrading and Maintaining Your Slimtop LCD Computer only at an ESD workstation If such a station is not available do not work in a carpeted area and do not handle materials th...

Page 104: ...t other objects The Sony Pen Tablet display uses high frequency radio signals and may cause interference to radio or TV reception Should this occur relocate the computer a suitable distance away from the radio or TV On Handling a CRT Display Do not place the display near a strong magnetic force Do not block the ventilation slots on the display On Using the Hard Disk Drive Do not place the computer...

Page 105: ...al cleaning hold the disc by its edge and use a soft cloth to wipe the surface from the center out If the disc is badly soiled moisten a soft cloth with water wring it out well and use it to wipe the surface of the disc from the center out Wipe off any remaining moisture with a dry soft cloth For Answers to Your Software Questions Sony Service Center For the Sony Service Center nearest you call 1 ...

Page 106: ...b site http www compuserve com phone 800 848 8990 hours M F 8 AM 1 AM Sat Sun 10 AM 10 PM Web site http www adaptec com phone 408 945 8600 hours M F 8AM 5 PM PT Web site http help earthlink net techsupport phone 800 395 8410 e mail support earthlink net hours 7 days a week 24 hours a day Web site http support mcafee com phone 408 988 3832 e mail cybr nai com hours M F 9 AM 5 PM CT Web site http he...

Page 107: ...T Web site http www intuit com support phone 900 555 4688 hours 7 days a week 24 hours a day Web site http www sony com pcsupport phone 888 4SONYPC 888 476 6972 Support from 1 888 4SONYPC is free of charge for 90 days after the original date of purchase hours 7 days a week 24 hours a day Web site http www sonicfoundry com support phone 608 256 5555 fax 608 256 7300 e mail support sonicfoundry com ...

Page 108: ...he desired document Manuals and online help files that may accompany your preinstalled software Most manuals for preinstalled software are located on your hard disk drive as online help files You can access online help files from the Help menu in a specific application A printed manual is available for some applications VAIO Support Agent VAIO Support Agent can be accessed from the Windows desktop...

Page 109: ...d service call 1 888 4SONYPC 1 888 476 6972 Requires a fax machine or fax software Software Updates You can download the latest software updates and software patches for your Sony computer by selecting Software Updates on the Sony PC Support web page at http www sony com pcsupport VAIO System Reference Manual Provides detailed technical information about your computer s hardware This document is a...

Page 110: ...VAIO Slimtop LCD Computer User Guide 110 ...

Page 111: ...x CD R reading 4X max CD RW writing 20X max CD RW reading Modem Lucent 1648 technology V 90 compatible data fax modem REN 0 7 Expansion Capabilities PCI slots 2 Connection Capabilities Front PC card slot Card bus support USB port Memory Stick media slot i LINK 4 pin port Connection Capabilities Rear USB ports 3 Modem line jack RJ 11 Phone line jack RJ 11 CRT display Sony Pen Tablet display Line In...

Page 112: ...or internal clock speed other factors may affect application performance 128 MB available 16 MB allocated to video RAM The CD RW CD R CD ROM data transfer standard 1X rate is 150 kbytes s Data on a CD RW is read at a variable transfer rate ranging from 8X at the innermost track to 20X at the outermost track The average data transfer rate is 14X 2100 kbytes s Data on a CD R CD ROM is read at a vari...

Page 113: ...e 15 CD RW drive troubleshooting 90 cleaning computer 101 mouse 96 computer adjusting voltage settings 100 cleaning 101 condensation and 103 disposing of battery 101 lithium battery 8 removing cover 100 starting problems with 89 turning off your computer 100 upgrading 103 customer assistance support options 108 D digital video camera recorder using 74 disconnecting power cords 100 diskettes handli...

Page 114: ... i LINK port 16 18 Information LED on LCD 20 input devices setting up 13 installing additional hardware precaution 101 interference 102 104 K keyboard 13 troubleshooting 96 L launching applications problems with 91 LCD adjusting 21 port 18 line jack 18 lithium battery disposal 8 safety precautions 8 locations choosing 13 losing power 100 lower switch position on VAIO Pen 22 M Media Bar 47 Memory S...

Page 115: ...s 102 printer 18 PS 2 keyboard 20 PS 2 mouse 20 Universal Serial Bus USB 16 18 20 ports locating 17 power cords 100 disconnecting 100 power fluctuations or loss 100 power indicator on LCD 20 power source precautions 100 101 printer port 18 problem solving 89 Programmable Power Keys PPK using 37 PS 2 keyboard port 20 PS 2 mouse port 20 R radio interference 102 104 reducing glare 14 removing compute...

Page 116: ...hone cable jack 18 telephone jack 18 troubleshooting 89 turning on your computer problems with 89 TV interference 102 104 U Universal Serial Bus USB port 16 18 20 upgrading your computer 103 upper switch position on VAIO Pen 22 UPS Uninterrupted Power Supply 100 V VAIO Action Setup 37 VAIO AV Applications 47 VAIO Pen 22 VAIO Support Agent 81 ventilation 13 102 viewing the taskbar problems with 97 ...

Reviews: