background image

3.

Restart your computer by clicking 

Start

Turn Off Computer

, and 

Restart

. If the 

New Hardware Wizard

appears, follow the on-screen instructions. 

4.

Make sure the computer recognizes the printer. Follow these steps: 

Click 

Start

Control Panel

Printers and Other Hardware

, and then 

Printers and Faxes

.

If the computer recognizes the printer, it will be listed in the 

Printers and Other Hardware 

window.

If the computer does not recognize the printer, you may need to install the printer driver software. See
the guide that accompanied the printer for more information. 


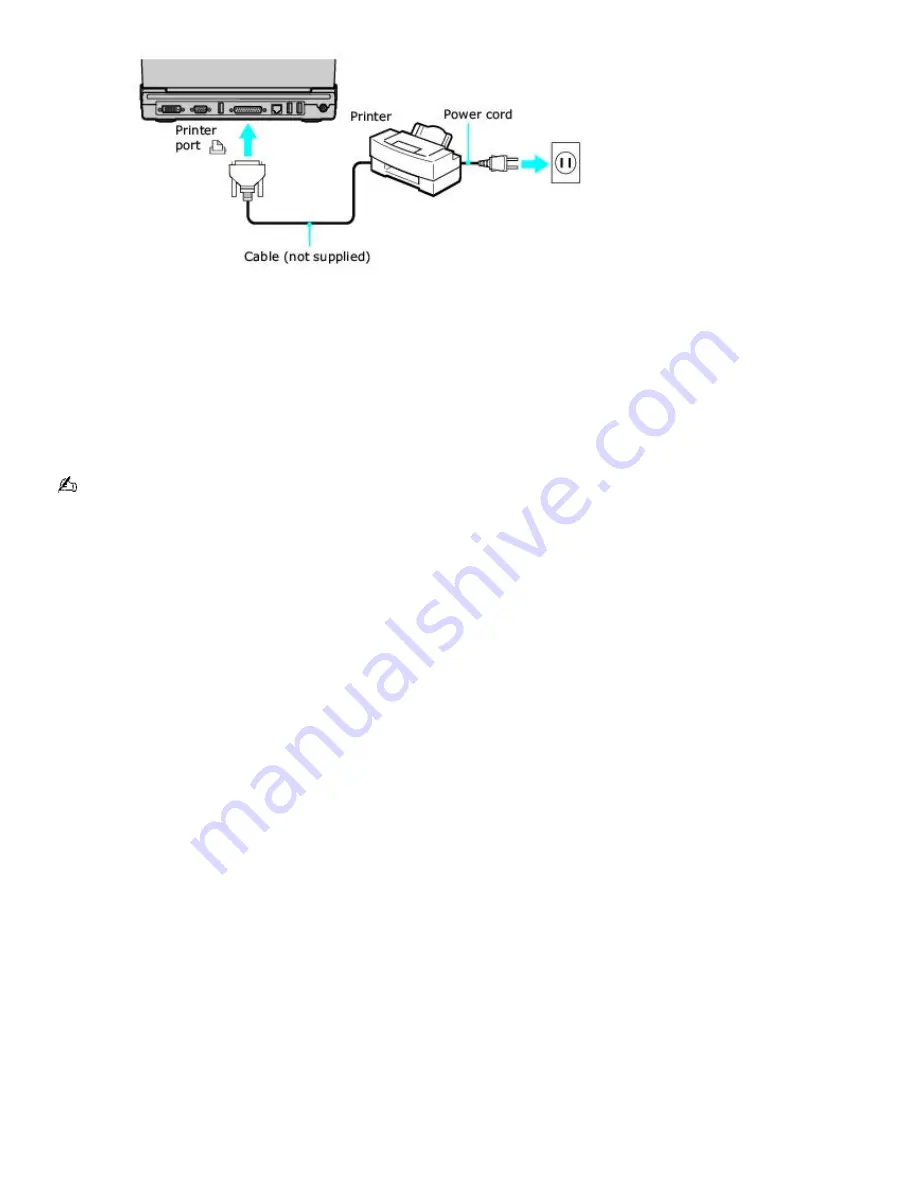
 See the guide that accompanied the printer for more information on its installation and use. 

Page  62

Summary of Contents for VAIO PCG-V505DXP

Page 1: ...n the left navigation window click the topics you want to learn more about and that information will be displayed in this main window View the Electronic Flyer which provides updates and supplemental information about your computer Go to the Sony Computing Support Site to view the VAIO Computer Specifications which list your computer s hardware specifications and preinstalled software information ...

Page 2: ...Caring for Your Computer This section provides information on how to safely use your Sony computer Page 2 ...

Page 3: ... on the floor A footrest may make you more comfortable Sit in a relaxed upright posture and avoid slouching forward or leaning far backward Viewing angle of the computer s display Tilt the display to find the best viewing angle Also try adjusting the brightness setting of the display Following these suggestions can reduce eye strain and muscle fatigue Lighting Choose a location where windows and l...

Page 4: ...ent internal heat buildup Do not place your computer on porous surfaces such as rugs or blankets or near materials such as curtains or draperies that may block ventilation Leave a space of at least 8 inches 20 cm behind the back of the computer If the computer is brought directly from a cold location to a warm one moisture may condense inside your computer In this case allow at least one hour befo...

Page 5: ...ny makes a service call to your home or office and determines that your computer is responsible for a problem the telephone company may bill you for the service call Also if you do not disconnect your computer when it is adversely affecting a telephone line the telephone company has the right to disconnect your service until you correct the problem Page 5 ...

Page 6: ... use canned compressed air specifically for computers to remove dust If a solid object falls onto the computer or a liquid leaks into the computer immediately turn off and unplug the computer It is best to have the computer checked by qualified personnel before you use it again Avoid rubbing the LCD screen as this can damage the screen Use a soft dry cloth to wipe the LCD screen or canned compress...

Page 7: ...e screen This is not a malfunction When the computer returns to normal temperature the screen returns to normal The screen becomes warm during operation This is normal and does not indicate a malfunction The LCD is manufactured using high precision technology You may however see tiny black points and or bright points red blue or green that continuously appear on the LCD This is a normal result of ...

Page 8: ...ry and an AC adapter This chapter explains how to install and use these supplied accessories to power your computer It also describes ways you can efficiently utilize the battery as a power source Using AC Power Using the Battery Conserving Battery Power Page 8 ...

Page 9: ... computer immediately use the supplied AC adapter as the power source While the computer uses AC power it automatically charges the battery if it is inserted See Using the Battery for more information on installing and using your battery Connecting the AC adapter Turning on the computer Page 9 ...

Page 10: ...connect the AC adapter 1 Plug the AC adapter cable into the DC IN port Connecting the AC Adapter to the Computer 2 Plug the power cord into the AC adapter and an AC outlet Use only the supplied AC adapter with your computer Page 10 ...

Page 11: ...ower switch to the right until the power indicator turns on Turning on the Computer If you slide and hold the power switch the computer turns off 3 If the computer screen is too dark or too bright follow these steps to adjust the brightness To increase brightness press the Fn and F5 keys and then press the Up Arrow or the Right Arrow key To decrease brightness press the Fn and F5 keys and then pre...

Page 12: ...g battery information Charging a battery Notes on batteries Frequently asked questions When operating your computer on battery power your computer s CPU speed is reduced The battery that comes with your computer is not fully charged at the time of purchase The brightness of your computer screen automatically dims when you switch from AC power to battery power To increase the brightness press the F...

Page 13: ...Slide the LOCK UNLOCK switch into the LOCK position If a port replicator is attached to your computer do not insert or remove the battery Lifting and turning the computer with the port replicator attached could cause a temporary loss of power Some programs and peripheral devices prevent the system from automatically entering Hibernate mode If you are using battery power save your data frequently t...

Page 14: ...puter is on or off If the computer is on connect the AC adapter and exit a power saving mode before you remove the battery To remove a battery 1 Turn the computer over and slide the LOCK UNLOCK switch on the bottom of the computer to the UNLOCK position 2 Push and hold the RELEASE switch 3 While holding the RELEASE switch slide the battery away from the computer Removing a Battery Page 14 ...

Page 15: ...p this shortcut To display the power icon on the taskbar 1 Click Start on the Windows taskbar and click Control Panel 2 Click Performance and Maintenance and click Power Options The Power Options Properties window appears 3 Select the Advanced tab and then select Always show icon on the taskbar in the Options box The power icon appears on the taskbar See the power icon descriptions below for more ...

Page 16: ...charge a battery You can charge the battery when the computer is on or off However the battery will charge faster when the computer is off Charging the battery takes several hours Charge the battery at temperatures between 50 F and 80 F 10 C to 30 C Lower temperatures require more time to charge 1 Insert the battery 2 Connect the AC adapter to the computer The computer automatically charges the ba...

Page 17: ... use or being discharged the battery heats up This is normal and is not cause for concern Keep the battery away from all sources of heat Keep the battery dry Do not open or disassemble the battery Do not expose the battery to any mechanical shock Battery life is shorter in a cold environment because of decreased battery efficiency at low temperatures Page 17 ...

Page 18: ...lled When should I recharge the battery When the battery level falls below 10 percent When both the battery and power indicators blink When you have not used the battery for a long time When should I replace the battery If the battery power is still low after charging it the battery may be reaching the end of its life and should be replaced Should I be concerned that the installed battery is warm ...

Page 19: ... and PowerPanel utility or power schemes to conserve battery power Conserving battery power may significantly extend your computing time depending on how you use your computer Using power saving modes Using PowerPanel utility Frequently asked questions Page 19 ...

Page 20: ...t being completely off Hibernate mode consumes the lowest level of power Your computer enters Hibernate mode when the remaining battery charge drops below 5 percent regardless of the setting you select Since some software programs and peripheral devices prevent the system from entering Hibernate mode save your data frequently to avoid data loss To activate Standby mode 1 Press the Fn and Esc keys ...

Page 21: ...ff setting Power Management automatically loads the AC profile unless you disable this feature Games Disables the display and the Hard Disk Standby timer Presentation Keeps the display on at all times while conserving power This option is ideal for slide show presentations You can establish settings for LCD Video Standby Hard Disk Standby and Standby mode to optimize power management for your syst...

Page 22: ...ptive Battery Life or More Battery Life These selections are listed in order from the greatest to least amount of power consumed System Standby Timer Controls the time it takes the system to activate the Standby mode when it is idle The longer you allow the computer to sit idle while it is not in a power saving mode the more power the computer consumes Hibernate Timer Controls the time it takes th...

Page 23: ... LINK Port Controls power to the i LINK port Disabling power to the i LINK port conserves power Memory Stick Port Power Saving Controls power to the Memory Stick media slot Disabling power to the Memory Stick slot conserves power Optical Drive Power Saving Controls power to the optical drive Disabling power to the optical drive conserves power 1 Slows the processor speed Page 23 ...

Page 24: ...m from entering Hibernate mode save your data frequently See To activate Hibernate mode for information on how you can manually activate Hibernate mode Why doesn t my computer enter Hibernate mode You may first need to enable Hibernate mode Follow these steps 1 Click Start on the Windows taskbar and click Control Panel 2 Click Performance and Maintenance and click Power Options The Power Options P...

Page 25: ...Internet and Network Connections Internet Connections Network Connections Connecting Another VAIO Computer Page 25 ...

Page 26: ...nnecting to the Internet and choosing an Internet service provider ISP or setting up an existing account When you connect to the Internet you can register your VAIO computer use online services and gain access to Sony Computing Support Setting up a dial up Internet connection Setting up an Ethernet Internet connection Customizing your Internet connection Frequently asked questions Page 26 ...

Page 27: ...ted to a coin operated telephone and may not work with multiple telephone lines or a private branch exchange PBX Some of these connections may result in excess electrical current and could cause a malfunction in the internal modem If you connect a telephone cable coming through a splitter the modem or connected device may not work properly To set up a dial up connection to the Internet 1 Connect y...

Page 28: ...t Cable 2 Plug one end of the Ethernet cable into your computer s Ethernet port and the other into the network connection To set up an Ethernet connection to the Internet 1 Connect your computer to a network connection 2 Click Start point to All Programs Accessories Communications and click New Connection Wizard The New Connection Wizard appears New Connection Wizard 3 Click Next If the Location I...

Page 29: ... You can also regulate content and set browsing preferences To open the Internet Properties dialog box 1 Click Start on the Windows taskbar and then Control Panel 2 Click Network and Internet Connections and then Internet Options The Internet Properties dialog box appears 3 Click the tabs to view options 4 Make changes and click Apply to activate your changes 5 Click OK Page 29 ...

Page 30: ...equipped with a V 90 compatible modem Many factors may influence modem connection speed including telephone line noise or compatibility with telephone equipment such as fax machines or other modems If you think your modem is not connecting properly to other PC based modems fax machines or your Internet Service Provider ISP follow these steps Ask your telephone company to verify your telephone line...

Page 31: ...ing wireless Ethernet or dial up connections For more information about networking click Start Help and Support and then Networking and the Web Using Ethernet and dial up connections Using wireless network connections selected models only Checking your network connection status Frequently asked questions Types of Networks The computers represented in this graphic may not be identical to the model ...

Page 32: ...e Local Information dialog box follow the on screen instructions Only connect 10BASE T and 100BASE TX cables to the Ethernet port Do not connect any other type of network cable or any telephone cable Connecting cables other than those listed above may result in an electric current overload and could cause a malfunction excessive heat or fire in the port To connect the unit to the network see Using...

Page 33: ...ection Wizard 3 Click Next If you are prompted to the Local Information dialog box follow the on screen instructions 4 Click Connect to the network at my workplace and then click Next 5 Follow the on screen instructions 6 Ask your network administrator for the detailed settings and devices needed to connect to an existing network Page 33 ...

Page 34: ...ges the wireless and wired LAN and acts as a central controller for the wireless LAN The access point coordinates transmission and reception from multiple wireless devices within a specific range A computer to computer ad hoc network is one in which a local network is created only by the wireless devices themselves with no other central controller or access point Each device communicates directly ...

Page 35: ...ecessary ask the administrator for the key 7 Retype the network key in the Confirm network key box 8 Click Connect If the network does not appear in the Available wireless networks list box 1 Click Advanced on the Wireless Network Connection dialog box The Wireless Network Connection Properties dialog box appears Wireless Network Connection Properties 2 Click Add in the Preferred networks box The ...

Page 36: ...ct a data encryption method from the Data Encryption menu 5 Click to cancel the The key is provided for me automatically check box 6 Type the network key in the Network key box if it is required by the selected authentication method 7 Retype the network key in the Confirm network key box 8 Click OK The network name appears in the Preferred networks list box To set up a computer to computer ad hoc ...

Page 37: ...he Wireless Network Connection window appears Wireless Network Connection 4 Click Advanced The Wireless Network Connection Properties dialog box appears Wireless Network Connection Properties 5 Click Add The Wireless network properties dialog box appears Wireless Network Properties Page 37 ...

Page 38: ...ey in the Network key box 10 Retype the network key in the Confirm network key box 11 Click to select This is a computer to computer ad hoc network wireless access points are not used 12 Click OK The network name appears in the Preferred networks list box 13 Click Advanced The Advanced dialog box appears Advanced 14 Click to select Computer to computer ad hoc networks only and then click Close To ...

Page 39: ... under LAN or High Speed Internet click Wireless Network Connection Enabled The Wireless Network Connectioin Status window appears 3 Click Properties The Wireless Network Connection Properties dialog box appears 4 On the Wireless Networks tab click Advanced The Advanced dialog box appears 5 Click to select Any available network access point preferred and click Close 6 Move the Wireless LAN switch ...

Page 40: ...n To check your network connection status 1 Click Start on the taskbar and click Control Panel Network and Internet Connections and Network Connections The Network Connections window appears 2 Under LAN or High Speed Internet click the enabled network connection to open the connection status window Wireless Network Connection Status Page 40 ...

Page 41: ...evices are communicated via the access point If your access point interferes with other access points change the access point channel See your access point instructions for more information Why is the communication speed interrupted or slowed down when MPEG2 data is transferred The typical effective data transfer speed via an access point is 4 5 Mbps when adhering to the IEEE 802 11b standard High...

Page 42: ...product contains an IEEE 1394 connection The i LINK connection may vary depending on the software programs operating system and compatible i LINK devices A ll products with an i LINK connector may not communicate with each other Refer to the documentation that came with your compatible i LINK device for information on operating conditions and proper connection Before connecting compatible i LINK P...

Page 43: ... instructions 5 When you are prompted type in a unique computer name for each computer You will use this unique name to differentiate the two computers once they are networked together The Workgroup name should remain the same for the two networked computers 6 When you finish the Network Setup Wizard on screen instructions click Start on the Windows taskbar and click My Computer 7 Click My Network...

Page 44: ...sconnect VAIO computers when the computers are on 1 Close all open files that are shared with the connected computers 2 Unplug the i LINK cable from the i LINK port on each computer To disconnect VAIO computer when the computers are off Unplug the i LINK cable from the i LINK port on each computer Page 44 ...

Page 45: ...oth computers For more information see Connecting VAIO computers 1 i LINK is a trademark of Sony used only to designate that a product contains an IEEE 1394 connection The i LINK connection may vary depending on the software applications operating system and compatible i LINK devices A ll products with an i LINK connection may not communicate with each other Refer to the documentation that came wi...

Page 46: ...CDs and DVDs Inserting and Ejecting CDs or DVDs Copying and Playing CDs Playing DVDs Page 46 ...

Page 47: ...isc onto the tray until the disc clicks securely into place If you do not seat the disc firmly over the hub the disc may come loose while it is in the drive A loose disc may damage the optical drive and make opening the drive tray difficult 5 Push the drive tray gently to close it The Busy indicator on the drive cover blinks while your computer is reading data from the drive To eject a disc 1 Turn...

Page 48: ...into the manual eject hole next to the Eject button 4 Lift the disc from the drive 5 Push the drive tray gently to close it Page 48 ...

Page 49: ... and Playing CDs Your computer comes equipped with a CD RW DVD drive which plays DVD and most DVD R discs and reads and writes data to CD R and CD RW discs Playing CDs Copying files to a CD RW or CD R Page 49 ...

Page 50: ... Click OK To adjust the volume for playing CDs and DVDs Some programs have built in volume controls which you can adjust If there are no volume controls then adjust the volume of your computer s built in speakers by doing one of the following Using the Function keys An on screen display may appear notifying you when a change occurs To increase volume press the Fn and F4 keys and then press or To d...

Page 51: ...1 O ptical drive types vary depending on the model you purchased Page 51 ...

Page 52: ...a CD RW or CD R 1 Insert a blank CD R or CD RW disc into the optical drive For more information see Inserting and Ejecting CDs or DVDs If the CD Drive window appears click Take no action CD Drive 2 Open Windows Explorer by pressing the Windows key and the E key simultaneously 3 In the Folders panel on the left locate the file s or folder s you want to copy and either Right click the file s or fold...

Page 53: ...Do not strike or move the computer while writing data to a disc 1 The read write drive letter designation may vary depending on your system s hardware configuration Page 53 ...

Page 54: ...Playing DVDs You can play DVDs in your computer s optical drive and view the video on the computer screen Playing DVDs on your computer Frequently asked questions Page 54 ...

Page 55: ...then select DVD from the submenu You can also select Automatic Profile Selection which sets the power management profile to DVD whenever a DVD is inserted into the optical drive See Conserving Battery Power for more information 2 Insert the DVD into the optical drive 3 Open a preinstalled DVD program such as WinDVD by following these steps 1 Click Start on the taskbar and point to All Programs 2 S...

Page 56: ... if the drive tray won t open Make sure the computer is on Press the Eject button on the optical drive If the Eject button does not work click Start on the Windows taskbar and click My Computer Right click the optical drive icon and select Eject from the shortcut menu If none of the above options work insert a thin straight object such as a paper clip in the manual eject hole to the right of the E...

Page 57: ...omputer s hardware devices appears If a X or an exclamation point appear on the listed device you may need to enable the device or reinstall the drivers 3 Double click the optical drive to open the submenu 4 Double click the listed drive name and select the Properties tab 5 Click to select the Enable digital CD audio for this CD ROM device check box if it is not selected You can confirm the driver...

Page 58: ... If the display mode is set to external display use the Fn F7 key combination See Selecting a display for more information Page 58 ...

Page 59: ...Printer Connections Printing With Your Computer Page 59 ...

Page 60: ...atible with many popular printers However to ensure the best performance printers must be compatible with the Microsoft Windows operating system installed on your computer Connecting a printer Disconnecting a printer Frequently asked questions Page 60 ...

Page 61: ...USB port on your computer See Locating Controls and Ports in the Setting Up chapter of your printed VAIO Computer Quick Start 2 Plug the other end of the USB cable into the USB port on the printer 3 Turn the printer on The Found New Hardware Wizard appears on the computer screen Connecting a USB Printer See the guide that accompanied the printer for more information on its installation and use To ...

Page 62: ...ol Panel Printers and Other Hardware and then Printers and Faxes If the computer recognizes the printer it will be listed in the Printers and Other Hardware window If the computer does not recognize the printer you may need to install the printer driver software See the guide that accompanied the printer for more information See the guide that accompanied the printer for more information on its in...

Page 63: ... computer is on or off Disconnecting a printer when the computer is in a power saving mode Standby or Hibernate may cause the computer to malfunction To disconnect a printer 1 Make sure all printing jobs are completed 2 Unplug the printer cable from the computer Page 63 ...

Page 64: ... is not functioning after the computer resumes from a power saving mode Standby or Hibernate then restart the computer If the bidirectional communication functions are provided with your printer disabling the functions on your computer may enable printing Follow these steps 1 Click Start and then Control Panel 2 Click Printers and Other Hardware 3 Click Printers and Faxes 4 Right click an unused p...

Page 65: ...Computer Features Using the Touch Pad Using Memory Stick Media Using the Multilingual User Interface Language Option Changing the Window Design of Sony Programs Page 65 ...

Page 66: ...ice called a touch pad is located in front of the keyboard You can point to select drag and scroll objects on the screen using the built in touch pad Describing the touch pad Customizing the touch pad Frequently asked questions Page 66 ...

Page 67: ...liding one finger while pressing the left button Equivalent to using the mouse to drag an item Moving your finger along the right edge of the touch pad Equivalent to scrolling vertically The scroll function is available only with programs that support a touch pad scroll feature Moving your finger along the bottom to scroll horizontally Equivalent to scrolling horizontally The scroll function is av...

Page 68: ...Notebook Setup is selected and press Enter A submenu appears with Sony Notebook Setup preselected 4 Press Enter The Sony Notebook Setup dialog box appears 5 Press the Right Arrow key to select the Device tab 6 Press the Tab key to select the Default button and press Enter A pop up window appears 7 Press the Left Arrow key to select OK and press Enter The Enable Touchpad option is automatically sel...

Page 69: ...f the pointer does not move while playing a disc press Ctrl Alt Delete simultaneously to stop playback and restart the computer If you are still experiencing problems make sure another mouse is not installed You may have disabled the touch pad without connecting a mouse to the computer See To enable the touch pad How do I change the left and right button assignments If your computer is interpretin...

Page 70: ...ally designed for exchanging and sharing digital data with compatible products Because it is removable the media can be used for external data storage Selecting Memory Stick media Inserting Memory Stick media Viewing the contents Write protecting Memory Stick media Formatting Memory Stick media Removing Memory Stick media Frequently asked questions Page 70 ...

Page 71: ...Selecting Memory Stick media Your VAIO computer is equipped with a Memory Stick slot that supports certain types of Memory Stick media Page 71 ...

Page 72: ...tible Memory Stick PRO devices VAIO computers support Memory Stick PRO media for data storage purposes only Currently high speed data transfer and the MagicGate technology features such as authentication and encryption are not available You can store different data formats on a single Memory Stick media Memory Stick media Provides data storage only The Memory Stick media does not provide MagicGate...

Page 73: ...sert the Memory Stick media with the arrow facing up and toward the Memory Stick media slot Inserting the media in the wrong direction may damage the connector pins 2 Carefully slide the Memory Stick media into the slot until it clicks in place The Memory Stick media indicator briefly blinks Inserting Memory Stick Media Page 73 ...

Page 74: ... copy or organize your Memory Stick images or data If the Sony Memory Stick window does not appear when you insert your Memory Stick media then follow these steps To view the contents 1 From the Start menu click My Computer The My Computer window appears 2 Click Sony Memory Stick The Sony Memory Stick window appears displaying the contents stored on the Memory Stick media Page 74 ...

Page 75: ... Move the tab to the right or left to set or release write protection When the write protect tab of the Memory Stick media is set to LOCK data cannot be recorded or erased Write protect off Data can be saved on the Memory Stick media Write protect on Data can be read from but not saved on the Memory Stick media Using the Write Protect Tab Page 75 ...

Page 76: ...aved to it Before you reformat Memory Stick media confirm that the media does not contain files you want to keep Back up important data before formatting the media To format Memory Stick media 1 Insert the Memory Stick media into the Memory Stick media slot See To insert Memory Stick media for more information 2 From the Start menu click My Computer The My Computer window appears 3 Right click Son...

Page 77: ...e media to finish reading or writing data To remove Memory Stick media 1 Wait a minimum of 10 seconds after the Memory Stick media finishes reading or writing data before removing the media 2 Make sure the access light is off 3 Push the Memory Stick media in toward the computer 4 When the Memory Stick media ejects pull it out Be careful when removing the Memory Stick media as it may not eject comp...

Page 78: ...uires permission of the copyright holders Sony is not responsible for music files that cannot be recorded from a CD or downloaded from other sources Can I copy images from a digital video camera using Memory Stick media Yes and you can view video clips that you have recorded with Memory Stick media compatible video camera recorders How do I prevent damage to the Memory Stick media Do not use the m...

Page 79: ...localized version of the Microsoft Windows XP Professional operating system Under certain conditions some third party software applications may not function properly To Change the Language Option 1 Click Start on the Windows taskbar and then click Control Panel 2 Click Date Time Language and Regional Options and then click Regional and Language Options The Regional and Language Options dialog box ...

Page 80: ...Windows taskbar and then click Control Panel 2 Click Date Time Language and Regional Options and click Regional and Language Options The Regional and Language Options dialog box appears 3 From the Regional Options tab click the Standards and formats drop down menu to view the available language choices Select the desired language 4 Click Customize to change the number currency time and date settin...

Page 81: ... Start and then Control Panel 2 In the left panel click Switch to Classic View 3 Double click UI Design Selector 4 Click or to view the designs 5 Click Apply to select a design that appears in the center window The UI Design Selector window design changes The window design for your Sony software will match the UI Design Selector window 6 Click OK Page 81 ...

Page 82: ...Mice and Keyboards Using the Keyboard Connecting External Mice and Keyboards Page 82 ...

Page 83: ...lar to a typewriter s but your computer keyboard has additional keys that perform specific computer related tasks Key descriptions Combinations and functions with the Windows key Indicator Lights Combinations and functions with the Fn key Page 83 ...

Page 84: ...ancel commands Print Screen key The Print Screen key takes an electronic snapshot of the screen and moves it to the Clipboard You can then paste the screen shot into a document and print it Operator keys Ctrl Alt Shift keys Several keys are always used with at least one other key Ctrl Alt and Shift When held down with another key the Ctrl Control and Alt Alternate keys offer another way to give co...

Page 85: ...Page 85 ...

Page 86: ... selecting Search from the Start menu Ctrl F Displays the Search Results Computers window where you can locate other computers This is the equivalent of selecting Search and then Computer from the Start menu M Minimizes all displayed windows Shift M Returns all minimized windows to their previous size R Displays the Run window This is the equivalent of selecting Run from the Start menu Fn Insert D...

Page 87: ... enter Standby mode or turn off the computer when this indicator is on Num Lock Press this key to activate the numeric keypad Press it a second time to deactivate the numeric keypad The numeric keypad is not active when the indicator is off Caps Lock Press this key to type letters in uppercase Letters appear in lowercase if you press Shift while the indicator is on Press the key a second time to t...

Page 88: ...ness press Fn F5 and then press or Fn F7 Toggles the display between the computer screen LCD a connected external device such as a monitor or projector and both the LCD and external device Select one display at a time when playing a DVD Connect the cable before you turn on the computer otherwise Fn F7 will not work Fn F12 Puts the system into Hibernate mode a power management state To return the s...

Page 89: ... properly the device you connect must be compatible with the Microsoft Windows operating system installed on your computer For information about your computer s built in keyboard and key functions see Key descriptions Connecting a mouse or keyboard Disconnecting a mouse or keyboard Frequently asked questions Page 89 ...

Page 90: ...ter 1 Plug the USB cable into the USB port See Locating Controls and Ports in the Setting Up chapter of your printed VAIO Computer Quick Start One USB port supports one USB connection 2 If the New Hardware Wizard appears follow the on screen instructions to complete the installation process Although the New Hardware Wizard guides you through the software installation some devices require separate ...

Page 91: ...e or keyboard when the computer is on or off Disconnecting the mouse or keyboard when the computer is in a power saving mode Standby or Hibernate may cause the computer to malfunction To disconnect a mouse or keyboard Unplug the USB cable from the USB port Page 91 ...

Page 92: ...l Alt Delete keys simultaneously to stop playback and restart the computer If you still cannot use the pointer restart the computer You can restart the computer three different ways Press the Windows key and press U When the Turn Off Computer window appears press R Press the Ctrl Alt Delete keys simultaneously When the Windows Task Manager window appears press the Alt key to highlight the menu bar...

Page 93: ...Floppy Disks and PC Cards Using a Floppy Disk Drive Using PC Cards Page 93 ...

Page 94: ... computer The floppy disk drive enables you to read or write data to a floppy disk Connecting a floppy disk drive Inserting and removing floppy disks Protecting floppy disks Disconnecting a floppy disk drive Storing a floppy disk drive Frequently asked questions Page 94 ...

Page 95: ...omputer is in a power saving mode Standby or Hibernate may cause the computer to malfunction To connect a USB floppy disk drive 1 Close any active programs to prevent data loss 2 Plug the USB cable with the USB icon facing upward into the USB port The Found New Hardware pop up message appears Connecting a Floppy Disk Drive Page 95 ...

Page 96: ...th the label facing up 2 Push the floppy disk into the drive until it clicks into place Inserting a Floppy Disk Do not open the shutter manually and touch the surface of the floppy disk To remove a floppy disk 1 Close all programs that access the floppy disk 2 Wait for the LED indicator on the floppy disk drive to turn off 3 Push the Eject button and remove the disk To avoid losing data do not pus...

Page 97: ...Protecting floppy disks Do not open the shutter manually or touch the surface of the floppy disk Keep floppy disks away from magnets direct sunlight and heat sources Page 97 ...

Page 98: ...to malfunction To disconnect a USB floppy drive while the computer is on 1 Double click the Safely Remove Hardware icon on the taskbar The Safely Remove Hardware dialog box appears 2 Click to select the floppy drive in the Hardware devices window if it is not already selected 3 Click Stop The Stop a Hardware device window appears 4 Make sure the floppy drive is selected and click OK A message appe...

Page 99: ...Storing a floppy disk drive Fold the floppy disk drive cable and connector into the side compartment on the floppy disk drive Storing a Floppy Disk Drive Page 99 ...

Page 100: ... and remove the disk 4 Reconnect the floppy disk drive by inserting the USB connector with the USB icon facing upward into the USB port 5 Restart the computer by clicking Start on the Windows taskbar Turn Off Computer and then Restart Why is the drive unable to write data to a floppy disk Make sure the floppy disk is properly inserted in the drive See Inserting and removing floppy disks for instru...

Page 101: ...ter Specifications for the type of PC Card that is compatible with your computer These slots are compatible with CardBus If your computer has more than one PC Card slot use the lower slot for Type III PC Cards You do not need to turn off your computer to insert or remove a PC Card Inserting PC Cards Removing PC Cards Connecting and disconnecting PC Card drives Frequently asked questions Page 101 ...

Page 102: ... Notebook Setup The Sony Notebook Setup dialog box appears To insert a PC Card 1 Make sure the front label of the PC Card is facing up 2 Push the PC Card gently into the slot The system automatically detects the PC Card Do not force a PC Card into the slot this may damage the connector pins When a PC Card is inserted do not place your computer in a bag or case Pressure or shock to a PC Card may da...

Page 103: ...it is not already selected 3 Click Stop The Stop a Hardware device window appears 4 Make sure the PC Card is selected and click OK A message appears stating it is safe to remove the hardware device 5 Push the Release button The Release button pops out 6 Push the Release button a second time The PC Card pops out 7 Gently pull the card out of the slot To remove a PC Card while the computer is off 1 ...

Page 104: ...ive you purchased 1 Remove the PC Card from the bottom of the optical drive Removing a PC Card 2 Insert the PC Card into the PC Card slot with the arrow facing the slot See To insert a PC Card for more information Remove the protective cover that is attached to the lens of the optical drive before you use the drive See Inserting and Ejecting CDs or DVDs for information on how to open the optical d...

Page 105: ...s while the card is inserted into the PC Card slot the computer may not recognize the PC Card or the connected device Restart your computer Why can t I insert my PC Card Make sure you are inserting the card correctly See Inserting PC Cards for more information You may not be able to use some PC Cards or some functions of the PC Card with this computer Check the guide that accompanied your PC Card ...

Page 106: ...Port Replicators Locating Ports and Jacks Connecting a Port Replicator Connecting a Flat Panel Display Disconnecting a Port Replicator Page 106 ...

Page 107: ...t replicator may come with your computer depending on the model you purchased If you wish to purchase a port replicator shop Sony online at http www sonystyle com vaio or contact your local retailer Port Replicator Back Panel 1 DVI D port 4 Printer port 2 Monitor VGA port 5 Network Ethernet port 10BASE T 100BASE TX 3 USB ports 6 DC IN port Page 107 ...

Page 108: ...r malfunction To connect a port replicator 1 Close active programs to prevent data loss 2 Turn off the computer and disconnect all attached devices 3 On the bottom of the computer slide the port replicator cover down until the port replicator connector is completely visible Sliding the Port Replicator Cover 4 Align the connector on the bottom of the computer with the port replicator connector and ...

Page 109: ...pter 6 Plug the AC adapter into the DC IN port on the port replicator and plug the power cord into the AC adapter and an AC outlet The power indicator turns on Connecting an AC Adapter to a Port Replicator 7 Turn on the computer Page 109 ...

Page 110: ...er to a flat panel display 1 Connect the computer to the port replicator See Connecting a Port Replicator for more information 2 Plug the flat panel display into an AC outlet 3 Plug the display cable into the DVI port on the port replicator 4 Turn on the computer and flat panel display 5 Press the Fn F7 keys to toggle the display between your computer the flat panel display or both the computer an...

Page 111: ...ter is on or off When the battery is low turn off the computer before you disconnect a port replicator To disconnect a port replicator 1 Close any active programs to prevent data loss and disconnect the AC adapter 2 Pull the release latches on each side of the port replicator to release the computer from the port replicator Releasing a Computer from a Port Replicator 3 Lift the computer away from ...

Page 112: ...Audio and Video Connections Using i LINK Digital Video Recorders Using Computer Monitors and Projectors Using Speakers Using Microphones Page 112 ...

Page 113: ...ked questions 1 i LINK is a trademark of Sony used to designate that a product contains an IEEE 1394 connector The i LINK connection may vary depending on the software application operating system and compatible i LINK devices A ll products with an i LINK connection may not communicate with each other Refer to the documentation that came with your compatible i LINK device for more information on o...

Page 114: ... device The i LINK port supports transfer rates of up to 400 Mbps however the actual transfer rate is the lowest transfer rate of the external device The i LINK features available may vary depending on the programs you use See the help guide that accompanied your program for more information To connect an i LINK digital video recorder 1 Turn on the digital video DV device and the computer 2 Plug t...

Page 115: ...ct the digital video recorder while the computer is on or off Simply unplug the i LINK cable from the i LINK port on the computer Disconnecting the cable when the computer is in a power saving mode Standby or Hibernate may cause the computer to malfunction Page 115 ...

Page 116: ...ital video camera recorder three different ways Select one set of instructions from the following list If your digital video camera recorder is compatible with the preinstalled programs the Digital Video Device window appears when you connect the camera to the computer Select the program you want to use in this window and click OK Click Start and click All Programs Select a program in which to vie...

Page 117: ...rademark of Sony used only to designate that a product contains an IEEE 1394 connection The i LINK connection may vary depending on the software applications operating system and compatible i LINK devices A ll products with an i LINK connection may not communicate with each other Refer to the documentation that came with your compatible i LINK device for information on operating conditions and pro...

Page 118: ...ojectors You can connect an external display such as a computer monitor or a projector to your computer Connecting a computer monitor Connecting a projector Selecting a display Disconnecting a computer monitor or projector Page 118 ...

Page 119: ...he computer monitor is plugged into an AC outlet 2 Plug the display cable into the Monitor VGA port on the computer 3 If it is not already on turn on the computer monitor 4 Press the Fn F7 keys to toggle the display between your computer the monitor or both the computer and monitor See Selecting a display for more information You cannot use the Monitor VGA port on your computer when a port replica...

Page 120: ...nitor port see Locating Controls and Ports in the Setting Up chapter of your printed VAIO Computer Quick Start Connecting a Projector 3 Turn on the projector if it is not already on and then turn on your computer 4 Press the Fn F7 key combination to toggle the display between your computer and the projector See Selecting a display for more information See the guide that accompanied your projector ...

Page 121: ...display such as a monitor or projector and both the LCD and external display Connect the cable before you turn on the computer otherwise Fn F7 may not work To switch the display using the Display Properties settings 1 Plug the display VGA cable into the Monitor VGA port on your computer 2 Right click the desktop and click Properties from the shortcut menu The Display Properties dialog box appears ...

Page 122: ...ee your movie or DVD on the external display change the monitor or TV setting by clicking on the Primary icon on the display panel of your choice You may not be able to display the computer screen LCD and an external display or projector at the same time depending on the types of computer displays and projectors you are using Page 122 ...

Page 123: ...connect the external computer monitor or projector by unplugging the monitor VGA cable from your computer s port Disconnecting the external display when the computer is in a power saving mode Standby or Hibernate may cause the computer to malfunction Page 123 ...

Page 124: ...chase and connect external speakers If you want to purchase speakers make sure the speakers are designed for computer use You can shop Sony online at http www sonystyle com vaio or contact your local retailer Connecting speakers Disconnecting speakers Adjusting the volume Enabling the audio feature Frequently asked questions Page 124 ...

Page 125: ...tic field may damage the data stored on the floppy disks To connect speakers to your computer 1 Turn down the volume of the speakers 2 Plug the speaker cable into the Headphone jack on the computer 3 Plug the other end of the speaker cable into the speaker Connecting Speakers See the guide that accompanied your speakers for more information on its installation and use Page 125 ...

Page 126: ...Disconnecting speakers You can disconnect external speakers when the computer is on or off Simply unplug the speaker cable from the Headphone jack on the computer Page 126 ...

Page 127: ...rag the Volume Control slider up to increase volume and down to decrease volume 3 Click to cancel any Mute check boxes that are selected Sound device Function Volume Control Adjust the sound level from the speakers or headphones Wave Adjust the wavfile sound or the system sound of Windows SW Synth Adjusts the internal or external synthesizer volume Microphone Adjust the internal or external microp...

Page 128: ...he System Properties window appears 3 Select the Hardware tab and click Device Manager The Device Manager window which lists the hardware devices appears 4 Double click DVD CD ROM drives1 5 Double click the listed drive name and click the Properties tab 6 Click the Enable digital CD audio for this CD ROM device check box if it is not already selected 1 The read write drive letter designation may v...

Page 129: ...y set See that program s help guide for more information Your speakers may be set to mute the volume setting may be too low or the audio option may be disabled See Adjusting the volume and Enabling the audio feature for more information Why don t the Fn F3 or the Fn F4 key combinations work The Fn F3 keys toggle the built in speakers on and off The Fn F4 keys adjust the built in speaker volume The...

Page 130: ...our computer Make sure your microphone is designed for computer use If you wish to purchase a microphone shop Sony online at http www sonystyle com vaio or contact your local retailer Connecting a microphone Disconnecting a microphone Using a microphone to record sound Frequently asked questions Page 130 ...

Page 131: ...crophone jack1 on the computer Connecting a Microphone See the guide that accompanied your microphone for more information on its installation and use 1 A protruding dot located next to the Microphone jack distinguishes this jack from the Headphone jack Page 131 ...

Page 132: ...Disconnecting a microphone You can disconnect an external microphone when the computer is on or off Simply unplug the microphone cable from the Microphone jack on the computer Page 132 ...

Page 133: ...selected Close the Recording Control window 5 Click Start and select All Programs Accessories Entertainment and then Sound Recorder The Sound Sound Recorder window appears For help using Sound Recorder click Help in the Sound Recorder window To adjust the volume for recording sound You can only adjust the volume for recording in the Recording Control window 1 Right click the Volume icon on the tas...

Page 134: ...hy doesn t my microphone work If you are using an external microphone make sure the microphone is turned on and is properly plugged into the Microphone jack on the computer See Connecting a microphone for more information Page 134 ...

Page 135: ...ety information in Precautions and procedures For the type of module and amount of memory installed on your computer see the Welcome page to find the VAIO Computer Specifications Precautions and procedures Removing and installing memory modules Confirming added memory capacity Page 135 ...

Page 136: ...stances or objects into the memory slots or other internal components of the computer will result in damage to the computer Electrostatic discharge ESD can damage disk drives memory modules and other components Perform the procedures described below only at an ESD workstation If such a station is not available do not work in a carpeted area and do not handle materials that produce or hold static e...

Page 137: ... cables and remove the battery if it is installed See Removing a battery 3 Wait for the computer to cool down The interior of the computer becomes extremely hot during operation Wait at least one hour for the computer to cool down before you remove the screws 4 Turn the computer over and use an appropriate screwdriver to loosen and remove the center screw on the bottom of the computer To avoid dam...

Page 138: ... module 1 Remove the new memory module from its packaging and install the memory module by sliding it into the open slot at a 45 degree angle See To remove a memory module Installing a New Memory Module 2 Push the module down until it snaps into place 3 When the module is correctly seated gently flip the keyboard back over the computer making sure the keyboard is also correctly seated 4 Replace th...

Page 139: ...information Page 139 ...

Page 140: ...ll Programs and then point to Sony Notebook Setup 3 Select Sony Notebook Setup from the submenu The Sony Notebook Setup dialog box appears 4 On the About This Computer tab make sure the System Memory displayed in the System Information box matches the amount of memory installed The displayed memory size may be less than the installed memory size due to the amount used by the display adapter Sony N...

Page 141: ...Support Options If you have questions about your computer or the preinstalled programs refer to the following sources for answers in the sequence listed below Page 141 ...

Page 142: ...lp files You can find the Help files from the Help menu under the specific program 3 Operating System Online Support Your computer comes preinstalled with a Microsoft Windows operating system For operating system support you can visit Microsoft customer support at http support microsoft com directory 4 Sony Computing Support This service provides instant access to information on commonly encounter...

Page 143: ...fers interface and editing tools for producing movies for video multimedia and the Web View source clips and edited footage simultaneously on screen You can create your own personal video clips that are up to three hours in length with complete audio video synchronization Upgrade possible to full version of Adobe Premiere software Support See Adobe Reader Adobe Premiere Adobe Systems Inc Professio...

Page 144: ...for playback on your Sony CLIÉ handheld After converting your Video Capsules you can use CLIÉ Converter software to transfer them to Memory Stick media or to save them to your hard disk drive for transfer to your CLIÉ handheld during your next HotSync operation Support Sony Electronics see VAIO Support Agent Corel WordPerfect Corel Corp WordPerfect software is a powerful word processing tool that ...

Page 145: ...le digital video camera to your computer s i LINK port and capture video clips and still images Edit clips from your video add new clips and combine clips into new movie segments Save your movies back to your digital video camera or in a variety of popular file formats Support Sony Electronics see VAIO Support Agent EarthLink TotalAccess DSL or Dial Up EarthLink Inc EarthLink one of the world s la...

Page 146: ... of Empires game is the sequel to the award winning best selling realtime strategy game Age of Empires The Age of Empires II game spans a thousand years from the fall of Rome through the Middle Ages in which players lead one of 13 civilizations into greatness The game keeps the epic scope of the original product s game play while evolving the combat and economic features Rated TEEN by the ESRB Con...

Page 147: ... on the camera itself Support See Microsoft Works Microsoft Office XP Professional Microsoft Corp Microsoft Office XP Professional software redefines the relationship between people and software by providing a smarter simpler way of working New Office XP Professional software features include context sensitive smart tags enhanced formatting options and more that enable you to continually integrate...

Page 148: ... can use the Web camera function to automatically upload your captured images Support Sony Electronics see VAIO Support Agent Norton Internet Security Symantec Corporation Symantec s Norton Internet Security software provides essential protection from viruses hackers and privacy threats This easy to use integrated suite includes full versions of Norton AntiVirus and Norton Personal Firewall softwa...

Page 149: ...o learn and use You can even pay your bills online Quicken software manages all of your finances bank accounts credit cards investments and loans Users of earlier versions of Quicken software must upgrade for a fee Upgrade possible to Quicken Deluxe and other versions Support web site http www intuit com support QuickTime Apple Computer Inc The versatile QuickTime software plays many different kin...

Page 150: ...orts comics instant messaging and more Support web site http help yahoo com Screenblast ACID Sony Pictures Digital Entertainment Use the amazing Screenblast ACID software to produce arrange and edit your loop based music With ACID software you can slice out long hours from the music making equation and unlock the doors of your creativity by picking painting and playing your songs Support web site ...

Page 151: ...y Wheel of Fortune Online card games and action titles like Cosmic Rift the station rewards its players with a host of contests and cash giveaways as well as localization so players can play in French German and Japanese Support Sony Electronics see VAIO Support Agent TurboTax for the Web Intuit Inc Quickly and easily prepares and files tax returns without downloading or installing any software Fr...

Page 152: ...ad music from the web create your own albums or have CDs sent straight to your house with VAIO Music Services The ultimate place on the Web for music lovers to find out information about their favorite artist and get all of the latest music news Support Sony Electronics see VAIO Support Agent VAIO Support Agent Sony Electronics Inc VAIO Support Agent provides immediate interactive online support w...

Reviews: