background image

20

Printing


O

per

a

tio

n

Printing

Before printing

• Is the printer connected to a computer? (page 14)
• Has the printer driver been installed? (page 14)
• Has the media tray been properly loaded? (page 16)


1

Press the printer 

1

On/standby switch to turn on the 

power of the printer. 
The 

1

On/standby indicator lights and initialization 

of the printer begins. 
The PRINT, ALARM, RIBBON/PAPER, and TRAY 
LOCK indicators light simultaneously during 
initialization of the printer, and go out when 
initialization is complete. 

2

Turn the computer on.

3

Using the computer, initiate a printing operation.
The PRINT indicator flashes while the image data is 
being received, and then remains steadily lit while 
printing is in progress.

Notes

• Do not place objects on the paper cover that will 

obstruct printing. Doing so may result in damage.

• Although the paper being printed may come into 

view in the paper outlet while printing is in 
progress, do not touch the paper until printing is 
completed. Doing so could result in misoperation.

• Do not allow more than 10 printouts to accumulate 

on the paper cover. Leaving too many printouts on 
the paper cover could cause a paper jam. 

• Do not press the 

1

On/standby switch to enter the 

standby state while printing is in progress. Doing so 
may cause a paper jam or the ink ribbon to break. 

Do not open the media tray while printing is in 
progress.

 If the media tray is opened, printing stops and the 
PRINT, ALARM, RIBBON/PAPER, and TRAY 
LOCK indicators all light simultaneously. In such 
an event, press the 

1

On/standby switch once to 

enter the standby state and then press the switch 
again to turn the printer ON, and check that there is 
no paper jam or the ink ribbon is not broken. Also, 
if printing was partway through, cut off the used 
part of the paper roll with a pair of scissors or the 
like before using the printer. 

Notes

Storing printed images

• Avoid storing printouts in a location subject to high 

temperatures, high humidity, excessive dust or direct 
sunlight. Such conditions could result in fading.

• Do not stick tape on a printout. Also, do not let printouts 

come into contact with materials which contain 
plasticizers, such as erasers or desk mats.

• Do not allow volatile organic solvents, such as alcohol, 

to come into contact with printouts.

Cancelling continuous printing

Press the STOP button. Printing of the current item 
finishes, and then the printer enters the ready state once the 
printout is ejected.

When printing is disabled

The printer will not operate if the ALARM, RIBBON/
PAPER or TRAY LOCK indicator is on. For details, see 
“Explanation of Indicators” on page 28.

If the ink ribbon runs out while continuous 
printing

The printer terminates the printing operation. Once the 
new ink ribbon is loaded, the printing operation 
automatically resumes and the remaining images are 
printed.

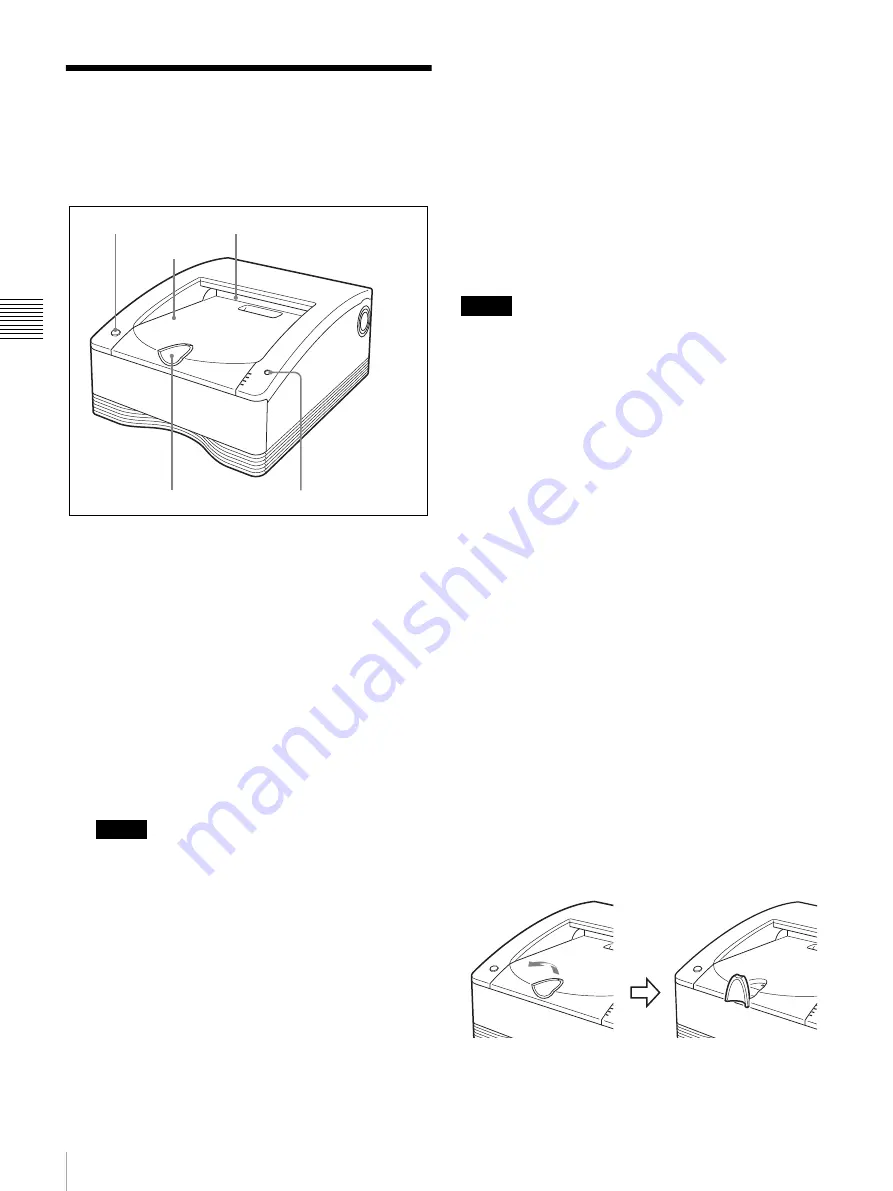
Using the stopper

To prevent ejected printouts from falling off of the paper 
cover, insert your finger in the depression on the edge of 
the stopper and then flip the stopper up in the direction 
indicated by the arrow in the diagram below.


Paper outlet

STOP button

Stopper

1

On/standby switch

Paper cover

Summary of Contents for UP-DR80MD

Page 1: ...4 118 614 18 1 2018 07 Digital Color Printer Instructions for Use UP DR80MD 2008 Sony Corporation ...

Page 2: ... equipment where it is difficult to unplug the power plug If a fault should occur during operation of the unit operate the disconnect device to switch the power supply off or disconnect the power plug WARNING Symbols on the product Consult the instructions for use Follow the directions in the instructions for use for parts of the unit on which this symbol appears This symbol indicates the manufact...

Page 3: ...ase be sure to connect this product to a center tapped circuit Important safeguards and notices for use in the medical environments 1 All devices connected to the unit must be certified or compliant according to IEC 60601 1 IEC 60950 1 and IEC 60065 standards and other IEC ISO standards applicable to the devices 2 Furthermore the system as a whole must comply with IEC 60601 1 standards All periphe...

Page 4: ...hose specified with the exception of replacement parts sold by Sony Corporation may result in increased emissions or decreased immunity of the UP DR80MD Guidance and manufacturer s declaration electromagnetic emissions The UP DR80MD is intended for use in the electromagnetic environment specified below The customer or the user of the UP DR80MD should assure that it is used in such an environment E...

Page 5: ...spital environment IEC 61000 4 5 2 kV line s to earth 2 kV common mode Voltage dips short interruptions and voltage variations on power supply input lines IEC 61000 4 11 0 UT 100 dip in UT for 0 5 1 cycles a 40 UT 60 dip in UT for 5 cycles 70 UT 30 dip in UT for 25 30 cycles a for 0 5 sec 0 UT 100 dip in UT for 250 300 cycles a for 5 sec 0 UT 100 dip in UT for 0 5 1 cycles a 40 UT 60 dip in UT for...

Page 6: ... c 3 Vrms d 1 2 P 6 Vrms 150 kHz to 80 MHz in ISM bands c 6 Vrms Radiated RF 3 V m 3 V m IEC 60601 1 2 2007 d 1 2 P 80 MHz to 800 MHz d 2 3 P 800 MHz to 2 5 GHz IEC 60601 1 2 2014 d 2 0 P 80 MHz to 2 7 GHz Where P is the maximum output power rating of the transmitter in watts W according to the transmitter manufacturer and d is the recommended separation distance in meters m Field strengths from f...

Page 7: ... in which radiated RF disturbances are controlled The customer or the user of the UP DR80MD can help prevent electromagnetic interference by maintaining a minimum distance between portable and mobile RF communications equipment transmitters and the UP DR80MD as recommended below according to the maximum output power of the communications equipment Rated maximum output power of transmitter W Separa...

Page 8: ...on 18 Hz 27 V m 27 V m 430 470 MHz GMRS 460 FRS 460 FM 5 kHz deviation 1 kHz sine 28 V m 28 V m 704 787 MHz LTE Band 13 17 Pulse modulation 217 Hz 9 V m 9 V m 800 960 MHz GSM 800 900 TETRA 800 iDEN 820 CDMA 850 LTE Band 5 Pulse modulation 18 Hz 28 V m 28 V m 1 700 1 990 MHz GSM 1800 CDMA 1900 GSM 1900 DECT LTE Band 1 3 4 25 UMTS Pulse modulation 217 Hz 28 V m 28 V m 2 400 2 570 MHz Bluetooth WLAN ...

Page 9: ...ked Hospital Only or Hospital Grade Caution Do not use the device in a MR Magnetic Resonance environment It may cause a malfunction fire and unwanted movement U S A and Canada Plug type HOSPITAL GRADE Cord type Min Type SJT Min 18 AWG Minimum rating for plug and appliance couplers 10 A 125 V Safety approval UL Listed and CSA For the customers in the U S A SONY LIMITED WARRANTY Please visit http ww...

Page 10: ...he Printer Driver 14 Operation Before Printing 15 Notes on Handling the Ink Ribbon and Paper 15 Loading the Ink Ribbon and Paper 16 Replacing the Ink Ribbon and Paper 19 Printing 20 Miscellaneous Precautions 22 Safety 22 Installation 22 Transportation 22 Cleaning the Cabinet 22 Cleaning the Internals of the Printer 23 Ink Ribbon and Paper 25 Specifications 26 Troubleshooting 27 Explanation of Indi...

Page 11: ...ansferring the ink onto special thermal printing paper System Configuration Location and Function of Parts and Controls Front A 1 On standby switch indicator When this switch is pressed the indicator lights and the printer enters the ready state When it is pressed again the indicator flashes and then goes out and the printer enters the standby state B Paper cover Printouts stack here C Paper outle...

Page 12: ... returns to ready state after the current page is printed and ejected Rear A OPTION connector type A indicator Flashes if an unsupported device is connected B OPTION connector Supplies power to the accessory sold separately WARNING Using this unit for medical purposes This connector is not isolated Do not connect any device other than a UPA WU10 Wireless Print System powered exclusively by the ele...

Page 13: ...acking materials in case you have to transport this unit in the future Carrying the printer Hold both sides of the printer as shown below when carrying the printer Note NEVER handle or lift the printer as shown Paper holder Paper holder pink 1 blue 1 USB cable 1 824 211 41 SONY 1 Before Using this Printer 1 Quick Guide 1 CD ROM 1 Cleaning ribbon 1 Software License Agreement 1 Service Contact List ...

Page 14: ...en the connecting cables After implementing these measures confirm that the reduced risk now conforms to IEC 60601 1 Securing the USB cable After you connect the USB cable to the printer it is recommended that you use the cable stopper to secure the USB cable to prevent it from being accidentally disconnected Notes Follow the connection procedures described in the computer manual Make sure that th...

Page 15: ...d can damage the thermal head Since like other color dyes the dyes used in this ink ribbon may discolor over time the product will neither be replaced nor be warranted against any color change Handling paper rolls Place the paper roll vertically on the stable place when opening the wrapping If you open the wrapping holding it with hands or placing it horizontally you may drop it Dropping may resul...

Page 16: ...ping the media tray may result in an injury When pulling out and inserting the media tray hold the handle part with one hand and support the media tray from the bottom with the other hand while making sure both of your hands are securely holding the media tray Do not leave the media tray partially opened When performing work on the media tray pull it out of the printer completely Perform the work ...

Page 17: ...d result in poor printing quality If inserting the paper holder into the paper roll is difficult when loading the paper roll squeeze the roll from both sides to restore its shape Correctly insert the paper holders all the way If the paper holder selector comes off The selector could come off if you drop the blue paper holder Follow the procedure described below to reattach the selector to the pape...

Page 18: ...hesive labels from the paper roll in the direction indicated by the arrow Note Be certain to remove the labels completely If the labels are not peeled off carefully they can leave adhesive on the paper Leaving any of the label in the printer can cause a malfunction 8 Insert the media tray into the printer Push the media tray in until it clicks into place Notes Dropping the media tray while it is l...

Page 19: ... tray Notes If the media tray does not pull out do not force it out Press the 1 On standby switch to enter the standby state and then press the switch again to turn the printer ON Try pulling the media tray again after the printer finishes initializing After a printing operation is completed the thermal head is very hot When pulling out the media tray be careful not to touch the thermal head Touch...

Page 20: ...tors all light simultaneously In such an event press the 1 On standby switch once to enter the standby state and then press the switch again to turn the printer ON and check that there is no paper jam or the ink ribbon is not broken Also if printing was partway through cut off the used part of the paper roll with a pair of scissors or the like before using the printer Notes Storing printed images ...

Page 21: ... Note When removing a partially used paper roll be sure to place the media tray on a stable surface before beginning If you drop the media tray while it contains a paper roll it could cause personal injury When removing and inserting the media tray be sure to use both hands with one hand holding the handle and the other hand supporting the media tray from the bottom ...

Page 22: ... printer will probably not work properly and may even develop a fault if you persist in using it If moisture condensation forms turn off the power and leave the printer standing for at least one hour If the printing pack is subjected to wide and sudden changes in temperature condensation may form on the ink ribbon or paper inside This will cause the printer to malfunction Also if the printing pack...

Page 23: ...the rollers proceed to Roller cleaning on page 23 If you are not cleaning the rollers continue with the steps below 6 Make sure that the TRAY LOCK indicator is extinguished then pull out the media tray 7 Remove the cleaning ribbon 8 Load the ink ribbon 9 Insert the media tray into the printer Notes Store the cleaning ribbon in a location without dust such as in a bag Place the removed media tray o...

Page 24: ...paper is fed out of the printer from the paper outlet 4 Remove the backing paper 1 from the cleaning sheet and attach the cleaning sheet to the partially ejected paper then remove the backing paper 2 Notes Orient the scratched printout that you kept in the direction it was facing when ejected and use it to align the position of the cleaning sheet with the position of the scratches Press the cleani...

Page 25: ...heet is attached may remain on the paper holder after cleaning is performed In such cases be sure to replace the paper roll If the cleaning sheet is not ejected despite sufficient paper cut off the paper on which the cleaning sheet is attached from the paper holder and repeat the procedure from step 2 Ink Ribbon and Paper Laminate Color Printing Pack UPC R80MD Contains two color ink ribbons and tw...

Page 26: ...tomers in Europe 1 Optional accessories Ink ribbon paper roll Self Laminating Color Printing Pack UPC R80MD Self Laminating Color Printing Pack UPC R81MD Wireless Print System UPA WU10 1 1 As of July 2017 this system can be used in the EU and EFTA the United States Canada and Japan Design and specifications are subject to change without notice Medical Specifications Protection against electric sho...

Page 27: ...en the paper roll has been reloaded t Load the paper roll in the proper direction page 18 The paper holder selector does not match the size of the paper roll t Set the selector properly page 16 The label affixed to the paper roll has not been peeled off t Peel the label off properly page 18 The paper roll is wound to loosely t Rewind the paper roll and then load it page 21 The leading edge of the ...

Page 28: ...ew ink ribbon and paper roll page 19 A paper feed error has occurred tCheck the ink ribbon and paper roll A paper eject error has occurred tCheck the ink ribbon and paper roll Flashing 2 One of the following causes A ribbon error occurred while cleaning was in progress tCheck that the cleaning ribbon has been loaded properly A paper jam occurred inside the printer while cleaning was in progress tR...

Page 29: ... the media tray cover check whether there is printing on the paper and cut the paper Cut the paper as follows If there is printing on the paper Cut off the printed portion with a pair of scissors If there is no printing on the paper Make sure that the leading edge of the paper is not creased or wrinkled If the leading edge is creased or the paper is wrinkled cut off the leading edge or wrinkled po...

Page 30: ...wners of copyright of these software applications we have an obligation to inform you of the following The FreeType Project LICENSE Copyright 1996 2002 by David Turner Robert Wilhelm and Werner Lemberg Source code provided by the FreeType Project is used for TrueType font rasterizing The Catharon Open Source LICENSE Copyright c 2000 by Catharon Productions Inc Source code provided by Catharon Prod...

Page 31: ......

Reviews: