


Advanced Operation
26
Advanced Operation
Detail Set Up menu
Auto Format
This TV can detect the type of screen format being transmitted by the
broadcaster (only if the specific signals are transmitted with the program). This
option allows the TV to automatically switch to the correct screen mode.
With the ‘Auto Format’ option highlighted, press the
b
button to adjust. Press the
V
or
v
button to select ‘On’ or ‘Off. Press the
OK
button to confirm.
Noise Reduction
Sometimes a weak signal can produce a snowy picture (called picture noise).
This option can help to reduce this effect.
With the ‘Noise Reduction’ option highlighted, press the
b
button to adjust. Press
the
V
or
v
button to select ‘Auto’ or ‘Off. Press the
OK
button to confirm.
AV2 Output
This option allows you to set a signal to be output through the socket labelled
i
2/
r
on the rear of the TV. If you connect a VCR to the
i
2/
r
socket, you
can then record from equipment connected to other sockets of the TV.
z
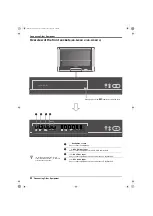
For example, to record from a camcorder to a video tape:
Connect a camcorder to the
t
3 sockets on the front of the TV and a VCR to the
i
2/
r
socket on the rear of the TV. Set the ‘AV2 Output’ option to ‘AV3’. Press
the
t
/
button repeatedly until
t
2 is displayed. Press ‘PLAY’ on the
camcorder. The picture is sent through the AV2 socket to the VCR. Change the
channel on the VCR until the picture from the camcorder appears. Press
‘RECORD’ on the VCR.
With the ‘AV2 Output’ option highlighted, press the
b
button to adjust. Press the
V
or
v
button to select ‘A-TV’, ‘D-TV’, ‘AV1’, ‘AV3’, ‘YC3*’ or ‘AUTO’. Press the
OK
button to confirm.
Setting
Function
A-TV
Outputs an analogue broadcast.
D-TV
Outputs an digital broadcast.
AV1
Outputs signals from equipment connected to the
i
1/
socket.
AV3
Outputs signals from equipment connected to the
t
3 socket.
YC3*
Outputs signals from equipment connected to the
r
3 socket*.
AUTO
Outputs whatever is being viewed on the TV screen.
RGB Centring
(only available when the TV is receiving a RGB signal)
When viewing a RGB signal from equipment connected to the
i
1/
socket
(e.g. DVD player, PlayStation2), the picture position may need some adjusting.
This option allows you to adjust the horizontal picture position so that the picture
is in the middle of the screen.
With the ‘RGB Centring’ option highlighted, press the
b
button to adjust. Press
the
V
or
v
button to adjust the fine tuning over a range of -10 to +10. Press the
OK
button to confirm.
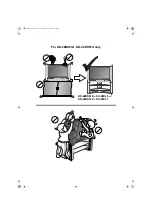
Picture Rotation
Due to the Earth’s natural magnetism, the picture might look slanted. This option
allows you to cancel this effect.
With the ‘Picture Rotation’ option highlighted, press the
b
button to adjust. Press
the
V
or
v
button to adjust the fine tuning over a range of -5 to +5. Press the
OK
button to confirm.
Radio Mode
This option reduces the brightness and contrast settings when the current
channel is a digital radio service**.
With the ‘Radio Mode’ option highlighted, press the
b
button to adjust. Press the
V
or
v
button to select ‘Auto’ or ‘Off’. Press the
OK
button to confirm.
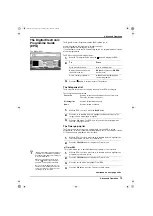
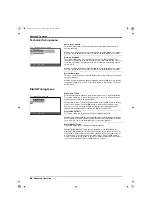
The ‘Detail Set Up’ menu.
Detail Set Up
OK
Auto Format:
Noise Reduction:
AV2 Output:
RGB Centring:
Picture Rotation:
Radio Mode:
On
Auto
A-TV
0
0
Off
z
**Brightness and contrast are reduced
after one minute.
Press any button on the remote control
(except
2
+/-
) to return the picture
settings to normal levels.
z
*Only for KD-28DX51U / KD-32DX51U
models.
DX51 DL11U.book Page 26 Tuesday, May 24, 2005 9:44 AM