background image

Ge
tting Star

te

d

9

GB

1

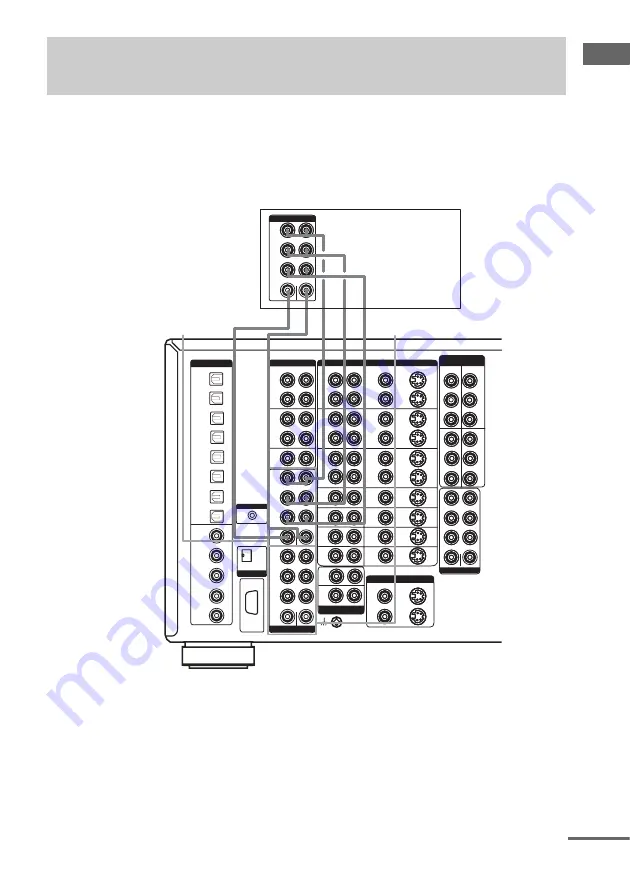
Connect the audio jacks.

If your DVD or Super Audio CD player is equipped with multi channel output jacks, you can connect 
it to this amplifier’s MULTI CHANNEL INPUT jacks to enjoy the multi channel sound. Alternatively, 
the multi channel input jacks can be used to connect an external multi channel decoder.
For details on the required cords (

A

I

), see page 5.

Tip

This connection also allows you to enjoy software with multi-channel audio recorded in formats other than the Dolby 
Digital and DTS.

Note

DVD and Super Audio CD players do not have SURR BACK terminals.

1b: Connecting components with multi channel output 
jacks

DIGITAL

AUDIO

VIDEO

CONTROL A1II

i.LINK S200

MONITOR OUT

VIDEO 1

IN

PB/CB/B-Y

PR/CR/R-Y

PR/CR/R-Y

PB/CB/B-Y

DVD 
IN

PB/CB/B-Y

PB/CB/B-Y

PR/CR/R-Y

PR/CR/R-Y

MONI

TOR
OUT

TV/

SAT

IN

S2 VIDEO

VIDEO

OUT

OUT

IN

IN

OUT

IN

OUT

IN

OUT

IN

OUT

IN

IN

IN

IN

IN

IN

IN

IN

VIDEO 1

VIDEO 2

VIDEO 3

VIDEO

LD

DVD

TUNER

IN

DVD

IN

LD

IN

IN

VIDEO 3

OUT

IN

VIDEO 2

OUT

OUT

IN

VIDEO 1

PHONO

IN

IN

AUDIO

VIDEO

S2 VIDEO

OUT 1

OUT 1

OUT 2

OUT 2

R

L

AUDIO

R

L

R

L

OUT

IN

OUT

IN

TAPE

MD/DAT

CD/

SACD

IN

FRONT

SURR

OUND

SURR

BACK

CENTER

FRONT

SURR

OUND

SURR

BACK

MULTI CHANNEL IN

CENTER

1

2

AUDIO IN

RS232C

COAXIAL

OPTICAL

COMPONENT 
VIDEO

4

SUB
WOOFER

VIDEO
4

Y

Y Y

Y

SUB

WOOFER

FRONT

SURROUND

SURR BACK

CENTER

SUB WOOFER

PRE OUT

SIGNAL 

GND

VIDEO 1

OUT

DVD

IN

CD/SACD

IN

MD/DAT

IN

MD/DAT

OUT

TV/SAT

IN

LD

IN

IN

TV/

SAT

LD

IN

DVD

IN

TV/SAT

IN

CD/SACD

IN

VIDEO 1

IN

VIDEO 1

IN

IN

TV/

SAT

MULTI CHANNEL IN 1

MULTI CHANNEL IN 2

FRONT

SURR

OUND

SURR

BACK

MULTI CHANNEL OUT

CENTER

SUB

WOOFER

G G

A

A

A

DVD player, 

Super Audio CD 

player,

Multi channel 

decoder, etc.

continued

Summary of Contents for TA-DA9000ES

Page 1: ... 2003 Sony Corporation 4 249 347 15 3 Multi Channel Integrated Amplifier Operating Instructions TA DA9000ES ...

Page 2: ...ifier You can also use the controls on the supplied remote if they have the same or similar names as those on the amplifier For details on the use of your remote see the separate operating instructions supplied with the remote This amplifier incorporates Dolby Digital and Pro Logic Surround and the DTS Digital Surround System Manufactured under license from Dolby Laboratories Dolby Pro Logic and t...

Page 3: ... Sound Using only the front speakers 26 Enjoying higher fidelity sound 26 AUTO FORMAT DIRECT Selecting a sound field 27 Selecting the surround back decoding mode 29 SURR BACK DECODING Advanced Adjustments and Settings Assigning the audio input 31 DIGITAL ASSIGN Switching the audio input mode for digital components 32 INPUT MODE Customizing sound fields 32 Adjusting the equalizer 34 Advanced settin...

Page 4: ...tting Started 1 Check how to hookup your components Component to be connected Page DVD player With digital audio outputa 6 7 With multi channel audio outputb 9 10 With analog audio output onlyc 6 7 LD player With digital audio outputa 6 With analog audio outputc 6 TV monitor With component video inputd 7 or 10 With S Video or composite video input only 12 Satellite tuner With digital audio outputa...

Page 5: ...onnections Be sure to make connections firmly to avoid hum and noise When connecting an audio video cord be sure to match the color coded pins to the appropriate jacks on the components yellow video to yellow white left audio to white and red right audio to red When connecting optical digital cords insert the cord plugs straight in until they click into place Do not bend or tie optical digital cor...

Page 6: ...IN IN IN IN IN IN IN IN IN VIDEO 1 VIDEO 2 VIDEO 3 VIDEO LD DVD TV SAT TUNER IN DVD IN LD IN IN VIDEO 3 OUT IN VIDEO 2 OUT OUT IN VIDEO 1 PHONO IN IN AUDIO VIDEO S2 VIDEO OUT 1 OUT 1 OUT 2 OUT 2 R L AUDIO R L R L OUT IN OUT IN TAPE MD DAT CD SACD IN FRONT SURR OUND SURR BACK CENTER FRONT SURR OUND SURR BACK MULTI CHANNEL IN CENTER 1 2 AUDIO IN RS232C COAXIAL LD IN DVD IN TV SAT IN CD SACD IN OPTIC...

Page 7: ...age on the TV screen may appear distorted horizontally or no image may be output DIGITAL AUDIO VIDEO DVI D CONTROL A1II i LINK S200 MONITOR OUT VIDEO 1 IN PB CB B Y PR CR R Y PR CR R Y PB CB B Y DVD IN PB CB B Y PB CB B Y PR CR R Y PR CR R Y MONI TOR OUT TV SAT IN S2 VIDEO VIDEO OUT OUT IN IN OUT IN OUT IN OUT IN OUT IN IN IN IN IN IN IN IN VIDEO 1 VIDEO 2 VIDEO 3 VIDEO LD DVD TUNER IN DVD IN LD I...

Page 8: ...als DIGITAL AUDIO VIDEO CONTROL A1II i LINK S200 MONITOR OUT VIDEO 1 IN PB CB B Y PR CR R Y PR CR R Y PB CB B Y DVD IN PB CB B Y PB CB B Y PR CR R Y PR CR R Y MONI TOR OUT TV SAT IN S2 VIDEO VIDEO OUT OUT IN IN OUT IN OUT IN OUT IN OUT IN IN IN IN IN IN IN IN VIDEO 1 VIDEO 2 VIDEO 3 VIDEO LD DVD TUNER IN DVD IN LD IN IN VIDEO 3 OUT IN VIDEO 2 OUT OUT IN VIDEO 1 PHONO IN IN AUDIO VIDEO S2 VIDEO OUT...

Page 9: ...Y PB CB B Y DVD IN PB CB B Y PB CB B Y PR CR R Y PR CR R Y MONI TOR OUT TV SAT IN S2 VIDEO VIDEO OUT OUT IN IN OUT IN OUT IN OUT IN OUT IN IN IN IN IN IN IN IN VIDEO 1 VIDEO 2 VIDEO 3 VIDEO LD DVD TUNER IN DVD IN LD IN IN VIDEO 3 OUT IN VIDEO 2 OUT OUT IN VIDEO 1 PHONO IN IN AUDIO VIDEO S2 VIDEO OUT 1 OUT 1 OUT 2 OUT 2 R L AUDIO R L R L OUT IN OUT IN TAPE MD DAT CD SACD IN FRONT SURR OUND SURR BAC...

Page 10: ... distorted horizontally or no image may be output DIGITAL AUDIO VIDEO CONTROL A1II i LINK S200 MONITOR OUT VIDEO 1 IN PB CB B Y PR CR R Y PR CR R Y PB CB B Y DVD IN PB CB B Y PB CB B Y PR CR R Y PR CR R Y MONI TOR OUT TV SAT IN S2 VIDEO VIDEO OUT OUT IN IN OUT IN OUT IN OUT IN OUT IN IN IN IN IN IN IN IN VIDEO 1 VIDEO 2 VIDEO 3 VIDEO LD DVD TUNER IN DVD IN LD IN IN VIDEO 3 OUT IN VIDEO 2 OUT OUT I...

Page 11: ... LD IN IN VIDEO 3 OUT IN VIDEO 2 OUT OUT IN VIDEO 1 PHONO IN IN AUDIO VIDEO S2 VIDEO OUT 1 OUT 1 OUT 2 OUT 2 R L AUDIO R L R L OUT IN OUT IN TAPE MD DAT CD SACD IN FRONT SURR OUND SURR BACK CENTER FRONT SURR OUND SURR BACK MULTI CHANNEL IN CENTER 1 2 AUDIO IN RS232C COAXIAL OPTICAL COMPONENT VIDEO 4 SUB WOOFER VIDEO 4 Y Y Y Y SUB WOOFER FRONT SURROUND SURR BACK CENTER SUB WOOFER PRE OUT SIGNAL GND...

Page 12: ...IDEO 1 PHONO IN IN AUDIO VIDEO S2 VIDEO OUT 1 OUT 1 OUT 2 OUT 2 R L AUDIO R L R L OUT IN OUT IN TAPE MD DAT CD SACD IN FRONT SURR OUND SURR BACK CENTER FRONT SURR OUND SURR BACK MULTI CHANNEL IN CENTER 1 2 AUDIO IN RS232C COAXIAL OPTICAL COMPONENT VIDEO 4 SUB WOOFER VIDEO 4 Y Y Y Y SUB WOOFER FRONT SURROUND SURR BACK CENTER SUB WOOFER PRE OUT SIGNAL GND VIDEO 1 OUT DVD IN CD SACD IN MD DAT IN MD D...

Page 13: ...hind the listening position Since the sub woofer does not emit highly directional signals you can place it wherever you want Speaker impedance To enjoy the best possible multi channel surround connect speakers with a nominal impedance of 8 ohms or higher to the FRONT CENTER SURROUND and SURROUND BACK terminals and set the IMPEDANCE SELECTOR to 8Ω Refer to the operating instructions supplied with y...

Page 14: ...you connect only one surround back speaker connect it to the SURROUND BACK SPEAKERS L terminal A B B A R L R L SURROUND BACK SURROUND FRONT IMPEDANCE USE 4 16 A B USE 8 16 CENTER VIDEO 1 IN PB CB B Y PR CR R Y PR CR R Y PB CB B Y DVD IN PB CB B Y PB CB B Y PR CR R Y PR CR R Y MONI TOR OUT TV SAT IN AC OUTLET COMPONENT VIDEO Y Y Y Y FRONT SURROUND SURR BACK CENTER SUB WOOFER PRE OUT A B B A R L SPE...

Page 15: ...placement 9 1 channel speaker operation covers an extremely wide listening area which you can enjoy from anywhere in the room behind the central point When using the CINEMA STUDIO EX modes with the 9 1 channel system be sure to set Virtual Speaker to OFF in SURR SET UP You can enjoy the surround effects of movies even without the use of virtual speakers since so many real speakers are used In addi...

Page 16: ...o switch the front speaker system A B and how you set CENTER SP in the SPEAKER SET UP menu YES or MIX you can set up two completely different systems For example you can set up a 2 channel or 4 channel speaker system for pure audio sources and a 7 1 channel speaker system for AV sources Please note that in most cases you can use the 9 1 channel setting for Super Audio CD and other pure audio sourc...

Page 17: ...ng initial setup operations Before using the amplifier for the first time initialize the amplifier by performing the following procedure This procedure can also be used to return settings you have made to their factory defaults 1 Press 1 to turn off the amplifier 2 Hold down 1 for 5 seconds ENTER to Clear ALL appears in the display for 10 seconds 3 Press ENTER while ENTER to Clear ALL appears in t...

Page 18: ... your speaker pattern using the supplied Easy Setup Guide x SUB WOOFER Sub woofer YES If you connect a sub woofer select YES NO If you did not connect a sub woofer select NO This activates the bass redirection circuitry and outputs the LFE signals from other speakers Tip In order to take full advantage of the Dolby Digital bass redirection circuitry we recommend setting the sub woofer s cut off fr...

Page 19: ...ally set to NO and the setting cannot be changed DUAL If you connect two surround back speakers select DUAL The sound will be output to a maximum of 7 1 channels SINGLE If you connect only one surround back speaker select SINGLE The sound will be output to a maximum of 6 1 channels NO If you did not connect surround back speakers select NO Tip The LARGE and SMALL settings for each speaker determin...

Page 20: ...r steps Tip The amplifier lets you to input the speaker position in terms of distance However it is not possible to set the center speaker further than the front speakers Also the center speaker cannot be set more that 1 5 meters closer than the front speakers Likewise the surround speakers can not be set farther away from the listening position than the front speakers And they can be no more than...

Page 21: ...ettings see page 33 Tips To adjust the level of all speakers at the same time press MASTER VOL on the remote or turn MASTER VOLUME on the amplifier You can also use TEST TONE on the amplifier to turn on or off the test tone You can also use on the amplifier for the adjustment 5 After the adjustment press on the remote repeatedly again until amplifier menu appears 6 Move the easy scroll key to sele...

Page 22: ...LINK is selected Disc The amplifier could obtain only general information from the connected component Unknown The amplifier could not obtain information from the connected component To mute the sound Press MUTING on the remote To cancel press MUTING on the remote again or turn MASTER VOLUME clockwise to raise the volume Even if you turn off the amplifier the muting function continues to mute the ...

Page 23: ...ng the information in the display You can check the sound field etc by changing the information in the display Press DISPLAY repeatedly Each time you press DISPLAY the display will change as follows Index name and sound field name y Input name and sound field name Index name appears only when you have assigned one to the input page 44 Index name does not appear when only blank spaces have been ent...

Page 24: ...hts up according to the current input E AUTO Lights up when INPUT MODE is set to AUTO 2CH page 32 F i LINK Lights up when an i LINK component is connected G DTS ES Lights up when DTS signals are input ES lights up when DTS ES signals are input When playing a DTS format disc be sure that you have made digital connections and that INPUT MODE is NOT set to ANALOG 2CH FIXED page 32 H COAX Lights up wh...

Page 25: ...hts up when Pro Logic II Movie decoding is activated W PRO LOGIC II Lights up when the amplifier applies Pro Logic processing to 2 channel signals in order to output the center and surround channel signals This indicator also lights when the Pro Logic II Movie Music decoder is activated However this indicator does not light if both the center and surround speakers are set to NO X L F E Lights up w...

Page 26: ... type of audio signal being input Dolby Digital DTS standard 2 channel stereo etc and performs the proper decoding if necessary This mode presents the sound as it was recorded encoded without adding any surround effects However when A F D 2CH SW in the SURR SET UP menu is set to CREATE and if there are no low frequency signals Dolby Digital LFE etc it will generate a low frequency signal for outpu...

Page 27: ...s a low frequency signal for output to the sub woofer However the low frequency signal is not generated for Neo 6 Cinema or Neo 6 Music when all speakers are set to LARGE You can take advantage of surround sound simply by selecting one of the amplifier s pre programmed sound fields They bring the exciting and powerful sound of movie theaters and concert halls into your home Selecting a sound field...

Page 28: ...listening with sound fields that employ the virtual speakers you will not be able to hear any sound coming directly from the surround speakers Selecting a sound field for music Press MUSIC repeatedly to select the sound field you want The selected sound field appears in the display x D CONCERT HALL A Uses 3D sound imaging to reproduce the sound characteristics of the CONCERTGEBOUW in Amsterdam whi...

Page 29: ... activated when the DIRECT function is activated Listening to the sound without any adjustment You can listen to the sound without adjusting the equalizer and surround effect Press DIRECT The equalizer and sound fields are canceled Note LIP SYNC page 37 is not activated when an analog input is selected and the DIRECT function is used This function lets you select the decoding mode for the surround...

Page 30: ...Software encoded with both 5 1 channel signals and an extension stream designed for returning those signals to 6 1 discrete channels Discrete 6 1 channel signals are DVD specific signals not used in movie theaters e When two surround back speakers are connected the output channel will be 7 1 channels f This decoder can be used for all 6 1 formats Dolby Digital EX DTS ES Matrix 6 1 DTS ES Discrete ...

Page 31: ...o input jack selected in step 4 The input you can assign varies for each audio input For details see Selectable inputs for each digital audio input Selectable inputs for each digital audio input Notes You cannot assign several digital audio inputs to the same input You cannot use the digital audio input with its the original input when it is assigned to another input When you assign the digital au...

Page 32: ...the sound fields to suit your particular listening situation Note on the displayed items The setup items you can adjust in each menu vary depending on the sound field Certain setup parameters may be dimmed in the display This means that the selected parameter is either unavailable or fixed and unchangeable Adjusting the SURR SET UP menu You can customize the surround effects of the selected sound ...

Page 33: ...level Initial setting 0 dB You can adjust from 20 dB to 10 dB in 0 5 dB steps x MULTI CH 1 SW XXX dB Multi channel 1 sub woofer level x MULTI CH 2 SW XXX dB Multi channel 2 sub woofer level Initial setting 0 dB Lets you increase the level of the MULTI CHANNEL INPUT 1 MULTI CHANNEL INPUT 2 sub woofer channel by 10 dB This adjustment may be necessary when connecting a DVD player to the MULTI CHANNEL...

Page 34: ...u want to adjust EQ BANK 1 5 5 Rotate MENU to select the parameter For details see EQUALIZER menu parameters below 6 While monitoring the sound rotate to adjust the selected parameter 7 Repeat steps 5 and 6 to adjust the other items EQUALIZER menu parameters x EQ BANK Equalizer bank selection Lets you select the equalizer bank 1 5 When you select OFF the equalizer is cancelled x FRONT BASS XXX dB ...

Page 35: ... select EQ BANK 3 Rotate to select EQ BANK 1 5 To turn off the equalizer Select EQ BANK OFF Clearing stored equalizer settings 1 Rotate MAIN MENU to select EQUALIZER 2 Rotate MENU to select EQ BANK 3 Rotate to select the equalizer EQ BANK 1 5 you want to clear 4 Rotate MENU to select PRESET X CLEAR X is the number of the selected equalizer bank 5 Rotate to select YES then press ENTER Are you sure ...

Page 36: ...to output the sound See page 22 for a note on switching the input when set to AUTO EVER ON Lets you keep the power of the i LINK circuits Select if you do not like the time lag that occurs with the AUTO setting x H A T S H A T S High quality digital Audio Transmission System function ON The digital audio signals input from the i LINK component is stored in the buffer temporarily then retrieved fro...

Page 37: ... you specify the input mode for the digital signal input to the DIGITAL IN jacks The initial setting is AUTO for VIDEO 1 VIDEO 2 VIDEO 3 VIDEO 4 VIDEO 5 LD TV SAT TAPE TUNER PHONO and i LINK and PCM for DVD CD SACD and MD DAT You can use DECODE PRIORITY on the front panel AUTO Automatically switches the input mode between DTS Dolby Digital or PCM PCM PCM signals are given priority to prevent inter...

Page 38: ...e 44 Advanced SPEAKER SET UP menu parameters When MENU EXPAND is set to ON all of the following parameters are displayed and adjustable See page 18 for the SPEAKER SET UP menu adjustments Initial settings are underlined All SPEAKER SET UP menu parameters Adjustable only when MENU EXPAND is set to ON x DISTANCE UNIT Distance unit Lets you select the unit of measure for setting distances feet The di...

Page 39: ...eft and right Therefore although it may result in a setting contrary to the above explanation we recommend that you playback multi channel surround encoded software and select the setting that provides a good sense of spaciousness and that best succeeds in forming a cohesive space between the surround sound from the surround speakers and the sound of the front speakers If you are not sure which so...

Page 40: ...erberation This parameter is especially for D CONCERT HALL A B page 28 This parameter lets you adjust the amount of reverberations to add to the front signals according to the original reverberations in the source STD Normally select STD WET Select to increase front reverberations x SCREEN DEPTH Screen depth Lets you create the sensation that the sound of the front speakers comes from inside the s...

Page 41: ...ker is set to MIX SUB WOOFER TRIM and CENTER TRIM do not function for Super Audio CD signals from an i LINK component MULTI CH IN signals or DTS 96 24 decoded signals x D RANGE COMP Dynamic range compressor Lets you compress the dynamic range of the sound track This may be useful when you want to watch movies at low volumes late at night OFF The dynamic range is not compressed STD The dynamic rang...

Page 42: ...an adjust either to 2 2 kHz or to 4 3 kHz USER PRESET You can store the adjusted sound field settings etc as user presets You can store up to 3 user presets and easily apply them Setting the USER PRESET 1 Adjust the sound field etc For the settings you can store see Settings that can be stored in USER PRESET 2 Rotate MAIN MENU to select CUSTOMIZE 3 Rotate MENU to select USER PRESET MEM 4 Rotate to...

Page 43: ... setting cannot be used a selectable setting is applied automatically Example 1 Use the DIGITAL ASSIGN function to assign DVD OPT to TAPE 2 Set the INPUT MODE of TAPE to AUTO 2CH or OPTICAL FIXED then store this setting in a USER PRESET 3 Use the DIGITAL ASSIGN function to assign DVD OPT to DVD 4 Select the USER PRESET stored in example 2 The INPUT MODE of TAPE is automatically set to ANALOG 2CH F...

Page 44: ...mbols To enter a blank space rotate until a blank space appears in the display If you make a mistake rotate MENU until the character you want to change flashes then rotate to select the correct character 6 Press ENTER The entered name is registered 7 To index other inputs repeat steps 1 to 6 You can set the amplifier to turn off automatically at a specified time Press SLEEP repeatedly while the po...

Page 45: ...eakers with a nominal impedance of 8 ohms or higher When you want to turn off the sound output from SPEAKERS jacks while turning on the sound output from PREOUT jacks set the SPEAKERS FRONT switch to A B or A B then set OUTPUT in the SPEAKER SET UP menu to PREOUT ONLY page 39 Selecting the surround speaker system Set the SPEAKERS SURROUND switch according to the surround speakers you want to drive...

Page 46: ...REC OUT SELECTOR are for analog output only Digital output is available for SOURCE current input only You can not select i LINK 5 Start recording on the recording deck then start playback on the playback component Notes You cannot record a digital audio signal using a component connected to the analog TAPE OUT or MD DAT OUT jacks To record a digital audio signal connect a digital component to the ...

Page 47: ...dio from that source will be recorded onto the audio track of the video tape instead of the audio from the original medium To resume audio recording from the original medium select the video source again Notes The analog audio signals of the current input are output from the VIDEO 1 OUT VIDEO 2 OUT or VIDEO 3 OUT jacks You cannot record a digital audio signal using a component connected to the ana...

Page 48: ...tor If your CD changer s COMMAND MODE selector can be set to CD 1 CD 2 or CD 3 be sure to set the command mode to CD 1 and connect the changer to the CD jacks on the amplifier receiver If however you have a Sony CD changer with VIDEO OUT jacks set the command mode to CD 2 and connect the changer to the VIDEO 2 jacks on the amplifier receiver Connections You can connect up to 10 CONTROL A1II compat...

Page 49: ...e established between the component receiving the audio signal and the component sending the audio signal Establishing a LINC means establishing a logical path for the transmission of digital audio signals between the two components Each logical path has an ID number Since the component that sends an audio signal must output the signal to a path and the component that receives the signal must inpu...

Page 50: ...it at a large volume the cabinet temperature of the top side and bottom rises considerably To avoid burning yourself do not touch the cabinet On placement Place the amplifier in a location with adequate ventilation to prevent heat buildup and prolong the life of the amplifier Do not place the amplifier near heat sources or in a place subject to direct sunlight excessive dust or mechanical shock Do...

Page 51: ...ield PRO LOGIC etc is selected When the center speaker is set to NO sound is output only from front L R speakers There is no sound or only a very low level sound is heard Check that the speakers and components are connected securely Check that you have selected the correct component with INPUT SELECTOR Check that the SPEAKERS is not set to OFF page 45 Check that the headphones are not connected Pr...

Page 52: ... multi channel sound is not reproduced Check that the playing DVD etc is recorded in Dolby Digital or DTS format When connecting the DVD player etc to the digital input jacks of this amplifier check the audio setting settings for the audio output of the connected component Recording cannot be done Check that the components are connected correctly Select the source component with REC OUT SELECTOR T...

Page 53: ...put at Stereo Mode1 8 ohms 20 Hz 20 kHz THD 0 15 200 W 200 W 4 ohms 20 Hz 20 kHz THD 0 15 220 W 220 W Reference Power Output 8 ohms 1 kHz THD 0 09 FRONT2 200 W 200 W CENTER2 200 W SURR2 200 W 200 W SURR BACK2 200 W 200 W 4 ohms 1 kHz THD 0 09 FRONT2 220 W 220 W CENTER2 220 W SURR2 220 W 220 W SURR BACK2 220 W 220 W Actual Rated Maximum Output at Stereo Mode1 8 ohms JEITA 260 W 260 W 4 ohms JEITA 3...

Page 54: ...cluding projecting parts and controls Mass Approx 28 5 kg Supplied accessories AC power coad 1 Easy Setup Guide 1 Remote commander RM LJ312 1 Operating Instructions for RM LJ312 1 R6 size AA batteries 3 Design and specifications are subject to change without notice CD SACD TAPE MD DAT DVD LD TV SAT VIDEO 1 2 3 4 5 Sensitivity 170 mV Impedance 50 kilohms S N3 100 dB A 2V4 CD SACD DVD LD VIDEO 1 TV ...

Page 55: ...Additional Information 55GB ...

Page 56: ...DING indicator qd MUSIC 9 28 33 NIGHT MODE qk ON SCREEN ql PHONES jack eh REC OUT SELECTOR wk SB DEC indicator 4 SLEEP qj SPEAKERS FRONT switch ef 45 SPEAKERS SURROUND switch es 45 SURR BACK DECODING wj 29 TEST TONE w TREBLE eg 35 USER PRESET ws 42 VIDEO 5 INPUT jacks wl 12 2CH 6 26 1 power 1 e 18 31 32 33 34 35 42 44 List of button locations and reference pages How to use this page Use this page ...

Page 57: ...Additional Information 57GB v 1 2 3 6 5 4 7 8 9 qd qg qa qs 0 qf wg wh wj ql qk qj qh w wa ws wd wf eh ef eg ed ej es wl eae wk ...

Page 58: ... Recording E Editing See Recording Effect level 32 EQUALIZER menu 34 I Indexing See Naming L Labeling See Naming LEVEL menu 40 41 N Naming 44 R Recording on a video tape 47 on an audio tape or MD 46 S Selecting component 22 front speaker system 45 sound field 27 28 Sleep Timer 44 Sound field customizing 32 pre programmed 27 28 resetting 33 selecting 27 28 SPEAKER SET UP menu 18 38 Speakers adjusti...

Page 59: ......

Page 60: ...Sony Corporation Printed in Japan Printed on 100 recycled paper ...

Reviews: