S95E Sony
21
5. Adjustment for White Balance
a. Display SMPTE at SXGA/60Hz(Input level 0.73V).
b. Set up [SERVICE MODE].
c. Click "CLEAR EEPROM" and AC Power off.
d. Set up [SERVICE MODE] of the monitor again.
e. Click "WHITE BALANCE" and then select "AUTO".
f. Prepare timing and full black pattern.
g. Click "OFFSET CALIBRATION".
h. After offset calibration is completed prepare full white pattern. i. Click " GAIN CALIBRATION".
6. 9300K color adjustment
a. Select "9300K" in "COLOR TEMP" and enter.
b. Use a 100% IRE white video field in the primary mode.
c. Adjust "CONTRAST " to secure the color temperature.
d. Press "MENU" key to exit adjust mode.
7. 6500K color adjustment
a. Select "6500K" in "COLOR TEMP" and enter.
b. Repeat the adjustment procedure as steps b to d at 9300K.
8. SRGB color adjustment
a. Select "SRGB" in "COLOR TEMP" and enter.
b. Repeat the adjustment procedure as steps b to d at 9300K.
3.5 Service OSD
To enter service OSD menu.
1). Turn off the power switch button.
2). Press volume down,and then power key.
3). Shows the service OSD menu. That menu is located in down side of main menu.
4). The service OSD menu contains additional menus as described below.
a). ADC CALBRATION : Adjust the offset voltage and gain value in PC mode.
b). VIDEO CALBRATION : Adjust the offset voltage and gain value in video input.
c). COLOR TEMP : Adjust R/G/B Color values of contrast and brightness in 9300k, 6500k,User color
mode.
d). AGING : Select aging mode. (on/off)
e). CLEAR ETI : Initilize the used time of MFT
f). CLEAR EEPROM : Initilize the EDID DATA at DDC2B EEPROM is saved system memory.
Process : Press ok button, and then power key.
g). DEFAULT TIMING 1 : Select the resolution timing of the signal.
Menu is 1152 X 864(VESA standard timing) 1152 x 870 (MAC computer timing).
h). DEFAULT TIMIN G2 : Select the resolution timing of the signal.
Menu is 1080 i (video timing) and 1035i.
Summary of Contents for S95E
Page 1: ...S95E Sony 1 Service Manual TFT LCD COLOR COMPUTER DISPLAY SONY ...
Page 3: ...S95E Sony 3 1 Precaution Warning on power connections Installation ...
Page 4: ...S95E Sony 4 Handing the LCD screen Maintenance Transportation ...
Page 10: ...S95E Sony 10 Adjustment steps of each menu ...
Page 11: ...S95E Sony 11 ...
Page 12: ...S95E Sony 12 ...
Page 13: ...S95E Sony 13 ...
Page 14: ...S95E Sony 14 ...
Page 15: ...S95E Sony 15 ...
Page 16: ...S95E Sony 16 ...
Page 17: ...S95E Sony 17 ...
Page 18: ...S95E Sony 18 ...
Page 19: ...S95E Sony 19 ...
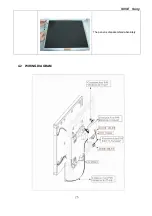
Page 26: ...S95E Sony 26 The panel is disassembled absolutely 4 2 WIRING DIAGRAM ...
Page 27: ...S95E Sony 27 4 3 Monitor Exploded View ...
Page 39: ...S95E Sony 39 ...
Page 63: ...S95E Sony 63 8 Schematic ...
Page 64: ...S95E Sony 64 ...
Page 65: ...S95E Sony 65 ...
Page 66: ...S95E Sony 66 ...
Page 67: ...S95E Sony 67 ...
Page 68: ...S95E Sony 68 ...
Page 69: ...S95E Sony 69 ...


