1-19
77
Index
Index
A
Adjusting
picture 64
tracking 64
Aerial hookup 16
Audio dubbing 71
Audio monitor 60
, 61
Audio track 61
Auto Clock Set 20
Auto Set Up 20
C
Changing the programme
position 27
Changing the station name 30
Cleaning the video heads 72
Clock setting 32
Colour system
compatible colour systems
2
Connecting
the VCR and your TV 16
,
17
to a stereo system 19
, 68
to a TV with a Scart
(EURO-AV) connector 17
to digital tuner 19
to satellite tuner 19
Counter 35
D
Demonstration 45
Dial Timer 41
Disabling the programme
positions 28
Dubbing.
see
Editing
E
Editing 68
H
Hi-fi audio track 61
I
Index scan 62
Index search 62
L
Language selection 23
LP mode 37
M
Manual fine tuning 26
Monaural 61
N
NICAM broadcasts 60
Normal audio track 61
O
Optional setting 66
P
PDC (Programme Delivery
Control) 48
Playback 34
at various speeds 53
selecting the sound 61
slow motion 53
Power save 65
Preset download 22
Presetting channels 24
R
Recording 37
bilingual programmes 60
duration time 55
saving 39
stereo programmes 60
timer setting 50
using the Dial Timer 41
using the VI
system 46
what you are watching on
the TV 40
while watching another
programme 38
RF channel 20
S
Safety tab 39
Scart connection 17
Searching
at various speeds 53
using the index function 62
Smart trilogic 64
SMARTLINK
NexTView Download 18
One Touch Menu 18
One Touch Play 18
, 36
One Touch Timer 18
TV Direct Rec 18
, 40
SP mode 37
Stereo 60
Synchronized Recording 57
T
Timer setting 50
cancelling 58
changing 58
checking 58
daily/weekly recording 48
,
51
using the Dial Timer 41
using the VI
system 46
V
VIDEOPLUS
recording 46
W
Wide screen format 66
AC68-02101R
Sony Corporation
Printed in Indonesia
Quick Start Guide
1
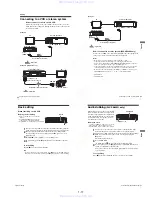
Connecting the VCR
1
... Connect the aerial to of the VCR.
2
... Connect and the aerial input of your
TV using the supplied aerial cable.
3
... For better picture and sound, connect
LINE-1 (EURO AV) to your TV using a
Scart cable if your TV has a Scart
(EURO-AV) connector.
2
Using the Auto Set Up function
1
... Turn on your TV and set it to the video
channel.
If your TV does not have a Scart
(EURO-AV) connector, tune the TV to
channel 21 (the initial RF channel of this
VCR). Refer to your TV’s manual for
TV tuning instructions. If the picture
does not appear clearly, see “To change
the RF channel.”
2
... Connect the mains lead to the mains.
3
... Press OK.
When all of the receivable channels are
preset, the menu disappears from the TV
screen. You can rearrange the programme
position in any order (see “Changing/
disabling programme positions”).
3
Setting the clock
1
... Press MENU, then press
M
/
m
/
<
/
,
to
highlight CLOCK SET and press OK.
2
... Press
M
/
m
to set the hour, then press
,
.
3
... Press
M
/
m
to set the minutes. Set the
day, month, and year in sequence by
pressing
,
to select the item to be set,
and press
M
/
m
to select the digits, then
press OK.
4
... Press MENU.
Now you can operate your VCR.
1
2
3
4
:Signal flow
LINE-1
(EURO AV)
www. xiaoyu163. com
QQ 376315150
9
9
2
8
9
4
2
9
8
TEL 13942296513
9
9
2
8
9
4
2
9
8
0
5
1
5
1
3
6
7
3
Q
Q
TEL 13942296513 QQ 376315150 892498299
TEL 13942296513 QQ 376315150 892498299


