1-17
RDR-GX220/GX330
69
Se
tti
n
g
s an
d Adj
u
st
m
ent
s
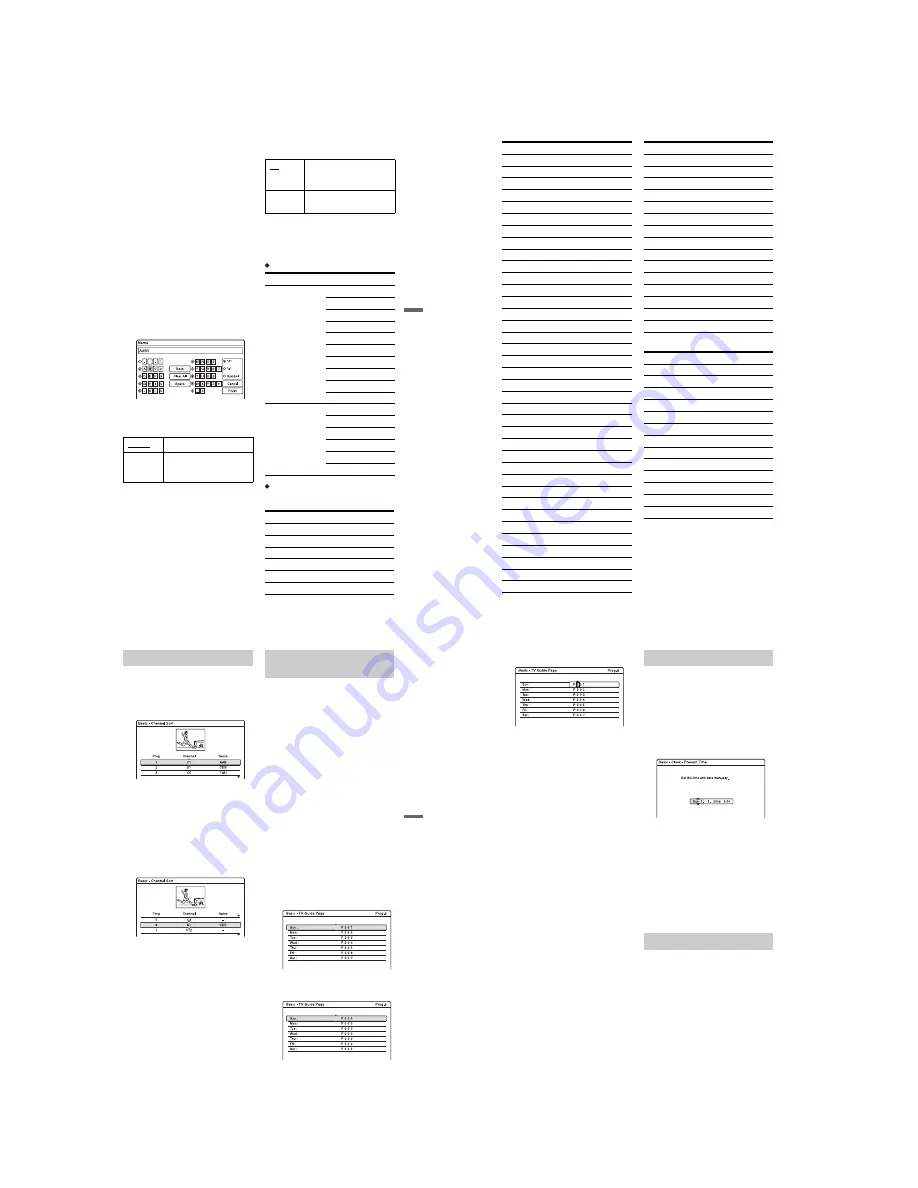
Channel
Press
M
/
m
repeatedly until the programme
position you want is displayed.
The programme positions are scanned in the
order shown in the table below.
• If you know the number of the programme
position you want, press the number
buttons. For example, for programme
position 5, first press “0” and then press
“5.”
• To disable a programme position, enter
“00.” The disabled programme positions
will be skipped when you press PROG +/–.
• To select a cable or satellite programme
position, press
M
/
m
until the programme
position you want is displayed.
Name
Changes or enters a new station name (up to
5 characters). The recorder must receive
programme position information (for
instance, SMARTLINK information) for
station names to appear automatically.
To enter characters, see page 29.
Audio
Select “NICAM” or “Standard.”
AFT
Select “On” to turn on AFT.
• If the Auto Fine Tuning function does not
work effectively, select “Off” and press
,
.
Press
M
/
m
to obtain a clearer picture, and
press
<
.
Receivable channels
For customers in Australia and New
Zealand
• Australia
NICAM
Normally, select this.
Standard
Select this if the sound from
NICAM broadcasts is not
clear.
On
Turns on the Auto Fine
Tuning function.
Normally, select this.
Off
Allows you to adjust the
pictures manually.
TV system
Channel coverage
BG
• Malaysia,
Singapore,
Thailand
• Middle East
• Australia, New
Zealand
E2 – E12 VHF
A – H VHF
AS0 – AS12 VHF
NZ1 – NZ11 VHF
E21 – E69 UHF
AS28 – AS69 UHF
S1 – S20 CATV
S1 – S46 CATV
S21 – S41 HYPER
S01 – S05 CATV
I
• Hong Kong
• South Africa
A – J VHF
4 – 13 VHF
B21 – B69 UHF
S1 – S20 CATV
S21 – S41 HYPER
S01 – S05 CATV
Channel Set number
Channel
C2
AS0
C3
AS1
C4
AS2
S44
AS3
S46
AS4
S1
AS5
,
continued
70
• New Zealand
S6
AS5A
C5
AS6
C6
AS7
C7
AS8
C8
AS9
C9
AS9A
C10
AS10
C11
AS11
C12
AS12
C28
AS28
C29
AS29
C30
AS30
C31
AS31
C31, C32
AS32
C32
AS33
C33
AS34
C34
AS35
C35
AS36
C36
AS37
C37
AS38
C38
AS39
C38, C39
AS40
C39
AS41
C40
AS42
C41
AS43
C42
AS44
C43
AS45
C44
AS46
C45
AS47
C45, C46
AS48
C46
AS49
C47
AS50
C48
AS51
C49
AS52
C50
AS53
C51
AS54
C52
AS55
Channel Set number
Channel
C52, C53
AS56
C53
AS57
C54
AS58
C55
AS59
C56
AS60
C57
AS61
C58
AS62
C59
AS63
C59, C60
AS64
C60
AS65
C61
AS66
C62
AS67
C63
AS68
C64
AS69
S1 – S20
S1 – S20
Channel Set number
Channel
C2
NZ1
C3
NZ2
C4
NZ3
C5
NZ4
C6
NZ5
C7
NZ6
C8
NZ7
C9
NZ8
C10
NZ9
C11
NZ10
C12
NZ11
C21 – C69
E21 – E69
S1 – S46
S1 – S46
Channel Set number
Channel
71
Se
tti
n
g
s an
d Adj
u
st
m
ent
s
After the programme positions have been set,
you can change the order of each programme
position in the display list.
1
Select “Channel Sort” in “Basic,” and
press ENTER.
2
Press
M
/
m
to select the row containing
the programme position you want to
move, and press ENTER.
• To display other pages for programme
positions 4 to 99, press
M
/
m
repeatedly.
3
Press
M
/
m
until the selected programme
position row moves to the desired
programme position.
The selected programme position is
inserted at the new programme position.
4
Press ENTER to confirm the setting.
5
To change the programme position of
another station, repeat from step 2.
Some broadcast systems provide a Teletext
service* in which complete programmes and
their data (title, date, programme position,
recording start time, etc.) are stored day by
day. A TV guide page corresponds to each
day of the week. When recording a
programme, the recorder automatically takes
the programme name from the Teletext pages
and stores it as the title name. The TV guide
page numbers depend entirely on the
broadcast itself and may be subject to change.
If so, you may have to set those TV guide
page numbers manually in the TV Guide
Page menu.
* This feature mostly likely cannot be used because
it requires a service that is provided in limited
areas only.
1
Select “TV Guide Page” in “Basic,” and
press ENTER.
The TV Guide Page menu appears.
2
Select the programme position for which
you want to set or change the TV guide
page using PROG +/– or number buttons.
• The TV guide page numbers (Example:
P301) appear automatically when the
recorder detects them.
• If no page numbers are detected (P000),
you have to set the appropriate TV
guide page number manually.
Channel Sort
Auto Programme Title Labelling
(TV Guide Page)
,
continued
72
3
Select the TV guide page number you
want to modify, and press ENTER.
4
Press the number buttons or
<
/
M
/
m
/
,
to enter the TV guide page number, and
press ENTER to confirm the setting.
• If you make a mistake, re-enter the
correct number.
• To return to the original settings, press
O
RETURN.
5
To set or change another TV guide page
number, repeat steps 3 and 4 above.
z
Hint
To view Teletext information on your TV screen
during a broadcast, switch to your TV’s tuner by
pressing TV/DVD.
b
Notes
• In step 4 above, enter “000” if you do not want to
use the TV guide page number for automatic
labelling. The recorder will instead store a default
title name (programme position, start time - stop
time).
• Refer to the Teletext information on your TV
screen to obtain the TV guide page number with
programme titles and their start times.
• If the Teletext TV guide has a page which always
shows the programmes for the current day, this
page should be input for all days.
• If you start recording more than three minutes
before the programme is scheduled to start, the
correct label information may not be transferred.
• Note that this function may not work correctly
with programmes broadcast from some stations.
• If the broadcast system updates the Teletext
information at the moment recording starts, the
title label may not correspond to the recorded
programme. In this case, you may have to
manually enter the correct title (page 29).
Auto Adjust (Auto Clock Set)
This function cannot be used in your area.
Present Time (Manual Clock Set)
Set the clock manually.
1
Select “Clock” in “Basic,” and press
ENTER.
2
Select “Present Time,” and press
ENTER.
3
Press
M
/
m
to set the day, and press
,
.
Set the month, year, hour, and minutes in
sequence. Press
<
/
,
to select the item
to be set, then press
M
/
m
to set the
numbers. The day of the week is set
automatically.
To change the numbers, press
<
to
return to the item to be changed, and
press
M
/
m
.
4
Press ENTER to start the clock.
Switches the display language on the screen.
Clock
OSD (On-Screen Display)


