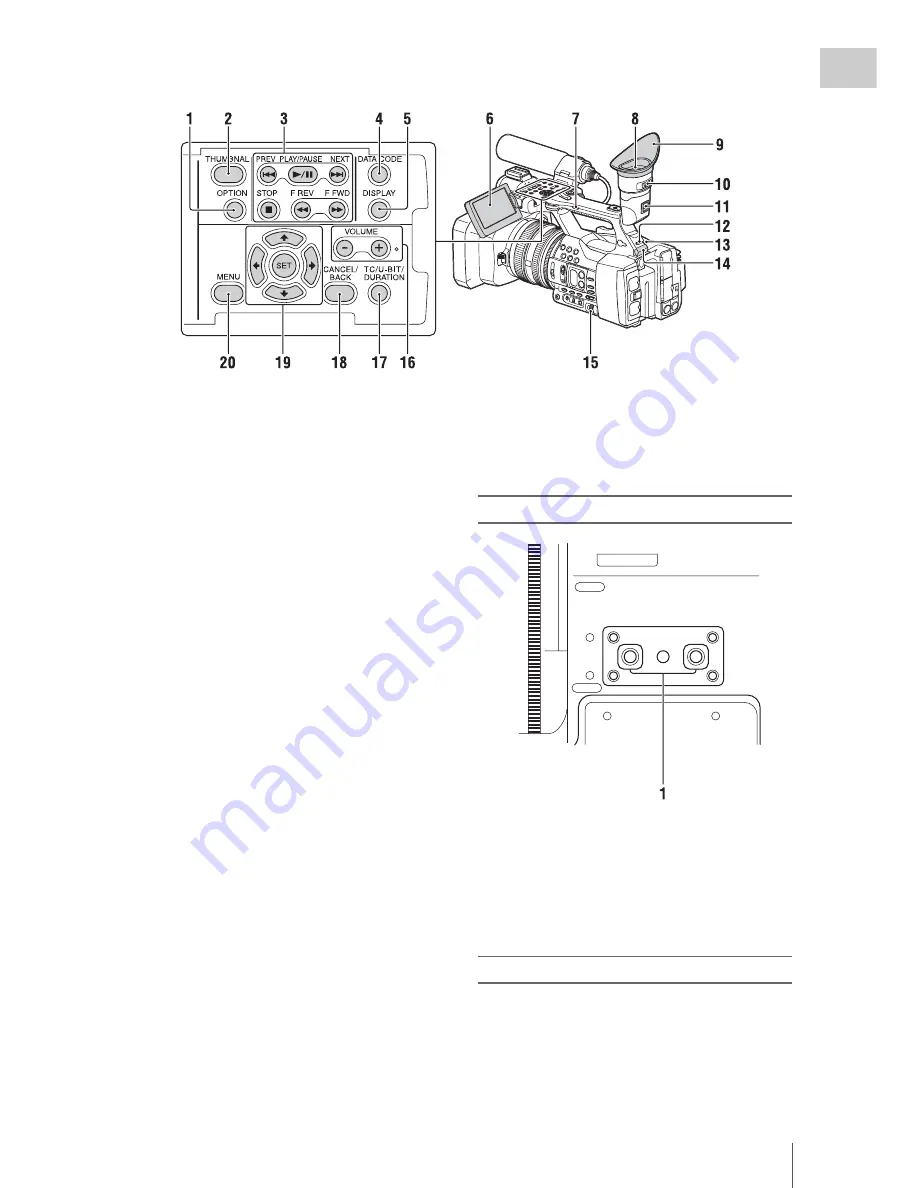
Location and Function of Parts
9
Ov
e
rv
ie
w
1.
OPTION button (36)
2.
THUMBNAIL button (35)
3.
Playback control buttons (PREV, PLAY/
PAUSE*, NEXT, STOP, F REV, F FWD)
(27)
4.
DATA CODE button
(To be supported by future upgrade.)
5.
DISPLAY button (12)
6.
LCD screen (17)
7.
Handle zoom switch (25)
8.
Viewfinder (18)
9.
Large eyecup
10.
Viewfinder lens adjustment lever (18)
11.
Viewfinder release lever (59)
12.
HEADPHONE MONITOR switch (32)
13.
Rear recording lamp (49)
14.
USB wireless LAN module retracting part
(20)
Connecting the supplied IFU-WLM3 USB
wireless LAN module (supplied) allows
communication with wireless LAN devices.
15.
SEL/SET dial buttons (39)
16.
VOLUME buttons*
17.
TC/U-BIT/DURATION button
(To switch between the timecode and
recording time display on the LCD screen.
The user bit will be supported by a future
upgrade.)
18.
CANCEL/BACK button (39)
19.
V
/
v
/
B
/
b
/SET buttons (39)
20.
MENU button (39)
* button and PLAY/PAUSE button have
raised tactile dots for your convenience in locating the
buttons.
Bottom
1.
Tripod receptacle (1/4 inch)
This is a 1/4-20UNC screw compatible.
Attach a tripod (sold separately) to the tripod
receptacle using a tripod screw (sold
separately: the length of the screw must be
less than 5.5 mm (7/32 in.)).
Status screen
To display a status screen
• Press the STATUS CHECK button.
To switch status screens
• Turn the SEL/SET dial.
Summary of Contents for PXWZ100
Page 72: ...Printed in China ...


