background image

28

Recording a picture

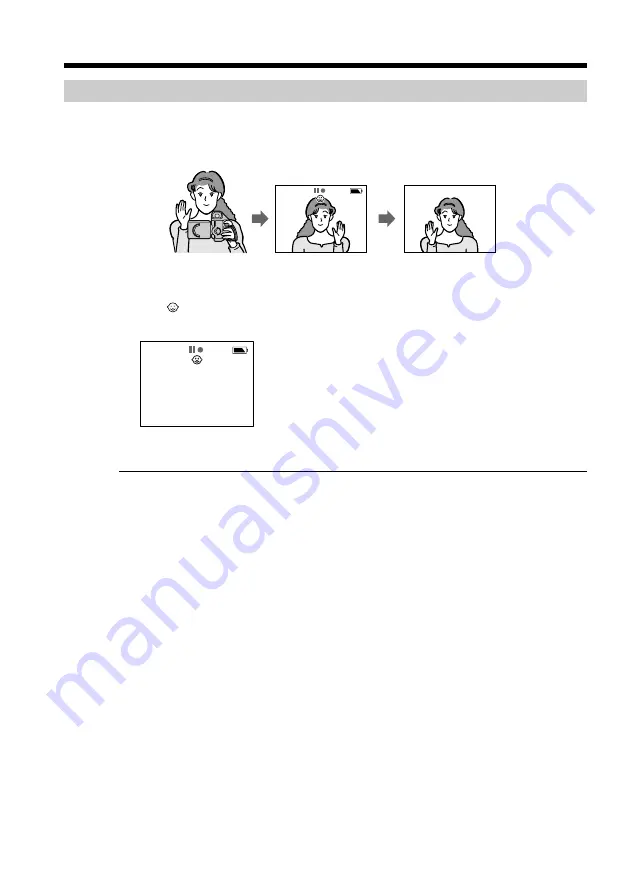
Recording while showing the picture on the LCD screen

You can record a person while showing himself/herself on the LCD screen. You can
also record yourself if you place your camcorder in a stable position. The supplied
Remote Commander will make it easy to record yourself.

(1)

Pull the 

b

OPEN protrusion and open the LCD panel.

(2)

Turn the LCD panel over so that it faces the other way.
The 

 indicator appears on the LCD screen and in the viewfinder 

(Mirror

mode)

.

(3)

Start recording.

Picture in the mirror mode

The picture on the LCD screen is a mirror-image. However, the picture will be normal
when recorded.

Indicators in the mirror mode

The STBY indicator appears as 

Xz

 and REC as 

z

. Some of the other indicators appear

mirror-reversed and others are not displayed.

Recording time using the battery pack in the mirror mode

Recording time is slightly shorter than the recording time using the LCD screen only
(p. 11).

Summary of Contents for MDDISCAM DCM-M1

Page 1: ...er is located on the bottom of the unit and serial number is located on the inside the disc lid The AC power adaptor charger s model and serial numbers are located on the bottom Record the serial number in the space provided below Refer to these numbers whenever you call upon your Sony dealer regarding this product DCM M1 MiniDisc AV Recorder Model No DCM M1 Model No AC VQ800 Serial No Serial No ...

Page 2: ...tructions in the literature accompanying the appliance For customers in the U S A and CANADA DISPOSAL OF LITHIUM ION BATTERY LITHIUM ION BATTERY DISPOSE OF PROPERLY You can return your unwanted lithium ion batteries to your nearest Sony Service Center or Factory Service Center Note In some areas the disposal of lithium ion batteries in household or business trash may be prohibited For the Sony Ser...

Page 3: ...for a Class B digital device pursuant to Part 15 of the FCC Rules These limits are designed to provide reasonable protection against harmful interference in a residential installation This equipment generates uses and can radiate radio frequency energy and if not installed and used in accordance with the instructions may cause harmful interference to radio communications However there is no guaran...

Page 4: ...e tracks 55 Jumping to the desired track 56 Setting the playing time of still picture tracks 57 Editing Checking the disc information 58 Checking the track information 59 Changing the index image 62 Moving tracks 64 Erasing tracks 65 Copying tracks 68 Dividing tracks 70 Trimming unnecessary scenes 72 Grouping the tracks 74 Making a photo track from a movie 76 Drawing Effect Drawing on the picture ...

Page 5: ...s in LP mode Still pictures photos of up to 4 500 shots Audio of up to 260 minutes REMAIN 01 23 00 07 0001 7 4 1999 2 58PM Hold the camcorder with both hands when recording You can select the picture to play back directly by touching the LCD screen Play or edit the picture by touching the menu displayed on the LCD screen Insert the disc from the bottom of the camcorder ...

Page 6: ...der Digital video edit functions p 58 Check the picture just after recording p 47 Draw on the picture p 78 Easy to move or erase the picture p 64 65 Long audio recording including three photos Interview recording p 36 PHOTO AUDIO STBY 00 01 0 00 01 0001 Listen to audio MD p 98 ...

Page 7: ...5 NP F550 battery pack 1 p 10 14 6 RMT DCM1 Wireless Remote Commander 1 p 32 1 2 3 4 6 Make sure that the following accessories are supplied with your camcorder 8 9 7 Size AA R6 battery for Remote Commander 2 p 125 8 Input pen 1 p 18 9 Tripod attachment 1 p 122 0 A V connecting cable 1 p 35 qa Lens cap 1 p 22 qs Ferrite cores large 1 small 2 p 124 qd Shoulder belt p 121 0 qa 5 qs ...

Page 8: ... Interview recording Audio track The track starts when you press AUDIO REC to begin audio recording and ends when you press x to stop recording If you record photos during audio recording the track includes those photos Title track and Drawing track The title track or drawing track makes an individual track except when you draw on a picture Each track is automatically assigned a track number You c...

Page 9: ...der get wet Keep your camcorder away from rain and sea water Letting your camcorder get wet may cause your camcorder to malfunction Sometimes this malfunction cannot be repaired a Never leave your camcorder exposed to temperatures above 140 F 60 C such as in a car parked in the sun or under direct sunlight b Do not place your camcorder so as to point the viewfinder or the LCD screen toward the sun...

Page 10: ...al shutter 5 Slide the battery pack in the direction of the arrow Press the battery pack until the terminal shutter enters completely into the AC adaptor charger Charging begins When the remaining battery indicator becomes and the CHARGE lamp lights up normal charge is completed For full charge which allows you to use the battery slightly longer than normal charge leave the battery pack attached u...

Page 11: ...an empty battery pack fully Full charge Approximate minute in parentheses indicates the time when you charge normally Normal charge The charging time may differ depending on the condition of the battery pack or the temperature of the environment Remaining battery indicator Recording time Recording with Recording with Battery pack the viewfinder the LCD screen Continuous Typical Continuous Typical ...

Page 12: ...the time using a normally charged battery The battery life will be shorter if you use your camcorder in a cold environment To check charging During charging you can check the charging time on the display BATTERY LIFE lights up on the display shortly after charging has started Press DISPLAY CHANGE during charging Each time you press DISPLAY CHANGE the display changes as follows The remaining batter...

Page 13: ...es There is a difference between the displayed time and actual charging time Even if this happens continue charging Full charge requires about 1 hour after normal charge is completed If you remove the battery pack between normal charge and full charge the charging time may not be displayed properly in the next charging If the charging time is not displayed properly fully charge the battery pack Th...

Page 14: ...y the battery compartment lid to prevent the battery pack from dropping Remaining battery time indicator of the camcorder Approximate time remaining for continuous recording will be displayed on the LCD screen or in the viewfinder The time may not be correct depending on the condition or environment the camcorder is used It will take about 1 minute for the camcorder to display a correct remaining ...

Page 15: ... the mode change switch to CHARGE while operating the camcorder the power supply to the camcorder stops Be sure that nothing metallic comes into contact with the metal parts of the AC adaptor charger If it does a short may occur and the AC adaptor charger may be damaged You cannot charge the battery pack attached to the AC adaptor charger while supplying the power to the camcorder Keep the AC adap...

Page 16: ...he disc compartment with the label facing up 4 Close the disc lid To eject the disc Follow the procedure above and take out the disc in step 3 Notes If the POWER switch is set to CAMERA or INTERVIEW you may not be able to eject the disc If this happens turn off the power first and then reconnect the power sources Then try again Do not face the disc opening down when you insert or eject a disc to a...

Page 17: ...17 Getting started Step 2 Inserting an MD DATA2 disc To prevent accidental erasure Slide open the tab at the side of the disc so the tab is concealed Rear of the disc ...

Page 18: ...How to operate the menu is described here as an example Using the input pen Example turning off the beep 1 Pull out the input pen Adjust the length of the input pen The length of the input pen can be extended by about 12 32 inch about 1 cm 2 Lift the bOPEN protrusion and open the LCD panel Turn the LCD panel over and move it back into the camcorder body with the LCD screen facing out You will get ...

Page 19: ...a pointed object such as a pen Notes on the input pen Use only the supplied input pen You may not be able to operate your camcorder with other commercially available input pens Do not push on or hit the LCD panel hard with the input pen Doing so may cause your camcorder to malfunction Take care not to damage or dirty the tip of the input pen If you made the input pen longer shorten it to the origi...

Page 20: ...ate it p 108 When PLEASE WAIT is displayed on the LCD screen Do not apply a mechanical shock to the camcorder or disconnect the power source Using the shortcut menu You can display some of the menu items quickly 1 Press MENU during playback or pause The shortcut menu appears 2 Touch the desired item The setting or adjusting display of the item appears To turn off the shortcut menu Press MENU again...

Page 21: ... select ON and press the dial 6 Press MENU to close the menu SEL PUSH ENTER STBY CAMERA RETURN SELF TIMER PROGRAM AE D ZOOM STEADYSHOT WHT BAL AUTO SHTR ANTI WIND NOISE STBY SET UP CAMERA CLOSE INTERVIEW C A M E RA P L A Y EDIT OFF 1 2 MENU 5 SEL PUSH ENTER 4 SEL PUSH ENTER 3 OFF STBY CAMERA RETURN SELF TIMER PROGRAM AE D ZOOM STEADYSHOT WHT BAL AUTO SHTR ANTI WIND NOISE OFF ON STBY CAMERA RETURN ...

Page 22: ...ressing the small green button Your camcorder is set to the standby mode after a few seconds 5 To record a movie Press START STOP Your camcorder starts recording The REC indicator appears The camera recording lamp located on the front of your camcorder lights up To stop recording press START STOP again To record a photo Press PHOTO once The scene when you press the button is recorded 4 3 2 5 PHOTO...

Page 23: ...track In the ANTI GROUND recording mode recording while you are pressing START STOP makes one track p 93 You can renew tracks every 10 seconds p 93 One photo makes one track Note on recording a photo If you record a fast moving object the playback picture may look blurred This is not a malfunction of your camcorder To record in the dark Use a video flash not supplied You can use a video flash when...

Page 24: ...is locked in the CAMERA and INTERVIEW mode you cannot open the disc lid without the battery Indicators displayed in the recording mode The indicators are not recorded in the disc Remaining battery time indicator p 14 REC REMAIN 09 59 00 01 0001 min 40 Recording mode indicator p 26 STBY REC indicator p 22 Remaining disc indicator p 58 Track number Recording time Track type icon p 31 ...

Page 25: ...inder automatically turns off When you use the LCD screen outdoors in direct sunlight The LCD screen may be difficult to see If this happens we recommend that you use the viewfinder When you adjust angles of the LCD panel Make sure that the LCD panel is opened up to 90 degrees Do not open or turn the LCD screen forcibly When you adjust the brightness of the LCD panel Select LCD BRIGHT in the menu ...

Page 26: ... min Recording mode of movie SP standard play High picture quality the default setting VP variable picture quality The data consumption is automatically adjusted according to the object being recorded The deterioration of picture quality is kept to a minimum and the recording time is longer than the SP mode LP long play The recording time is double the SP mode The picture quality is lower than the...

Page 27: ...subject If you cannot get a sharp focus move the power zoom lever to the W side until the focus is sharp You can shoot a subject that is at least about 2 feet 5 8 inch about 80 cm away from the lens surface in the telephoto position or about half an inch about 1 cm away in the wide angle position Notes on digital zoom Digital zoom starts to function when zoom exceeds 10x The picture quality deteri...

Page 28: ...panel over so that it faces the other way The indicator appears on the LCD screen and in the viewfinder Mirror mode 3 Start recording Picture in the mirror mode The picture on the LCD screen is a mirror image However the picture will be normal when recorded Indicators in the mirror mode The STBY indicator appears as Xz and REC as z Some of the other indicators appear mirror reversed and others are...

Page 29: ... Turn the control dial to select YES and press the dial to confirm After the PLEASE WAIT message which appears while the change is written in the disc the camcorder returns to the recording standby mode The track is erased Note You cannot restore the track once it has been erased To erase all tracks While pressing ERASE press START STOP Erasing the last portion of the last recorded track 1 During ...

Page 30: ... by 12 32 inch about 1 cm 3 Lift the bOPEN protrusion and open the LCD panel Turn the LCD panel over and move it back into the camcorder body with the LCD screen facing out 4 Set the POWER switch to PLAY EDIT while pressing the small green button The tracks of recorded pictures appear on the index display 5 Touch the track you want to play with the input pen The selected track is framed in orange ...

Page 31: ...alfunction Index display Track icons Type of track is indicated by the icons Movie track Photo track Audio track Title track Memo track Group track To change the index image of a movie You can use the scene you want p 62 If date and time are not set in your camcorder appears Playing a disc REMAIN 01 23 00 07 0004 7 4 1999 2 58PM Menu icons Selected track Index image The first scene appears in case...

Page 32: ... the previous track To locate a scene monitoring the picture Keep pressing or during playback To resume normal playback release the button To view the picture frame by frame 1 Press u X during playback 2 Turn the control dial press cursor B V v b To resume normal playback press u N To view the picture at slow speed movie only You can play at the desired speed 1 Press y during playback The picture ...

Page 33: ...the VOL buttons The speaker is muted Erasing a track 1 Touch the track you want to erase on the index display 2 Press ERASE The confirmation message appears 3 Touch YES After the PLEASE WAIT message which appears while the change is written in the disc the index display appears The track is erased Note You cannot restore the track once erased While playing You can also erase the track by pressing ...

Page 34: ...mation display 1 Press DSPL when the index display is on The track type icons disappear from the LCD screen To make the track data appear press DSPL again If you press DSPL during playback The track data appears Playing a disc DSPL ...

Page 35: ...our TV is already connected to a VCR Connect your camcorder to the LINE IN input on the VCR by using the A V connecting cable supplied with your camcorder Set the input selector on the VCR to LINE If your TV or VCR is a monaural type Connect the yellow plug of the A V connecting cable to the video input jack and the white or the red plug to the audio input jack on the VCR or the TV If you connect ...

Page 36: ...d by x which increases every 10 seconds When x reaches the right end it starts over 3 Press PHOTO when you want to insert photos If you have not started audio recording you cannot record photos The recorded photos appear to the right of the screen To stop recording Press x When you have finished interview recording Slide the mode lock to the left to prevent the POWER switch from being set to INTER...

Page 37: ...reen of the track recorded in the INTERVIEW MODE You will hear the audio On the LCD screen are a large blank screen and small photos to the right of the screen When the recorded photo is reached during playback the large screen will be replaced by the photo When the interview recording was done like this Audio recording Photo recording it is played back like this Audio playback Photo playback Pict...

Page 38: ...the waiting time passes x decreases every 1 second When x all disappear your camcorder starts recording automatically As the recording time passes the bar becomes longer Your camcorder stops recording automatically after 10 seconds To record a photo Press PHOTO Self timer starts counting down from 10 seconds As the waiting time passes x decreases every 1 second When x all disappear your camcorder ...

Page 39: ... Use your camcorder in the mirror mode Note The self timer recording mode is automatically canceled when Self timer recording is done The POWER switch is set to OFF PLAY EDIT or INTERVIEW To cancel self timer recording after counting down has started Press START STOP or PHOTO again Note on the mirror mode Since DETAIL is not displayed in the mirror mode set the waiting and recording time before yo...

Page 40: ...t or a subject with a light background use the backlight function 1 Press BACK LIGHT in the recording or standby mode The indicatorappearsontheLCDscreenorintheviewfinder To cancel press BACK LIGHT again If you press EXPOSURE when shooting backlit subjects The backlight function will be canceled BACK LIGHT ...

Page 41: ...e prevents people s faces from appearing dark in strong light or reflected light such as at a beach in midsummer or on a ski slope Sunset moon mode This mode allows you to maintain atmosphere when you are recording sunsets general night views fireworks displays and neon signs Landscape mode This mode is for when you are recording distant subjects such as mountains and prevents your camcorder from ...

Page 42: ...o far distance In the sunset moon and landscape modes your camcorder is set to focus only on distant subjects While WHT BAL is set to AUTO in the menu settings The white balance is adjusted even if the PROGRAM AE function is selected If you press EXPOSURE when the PROGRAM AE function is selected You can adjust the exposure If you are recording under a discharge tube such as a fluorescent lamp sodi...

Page 43: ...wfinder 2 Turn the focus ring to sharpen focus Focusing manually To return to the autofocus mode Press FOCUS lightly to turn off the 9 or indicator To record distant subjects Press FOCUS for more than one second INFINITY Your camcorder focuses on distant subjects and the indicator appears Use this mode when your camcorder focuses on near objects even though you are trying to shoot a distant object...

Page 44: ...URE The exposure indicator appears 2 Turn the control dial to adjust the brightness To return to the automatic exposure mode Press EXPOSURE again Note When you adjust the exposure manually the backlight function does not work If you select a PROGRAM AE mode while you are adjusting the exposure manually Your camcorder automatically returns to the automatic exposure mode Press EXPOSURE again and adj...

Page 45: ...select STEADYSHOT and press the dial 4 Turn the control dial to select OFF and press the dial 5 Press MENU The menu disappears and the indicator appears on the LCD screen or in the viewfinder To activate the STEADYSHOT function Set STEADYSHOT to ON in the menu Notes The STEADYSHOT function will not correct excessive camera shake If you attach a tele conversion lens or wide conversion lens the STEA...

Page 46: ...eturn to the automatic white balance mode Set WHT BAL to AUTO in the menu If the picture is being taken in a studio lit by TV lighting We recommend that you record in the n indoor mode When you record under fluorescent lighting Use the automatic white balance or hold mode Your camcorder may not adjust the white balance correctly in the n indoor mode In the automatic white balance mode Point your c...

Page 47: ...URE IN PICTURE 2 Touch ON 3 Touch to close the menu appears at the top of the index display 4 Play back the desired track 5 Pause at the scene you want to use in the picture in picture screen You can change the scene by turning the control dial 6 Touch CAPTURE The scene appears in the picture in picture screen 7 Release pause To turn off the picture in picture screen Set PICTURE IN PICTURE to OFF ...

Page 48: ...To operate the menu You may use the control dial If PICTURE IN PICTURE is already set to ON A previously selected scene appears in the picture in picture screen The picture will be replaced by a new scene when you touch CAPTURE You can select PICTURE IN PICTURE in the shortcut menu To turn on the shortcut menu press MENU during playback or playback pause The image in the picture in picture screen ...

Page 49: ...d 1 On the index display touch PLAYBACK and then 9 FRAME SEQUENCE 2 Touch the desired track You can select a movie track only If you want to cancel the operation touch CANCEL 3 Touch PAUSE at the desired scene 4 Adjust the scene position by touching FORWARD or BACK and touch EXEC Nine still pictures appear on the screen 9 FRAME SEQUENCE CANCEL PLAYBACK RETURN PICTURE IN PICTURE 9 FRAME SEQUENCE PL...

Page 50: ...ial You can select 9 FRAME SEQUENCE in the shortcut menu To turn on the shortcut menu press MENU during playback or playback pause To select the scene You may use the control dial Turn the control dial to select the scene and press the dial to confirm Note on digital effect Drawing scene transition and picture effects are not applied to the nine still pictures or its enlarged picture If you select...

Page 51: ...epeated first Repeating a portion of a movie A B repeat 1 On the index display touch PLAYBACK and then PLAY MODE 2 Touch A B REPEAT 3 Touch to close the menu Ay B appears at the top of the index display PLAYBACK RETURN PICTURE IN PICTURE 9 FRAME SEQUENCE PLAY MODE SORT JUMP STILL PLAYBACK TIME PRESET TRANSITION NORMAL ALL REPEAT SINGLEREPEAT A B REPEAT SHUFFLE INTRO SCAN PLAYBACK RETURN PICTURE IN...

Page 52: ...an set the A and B points by touching AB with the input pen A B repeat is possible only with movie tracks If you select other type of track AB appears but it cannot be set A B repeat is possible only within one track You cannot set A in one track and B in another track A B repeat is possible with a movie track in a group track If the interval between A and B is shorter than 0 5 second your camcord...

Page 53: ... tracks in another order touch SHUFFLE To operate the menu You may use the control dial Shuffle play is canceled if you eject the disc turn the POWER switch to OFF When the shuffle play is set The menu does not appear on the index display You can turn on the shortcut menu PLAYBACK RETURN PICTURE IN PICTURE 9 FRAME SEQUENCE PLAY MODE SORT JUMP STILL PLAYBACK TIME PRESET TRANSITION NORMAL ALL REPEAT...

Page 54: ... top of the index display 4 Play the track to be played first The first 3 seconds of each track are played To stop scanning Set PLAY MODE to NORMAL To operate the menu You may use the control dial PLAYBACK RETURN PICTURE IN PICTURE 9 FRAME SEQUENCE PLAY MODE SORT JUMP STILL PLAYBACK TIME PRESET TRANSITION NORMAL ALL REPEAT SINGLEREPEAT A B REPEAT SHUFFLE INTRO SCAN PLAYBACK RETURN PICTURE IN PICTU...

Page 55: ... desired order To display the desired type of tracks 1 Touch JUMP on the SORT screen The type of tracks recorded in the disc are displayed 2 Touch the desired track type To return to the index display Touch CLOSE To operate the menu You may use the control dial When sorting mode is selected The menu does not appear on the index display You can turn on the shortcut menu Sorting mode is canceled if ...

Page 56: ...oll the list touch v or V or turn the control dial The selected track is framed on the index screen Title Tracks created by the title function p 82 or recording date automatically recorded in the disc p 93 Track name Names input on the track information display p 60 To turn off the list Touch CLOSE in the list To operate the menu You may use the control dial PLAYBACK RETURN PICTURE IN PICTURE 9 FR...

Page 57: ... another playing time is selected 1 On the index display touch PLAYBACK and then STILL PLAYBACK TIME 2 Touch the desired playing time 3 Touch to close the menu The index display appears 4 Play the desired track To operate the menu You may use the control dial PLAYBACK RETURN PICTURE IN PICTURE 9 FRAME SEQUENCE PLAY MODE SORT JUMP STILL PLAYBACK TIME PRESET TRANSITION PLAYBACK RETURN PICTURE IN PIC...

Page 58: ...oto memo and title tracks recorded in the disc Playback time of each still picture track photo memo and title is the one set in the menu If more than 10 hours total playback time is recorded in the disc 10HOver appears Note on the figure in REMAIN REMAIN shows the remaining recording time or tracks If you set REC MODE to VP you may be able to record longer than the indicated recording time DISC IN...

Page 59: ...te the menu You can use the control dial To display the track information display directly Select the track on the index display Touch the track information at the bottom of the screen Note on the data rate The data rate only appears for movie tracks The average rate appears for the movie tracks recorded in the VP mode To check the information of other tracks Touch CONTINUE in step 5 Track name bo...

Page 60: ...ex display 1 Touch the MARK box in the track information display to indicate icon will be displayed on the marked tracks To cancel the mark setting Touch the MARK box again to erase You cannot mark the track if the disc is protected the track is protected is in the PROTECT box To mark using the Remote Commander Select the desired track on the index display then press MARK on the Remote Commander T...

Page 61: ...x in the track information display to indicate icon will be displayed on the protected tracks To release protection Touch the PROTECT box again to erase You cannot protect the track if the disc is protected Checking the track information 12 24 1999 1 30PM 0002 01 23 TRACK INFORMATION MARK PROTECT 8 00 Mbps DATA RATE CLOSE ...

Page 62: ...ppears while the change is written in the disc the INDEX IMAGE CHANGE screen appears 7 Touch FINISH The index display appears To operate the menu You can use the control dial You cannot change the index image if the disc is protected the track is protected Note on effects Drawing scene transition and picture effects are not applied to the index image You can select INDEX IMAGE CHANGE in the shortc...

Page 63: ...GE on the Remote Commander at the scene you want to make into the index image The confirmation message appears 2 Select YES using B b then press ENTER After the PLEASE WAIT message which appears while the change is written in the disc the camcorder resumes playback Changing the index image ...

Page 64: ... WAIT message which appears while the change is written in the disc the index display appears To move several tracks together First group the tracks and then move them 1 Group the tracks you want to move p 74 2 Move the tracks as described above To operate the menu You can use the control dial You cannot move the track s if the disc is protected To cancel moving Touch CANCEL To move other tracks T...

Page 65: ...h YES If you do not want to erase the track touch NO 5 Touch FINISH After the PLEASE WAIT message which appears while the change is written in the disc the index display appears The track is erased and the track next to the erased track is framed To operate the menu You can use the control dial If you erase a group of tracks All tracks in the group are erased You cannot erase the track s if the di...

Page 66: ...e top of the screen 3 Touch the box at the top left of each track you want to erase appears in the box 4 Touch EXEC The confirmation message appears 5 Touch YES If you do not want to erase the tracks touch NO After the PLEASE WAIT message which appears while the change is written in the disc the index display appears The selected tracks are erased and the first track is framed To cancel erasing To...

Page 67: ...nge is written in the disc the index display appears All tracks except the protected tracks are erased To cancel erasing Touch CANCEL Initializing the disc All tracks in the disc including the protected tracks will be erased 1 Touch ADVANCED 2 Touch DISC FORMAT The confirmation message appears 3 Touch YES If you do not want to erase the tracks touch NO EDIT RETURN SINGLE SELECT ALL RETURN MOVE COP...

Page 68: ...age which appears while the change is written in the disc the index display appears To copy several tracks together First group the tracks and then copy them 1 Group the tracks you want to copy p 74 2 Copy the tracks as described above To operate the menu You can use the control dial You cannot copy the track s if the disc is protected Note on the remaining disc capacity The remaining disc capacit...

Page 69: ...69 Editing Copying tracks To not erase a track by mistake Copy the track and use the copy for editing To cancel copying Touch CANCEL To copy other tracks Touch CONTINUE in step 5 ...

Page 70: ...ching FORWARD or BACK then touch EXEC 6 Touch EXEC 7 Touch FINISH After the PLEASE WAIT message which appears while the change is written in the disc the new track made by dividing appears next to the original track To operate the menu You can use the control dial To cancel dividing Touch CANCEL Track 1 Track 2 Track 3 Divide Track 1 Track 2 Track 3 Track 4 EDIT RETURN DIVIDE COMBINE RETURN MOVE C...

Page 71: ...corded time of the track made by dividing It is same as the original track To divide other tracks Touch CONTINUE in step 7 Combining the divided track If the divided track has been moved away from the original track you cannot recombine them First line them up in the same order as the original track 1 Touch EDIT 2 Touch DIVIDE then COMBINE TRACK COMBINE appears at the top of the screen 3 Touch the...

Page 72: ... keep the scenes from 5 Adjust the scene position by touching FORWARD or BACK then touch EXEC 6 Touch PAUSE where you want to keep the scenes up to 7 Adjust the scene position by touching FORWARD or BACK then touch EXEC The scenes you have kept are displayed 8 Touch EXEC 9 Touch FINISH After the PLEASE WAIT message which appears while the change is written in the disc the index display appears Tra...

Page 73: ...n the trimming position The trimming position is automatically adjusted so that trimmed track becomes at least 0 5 second long Note on effects Scene transition setting will be canceled if you trim the track To adjust the trimming position You can use the control dial Turn the control dial to adjust the position and press the dial to confirm To trim other tracks Touch CONTINUE in step 9 Trimming un...

Page 74: ...rack to be included in the group 5 Touch FINISH After the PLEASE WAIT message which appears while the change is written in the disc only the first track of the group is displayed on the index display To operate the menu You can use the control dial To cancel grouping Touch CANCEL You cannot group the tracks if the disc is protected If you include a protected track in the group The entire group tra...

Page 75: ...ng playback EDIT menu TRIM DIVIDE STILL FRAME CAPTURE INDEX IMAGE CHANGE DRAWING EFFECT menu DRAWING SCENE TRANSITION PICTURE EFFECT Releasing the tracks from the group If you want all the tracks to appear individually on the index display after you have moved or copied the tracks in a group release the group 1 Touch EDIT 2 Touch GROUP then RELEASE 3 Touch the grouped track All the tracks in the g...

Page 76: ...ACK then touch EXEC 6 Touch EXEC After the PLEASE WAIT message which appears while the change is written in the disc the new photo track of the scene appears next to the original movie track 7 Touch FINISH The index display appears To operate the menu You can use the control dial To cancel the operation Touch CANCEL You cannot make a track by capturing a scene if the disc is protected Note on the ...

Page 77: ...and picture effects which have been set on the original movie are not applied to this photo track To adjust the scene position You can use the control dial Turn the control dial to adjust the position and press the dial to confirm To continue making photo tracks Touch CONTINUE in step 7 ...

Page 78: ...as you like then touch SAVE See page 77 for how to use the illustration tool After the PLEASE WAIT message which appears while the change is written in the disc the DRAWING mode display appears 5 Touch FINISH The index display appears To operate the menu You can use the control dial To cancel drawing Touch CANCEL All the drawing you made so far is canceled You cannot draw if the disc is protected ...

Page 79: ...track The illustration tool appears on the black screen 4 Draw as you like then touch SAVE See page 80 for how to use the illustration tool After the PLEASE WAIT message which appears while the change is written in the disc the DRAWING mode display appears 5 Touch FINISH The index display appears To revise the memo track Select ADD LAYER then the memo track to be revised RETURN ADD LAYER INSERT TR...

Page 80: ...ge the size of the illustration tool To draw a straight line To draw a square Cursor To move the cursor To insert a space To delete the character before cursor To write lower case letters To draw a frame To erase First touch this eraser icon then touch where you want to erase on the LCD screen Stamp icon Touch this stamp icon and the stamps will be displayed Touch the desired stamp To draw a circl...

Page 81: ... The icon disappears from the track 5 Touch FINISH After the PLEASE WAIT message which appears while the change is written in the disc the index display appears To cancel erasing Touch NO If you select CLEAR in the illustration tool The icon does not disappear To erase the icon follow the above steps To erase the memo track Erase the track by selecting ERASE in the EDIT menu To continue erasing th...

Page 82: ...Input the title you like then touch EXEC The title you made appears at the selected position 6 Touch FINISH After the PLEASE WAIT message which appears while the change is written in the disc the index display appears To operate the menu You can use the control dial To cancel making a title Touch CANCEL Track name of the title track The title track has the same name as the title itself If you chan...

Page 83: ...ack appears inlaid into the previous track Effects to be applied only to the end of a track Blackout A black screen is displayed at the end of each track Hold Each track pauses for a while at the end 1 Touch DRAWING EFFECT 2 Touch SCENE TRANSITION SCENE TRANSITION appears at the top of the screen 3 Touch the desired track 4 Touch the effect and direction for the track to appear 5 Touch the effect ...

Page 84: ...lect the track which appears first when you set these effects These effects are available only when you select a track followed by either a movie or a photo track These effects are canceled if you set an IN effect to its succeeding track if you move the track if you move or copy other track between the tracks Notes on wipe and cross wipe effects Touch the desired direction to switch You cannot set...

Page 85: ...t To not fade or hold Select OFF of PRESET TRANSITION Note The PRESET TRANSITION setting is kept even if your camcorder is turned off If a SCENE TRANSITION effect of the EDIT menu is set to the track The track is played back with the SCENE TRANSITION effect Note on playback The PRESET TRANSITION effects will not be played back on a photo set to play for one second a very short movie Note on a grou...

Page 86: ...ge which appears while the change is written in the disc the index display appears To not apply the digital effect on the track Select OFF To operate the menu You can use the control dial To cancel setting the picture effects Touch CANCEL All the settings you made so far are canceled You cannot set the picture effects if the disc is protected the track is protected Note on playback Sepia black and...

Page 87: ...he control dial to adjust the brightness or color then press the dial Note You cannot adjust the brightness and color of the LCD screen when the LCD screen is closed To operate the menu You can use the control dial to select the menu items LCD BRIGHT LCD COLOR STBY SET UP RETURN REC MODE LCD BRIGHT CLOCK SET LCD COLOR VF BRIGHT Camera Interview mode Play Edit mode SET UP RETURN LCD BRIGHT LCD COLO...

Page 88: ...he dial The bar indicator appears 4 Turn the control dial to adjust the brightness while looking into the viewfinder then press the dial Note You cannot adjust the brightness of the viewfinder when the viewfinder is turned off STBY SET UP RETURN REC MODE LCD BRIGHT CLOCK SET LCD COLOR VF BRIGHT Camera Interview mode SET UP RETURN LCD BRIGHT LCD COLOR VF BRIGHT CLOCK SET AVLS BEEP COMMANDER VF BRIG...

Page 89: ...n the control dial to adjust the year then press the dial 5 Set the month day hour and minute by turning the control dial and pressing the dial 6 Touch EXEC on the screen The clock starts to operate Resetting the date and time Camera Interview mode Play Edit mode STBY SET UP RETURN REC MODE LCD BRIGHT CLOCK SET LCD COLOR VF BRIGHT SET UP RETURN LCD BRIGHT LCD COLOR VF BRIGHT CLOCK SET AVLS BEEP CO...

Page 90: ... in the disc Note on the time indicator The internal clock of your camcorder operates on a 12 hour cycle 12 00 AM stands for midnight 12 00 PM stands for noon To operate the menu You can use the control dial to select the menu items Resetting the date and time 1999 2000 N n 2098 ...

Page 91: ... RETURN 6 To close the menu touch or press MENU Items in the main menu are displayed with the following icons CAMERA menu SET UP menu PLAYBACK menu EDIT menu DRAWING EFFECT menu ADVANCED menu MENU STBY SET UP CAMERA CLOSE EDIT PLAYBACK DRAWING EFFECT SET UP ADVANCED CLOSE Camera Interview mode Play Edit mode PLAYBACK RETURN PICTURE IN PICTURE 9 FRAME SEQUENCE PLAY MODE SORT JUMP STILL PLAYBACK TIM...

Page 92: ...hooting requirement p 41 To deactivate the digital zoom Up to 10 zoom is carried out To activate the digital zoom More than 10 to 40 zoom is performed digitally To cancel the SteadyShot function p 45 Natural pictures are produced when shooting a stationary object with a tripod To compensate for camera shake To adjust the white balance p 46 To deactivate the electronic shutter even when shooting in...

Page 93: ...t the beep when you start stop recording or press other operation buttons To turn off the camera recording lamp so that person is not aware of the recording To turn on the camera recording lamp at the front of the camcorder To deactivate the Remote Commander to avoid remote control misoperation caused by other VCR s remote control To activate the Remote Commander supplied with your camcorder To no...

Page 94: ...s in the disc with an effect such as fade p 85 To move tracks to the desired position p 64 To copy tracks to the desired position p 68 To erase unnecessary scenes at the beginning and the end of a movie p 72 To erase tracks p 65 To divide a movie track into two tracks p 70 To group some tracks p 74 To make a photo track of a scene in a movie p 76 To change the scene of the track to be displayed on...

Page 95: ... operation buttons will be reset to the default settings except for clock setting Mode OFF z ON OFF z ON Meaning To cancel the beep sound To output the beep when you start stop recording or press other operation button To deactivate the Remote Commander to avoid remote control misoperation caused by other VCR s remote control To activate the Remote Commander supplied with your camcorder To transmi...

Page 96: ...i8 Digital8 VHS S VHS VHSC S VHSC Betamax ED Betamax mini DV or DV If your VCR is a monaural type Connect the yellow plug of the A V connecting cable to the video input jack and the white or the red plug to the audio input jack on the VCR When the white plug is connected the left channel audio is output and the red plug is connected the right channel audio is output Connect using an S video cable ...

Page 97: ...order Connect it to the AUDIO VIDEO jack and connect the yellow plug of the cable to the video input of the video printer Refer to the operating instructions of the video printer as well If the video printer is equipped with S video input Use the S video connecting cable not supplied Connect it to the S VIDEO jack and the S video input of the video printer Signal flow Video printer Yellow S VIDEO ...

Page 98: ... 8 Playing time of current track 9 Recording mode stereo or monaural 0 Scroll bar qa Play time of each track displayed only if it is recorded in the MD Note on headphones Use headphones of the stereo mini plug type To select a track You can use the control dial Turn the control dial to select the track and press the dial to start playing Note on the menu You cannot control the menu when an audio M...

Page 99: ...our surroundings so you can avoid mishaps Playing repeatedly or in random order You can play one track or all tracks repeatedly or all tracks in random order 1 Insert the audio MD and set the POWER switch to PLAY EDIT The operation screen for audio MDs appears 2 Touch PLAY MODE repeatedly until the desired play mode icon appears to the left Icon Play mode None normal play All the tracks are played...

Page 100: ...rack is sent to the computer To play the photo on the computer The format of the photo turns into JPEG format To play the movie on the computer The format of the movie turns into Quick Time format Motion JPEG on the camcorder s homepage To play the movie Apple Quick Time Ver 3 0 or greater is required Data size Photo about 96 kilobytes per track Movie about 8 kilobytes minimum about 96 kilobytes m...

Page 101: ...ouch CANCEL and repeat from step 1 6 Touch CONFIRM The camcorder automatically turns off and on again The setting is completed To set the IP address on the computer Set the IP address on the computer in accordance with your camcorder In case of the above setting 192 168 0 10 set as follows IP address 192 168 0 X X can be any number from 1 to 254 except 10 Do not use the same number for the last di...

Page 102: ...ally available cross cable 1 Connect the connecting cable to the camcorder 2 Connect the camcorder to the computer using a commercially available cross cable Notes Turn off the power of the camcorder and computer before connection You cannot shut the battery lid when the cross cable is connected Note on the type of the computer s network terminal Either an exclusive 10BASE T terminal or a 10BASE T...

Page 103: ...ore than one computer at the same time Doing so may cause malfunction If the Connect the network cable message appears Make connection as described in Step 2 Connecting the camcorder to the computer Caution Do not change the disc while the homepage is displayed When you change the disc close the homepage first If the picture in the previous disc appears on the computer display after you have chang...

Page 104: ... 15 5 2 1 2 Track number 3 Title track 4 Click the index image another window will open 5 Go back to previous page 6 Go to the browser page of text only 7 Movie track 8 Playback time 9 Photo track 0 Go to next page qa Jump to the designated page To close the homepage 1 Quit the browser on the computer 2 Touch EXIT on the homepage on your camcorder s screen 3 Turn off your camcorder 1 2 3 4 5 6 7 8...

Page 105: ...ecked by a Sony dealer before operating it any further Avoid rough handling or mechanical shock Be particularly careful of the lens Do not touch the lens in the disc compartment If the lens becomes dirty playback may not be performed or pictures may dropout To keep the lens away from dust keep the disc lid shut except when you insert or eject a disc To attach a tripod use the supplied tripod attac...

Page 106: ... the LCD screen when you move or carry your camcorder Doing so may cause malfunction of the LCD screen AC adaptor charger Unplug the AC adaptor charger from the wall outlet when you are not using the AC adaptor charger for a long time To disconnect the power cord pull it out by the plug Never pull the power cord itself Do not operate the AC adaptor charger with a damaged cord or if the AC adaptor ...

Page 107: ... completely once a year Store the battery pack in a cool dry place Dry batteries To avoid possible damage from battery leakage or corrosion observe the following Be sure to insert the batteries with the polarities matched to the marks Dry batteries are not rechargeable Do not use a combination of new and old batteries Do not use different types of batteries Current flows from batteries when you ar...

Page 108: ...four months if you do not use your camcorder at all Even if the vanadium lithium battery is not charged it will not affect the camcorder operation To retain the date and time etc charge the battery if it is discharged Charging the vanadium lithium battery Connect your camcorder to house current using the AC adaptor charger supplied with your camcorder and leave your camcorder with the POWER switch...

Page 109: ... trademarks of Sony Corporation MD VIEW is a registered trademark of Sony Corporation for MD DATA2 discs Usable MDs with your camcorder For recording and playing audio and picture MD DATA2 For playing audio only Audio MD You cannot use any other discs with your camcorder Notes on MDs The MiniDisc MD is easy to handle requiring less caution about dust or fingerprints as it is encased in a plastic c...

Page 110: ...diting on a disc which has hundreds of recorded pictures will take a long time The total recorded time and the remaining time on the MD may not reach the maximum recording time Repeated editing may reduce the recordable time of the disc The picture or sound may dropout while fast forwarding or reversing the edited tracks Tracks created through editing may exhibit picture or sound dropout during fa...

Page 111: ...s p 65 or insert a new disc p 16 The battery pack is dead or nearly dead c Install a charged battery pack p 10 START STOP is set to ANTI GROUND in the menu c Set it to NORMAL p 93 Moisture has condensed inside the camcorder c Remove the disc and leave the camcorder for a couple of hours p 105 START STOP is set to ANTI GROUND in the menu c Set it to NORMAL p 93 While being operated in CAMERA mode t...

Page 112: ...icture turns off when you insert or eject the disc This is not a malfunction It happens occasionally This is not a malfunction Playback Symptom Cause and or Corrective Actions The POWER switch is not set to PLAY EDIT c Set it to PLAY EDIT p 30 The battery pack is dead or nearly dead c Install a charged battery pack p 10 The camcorder is placed close to equipment generating a strong magnetic field ...

Page 113: ...TBY flashing on the screen goes off The AC adaptor charger is not connected to a wall outlet c Connect the AC adaptor charger to a wall outlet p 15 You are using the battery pack in an extremely hot or cold environment for a long time The battery pack is completely dead and cannot be recharged c Replace with a new battery pack The battery is dead c Use a fully charged battery pack p 10 The write p...

Page 114: ...recording or editing c Disconnect the power source once and connect it again c Eject the disc once and insert it again The disc does not conform with Video MD format or NTSC system c Use MD DATA2 disc The AC adaptor charger is disconnected c Connect it properly p 15 c Check the mode change switch p 15 The headphones are not connected securely c Connect the headphones to the i jack securely c Turn ...

Page 115: ...charger or the battery pack is malfunctioning Remove the battery pack once from the AC adaptor charger and install the same battery pack again If the CHARGE lamp lights up and no longer flashes If the CHARGE lamp turns off when charging time has passed neither the AC adaptor charger or the battery pack has problem If the CHARGE lamp flashes again Try with another battery pack If the CHARGE lamp fl...

Page 116: ...ashing The battery is dead Depending on conditions the E indicator may flash even if there are 5 to 10 minutes remaining You need to eject the disc Slow flashing The write protect tab on the disc is out Fast flashing The disc is full Warning indicator as to disc Slow flashing Remaining disc is less than 15 seconds Remaining disc is less than 5 minutes in the interview recording mode No disc is ins...

Page 117: ... SET THE CLOCK TIME p 89 CANNOT RECORD ON AUDIO MD p 109 CANNOT USE MD DATA DISC p 109 THIS DISC IS PLAY ONLY EJECT ENABLED DISC LID IS OPEN p 16 TOO MANY CHARACTERS p 60 THIS TRACK IS PROTECTED p 61 CAN NOT RECORD ON AUDIO MD DISC ERROR p 114 PLEASE CHECK THE BATTERY HIGH TEMPERATURE REMOVE THE BATTERY AND WAIT A WHILE TO COOL DOWN CANNOT OPEN DISC LID WHILE RECORDING THIS DISC IS BLANK AUDIO MD ...

Page 118: ...omon Product Code RSPC Using audio MD Advanced Cross Interleave Reed Solomon Code ACIRC Modulation system Using MD DATA2 DC component suppressed RLL 1 7 DRL Using audio MD EFM Audio Channel Stereo 2 channels Sampling frequency 44 1 kHz Frequency response 20 to 20 000 Hz 3 dB Wow and flutter Below measurable limit Input Output connectors S video output 4 pin mini DIN 1 Luminance signal 1 Vp p 75 oh...

Page 119: ...8 90 mm w h d Mass Approx 8 8 oz 250 g Battery pack NP F550 Type Lithium ion Output voltage DC 7 2 V Capacity 10 8 Wh Dimensions approx 1 9 16 13 16 2 7 8 inches 38 4 20 6 70 8 mm w h d Mass approx 3 4 oz 95 g Design and specifications are subject to change without notice Recommended accessories Battery pack NP F550 DC adaptor charger car battery adaptor DC VQ800 DCC L50 Wide conversion lens VCL 0...

Page 120: ...wing shows TV color systems used overseas NTSC system Bahama Islands Bolivia Canada Central America Chile Colombia Ecuador Jamaica Japan Korea Mexico Peru Surinam Taiwan the Philippines the U S A Venezuela etc PAL system Australia Austria Belgium China Czech Republic Denmark Finland Germany Great Britain Holland Hong Kong Italy Kuwait Malaysia New Zealand Norway Portugal Singapore Slovak Republic ...

Page 121: ...8 This mark indicates that this product is a genuine accessory for Sony video products When purchasing Sony video products Sony recommends that you purchase accessories with this GENUINE VIDEO ACCESSORIES mark Attaching the shoulder belt supplied Camcorder 6 Accessory shoe 7 VOL volume buttons p 33 8 DSPL DISPLAY button p 34 9 Viewfinder p 26 0 Speaker p 33 qa Control dial p 21 qs EXPOSURE button ...

Page 122: ... button p 40 wd FOCUS button p 43 wf Battery compartment p 14 wg Cord shutter p 15 wh LOCK switch p 23 wj OPEN BATT battery lever p 14 Attaching the supplied tripod attachment 1 Hook the tripod attachment to the rear of the camcorder 2 Fasten the screw Make sure that you detach the tripod when you change the disc However you can change the disc with the tripod attachment attached to the camcorder ...

Page 123: ...nd the screw may damage your camcorder If you cannot attach the tripod use the supplied tripod attachment p 122 Identifying the parts and controls ed AUDIO VIDEO output jack p 35 ef S VIDEO output jack p 35 eg MIC jack PLUG IN POWER Connect an external microphone not supplied This jack also accepts a plug in power microphone eh Lens ej Remote sensor ek Camera recording lamp p 22 el Lens cap p 22 r...

Page 124: ...nce 2 Fasten the catch Headphones and external microphone Use the supplied small ferrite cores Audio connecting cable Use the supplied large ferrite core Connect the plug which the ferrite core is attached to the camcorder Notes Attach the ferrite cores as close to the plug as possible Use headphones with a cord diameter of less than 3 32 inch 2 5 mm so that the cord can be tied round the ferrite ...

Page 125: ...tion identically to the buttons on your camcorder 1 ERASE button p 29 33 2 INDEX CHANGE button p 63 3 MENU button p 21 4 Video audio control buttons p 32 99 5 B V v b buttons p 21 You can select tracks on the index display items on the menu and play frame by frame just like the control dial of the camcorder 6 ENTER button p 21 Press to confirm the selection in the menu 7 MARK button p 60 8 DISPLAY...

Page 126: ...6 Warning indicators p 116 7 Track number 8 10 second track mode indicator p 93 9 Flash mode indicator p 23 0 Remaining disc indicator p 58 qa PROGRAM AE indicator p 41 qs Backlight indicator p 40 qd Manual focus Infinity indicator p 43 qf White balance mode indicator p 46 qg Anti ground recording indicator p 93 qh Anti wind noise indicator p 92 qj Track type icon p 31 qk Recording time STBY REMAI...

Page 127: ...p 59 Track number recorded date track name recording time track type 7 Play mode indicator p 51 53 54 8 Movie icon p 31 9 Memo icon p 78 q Title icon p 82 qa Disc indicator p 58 qs Drawing icon p 78 qd Scene transition picture effect icon p 83 86 qf Group icon p 74 qg Scroll bar p 31 qh Audio icon p 36 REMAIN01 23 00 07 0001 7 4 1999 2 58PM min 100 SHUF 1 2 3 4 5 6 7 8 9 q qa qs qd qf qg qh ...

Page 128: ...GE button p 12 6 Display window 7 InfoLITHIUM indicator 8 WARNING indicator 9 TIME TO CHG charge indicator p 13 0 Time indicator p 13 qa BATTERY LIFE battery remaining time indicator p 12 qs VTR CAMERA indicator qd Full charge indicator p 11 qg Remaining battery indicator p 10 1 2 3 4 5 6 WARNING BATTERY LIFE TIME TO CHG NORMAL FULL h m VTR CAMERA 7 8 9 q qa qs qd qf ...

Page 129: ...129 Quick Reference Connecting cord 1 10BASE T connecting jack p 102 2 LINE IN jack p 23 Identifying the parts and controls 1 2 ...

Page 130: ...er speed between 1 250 and 1 3000 in accordance with the brightness Fixed shutter speed Functions to be used after recording in the play edit mode Drawing on the recorded picture Looking at a fast moving scene carefully Comparing with other scenes Digital processing of recorded images Checking the recorded date and time Inserting the title track Searching for scenes having a title Playing movies o...

Page 131: ...isc Insert 16 Record mode 26 Type 109 Mirror mode 28 Moisture condensation 105 Mosaic 83 Move 64 Movie recording 22 N O Normal charge 11 NTSC system 120 Operation indicators 126 127 P Q Photo recording 22 Picture effect 86 Picture in picture 47 Playback 30 Playback pause 32 Power sources battery pack 10 car battery 15 house current 15 Power zoom 27 PROGRAM AE 41 Protect Disc 17 Track 61 R Recordin...

Page 132: ...Sony Corporation Printed in Japan MD DISCAM Homepage http www sony com mddiscam ...

Reviews: