— 10 —
KV-32XBR400/36XBR400/36XBR400H/38DRC1/38DRC1C
Installing the TV
18
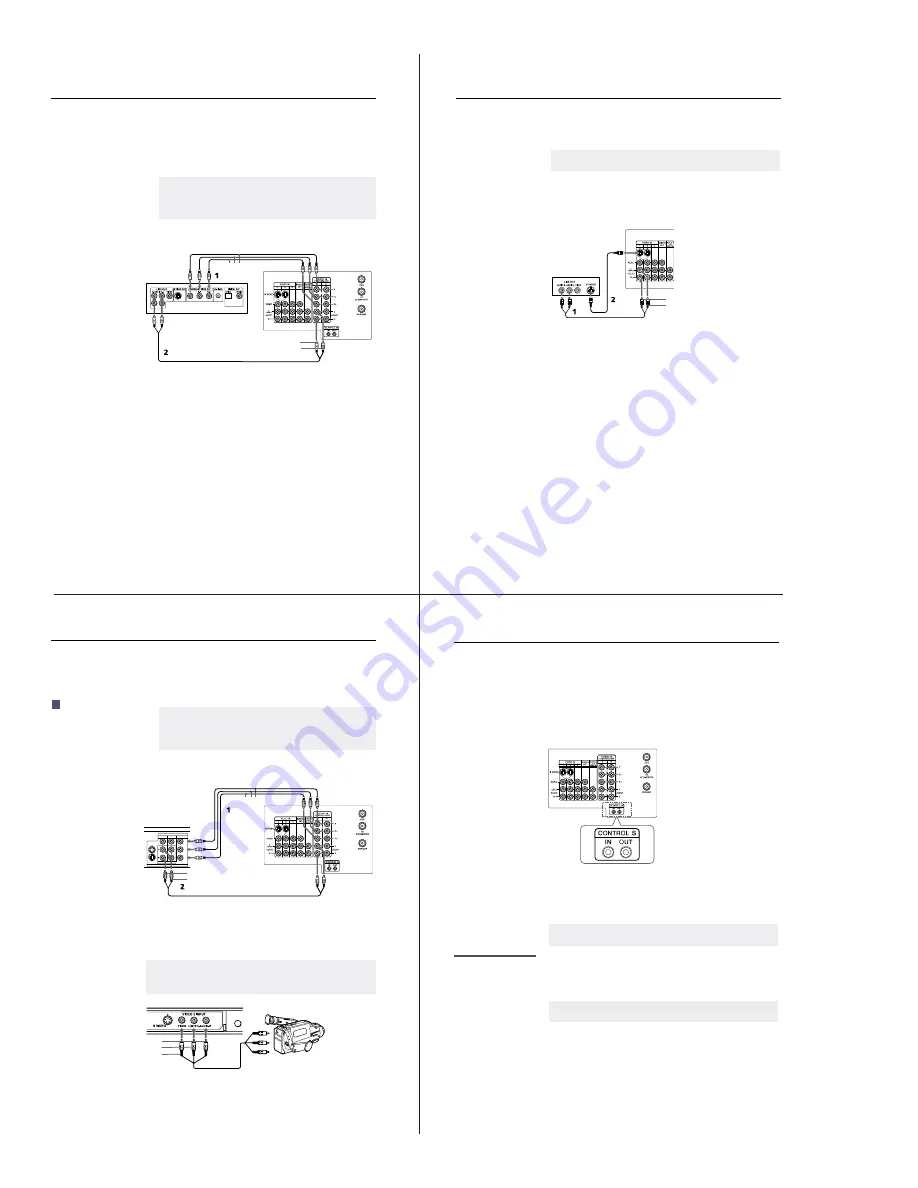
Using the CONTROL S Feature
CONTROL S allows you to control your TV system and other Sony
equipment with one remote control.
To control your other Sony equipment with your TV’s remote control,
use a CONTROL S cable (not supplied) to connect the equipment’s
CONTROL S IN jack to the TV’s CONTROL S OUT jack.
Setting Up the TV Automatically
After you finish connecting your TV, you need to run Auto Setup to
set up your channels.
Using Auto Setup
1
Press
POWER
to turn on the TV.
The first time you turn on the TV, the Auto Setup screen appears.
2
Press
CH+
to run Auto Setup or press
CH–
to exit.
TV
✍
The Auto Setup feature does not apply for installations that use a cable box for all
channel selection.
✍
You can run Auto Program by selecting it in the Channel menu, as described on
page 30.
Installing the TV
15
Connecting a DVD Player with Component
Video Connectors
1
Using three separate component video cables, connect the DVD
player’s Y, P
B
, and P
R
jacks to the Y, P
B
, and P
R
jacks on the TV.
2
Using an audio cable, connect the DVD player’s audio OUT jacks
to the TV’s audio IN jacks.
✍
The Y, P
B
, and P
R
jacks on your DVD player are sometimes labeled Y, C
B
, and C
R
, or
Y, B-Y, and R-Y. If so, connect the cables to like colors.
The Y, P
B
, and P
R
jacks do not provide audio, so audio cables must be connected to
provide sound.
Component video cables
DVD player
TV
AUDIO-R (red)
AUDIO-L (white)
Audio cable
Installing the TV
16
Connecting a DVD Player with A/V Connectors
1
Using audio cables, connect the DVD player’s audio OUT jacks to
the TV’s audio IN jacks.
2
Using an S VIDEO cable, connect the DVD player’s S VIDEO jack
to the TV’s S VIDEO jack.
✍
If your DVD player has video component output connectors: for best picture quality use
the connection described on page 15.
Audio cable
DVD player
S VIDEO
cable
AUDIO-R (red)
AUDIO-L (white)
TV
Installing the TV
17
Connecting a Digital TV Receiver
1
Using three separate component video cables, connect the Digital
TV Set-top box’s Y, P
B
, and P
R
jacks to the TV.
2
Using an audio cable, connect the DTV Set-top box’s audio OUT
jacks to the TV’s audio IN jacks.
Connecting a Camcorder
1
Using A/V cables, connect the camcorder’s A/V OUT jacks to
the TV’s A/V IN jacks.
✍
The Y, P
B
, and P
R
jacks do not provide audio, so audio cables must be connected to
provide sound.
Component input (Y, P
B
, and P
R
) is recommended for optimum picture quality. You
may also use component video or S Video connections.
Be sure to read the
manual for the Set-top box.
z
S VIDEO
VIDEO
VIDEO
PB
Y
PR
AUDIO/VIDEO OUT
1
2
3
(MONO)
AUDIO-R (red)
AUDIO-L (white)
Component video cables
DTV Set-top box
TV
Audio cable
✍
If you have a mono camcorder, connect its left audio output to the TV’s AUDIO L jack.
For easy connection of the camcorder, the TV has front A/V inputs (shown below).
However, if you prefer, you can also connect the camcorder to the TV’s rear A/V IN jacks.
MENU
AUDIO-R (red)
AUDIO-L (white)
VIDEO (yellow)
A/V output
Summary of Contents for KV-32XBR400
Page 53: ...KV 32XBR400 36XBR400 36XBR400H 38DRC1 38DRC1C 53 NOTES ...
Page 54: ...KV 32XBR400 36XBR400 36XBR400H 38DRC1 38DRC1C 54 NOTES ...
Page 75: ... 75 KV 32XBR400 36XBR400 36XBR400H 38DRC1 38DRC1C NOTES 6556 03N 43N 03S 43S 13N 53N NOTES ...
Page 80: ... 80 KV 32XBR400 36XBR400 36XBR400H 38DRC1 38DRC1C 6556 03N 43N 03S 43S 13N 53N NOTES NOTES ...
Page 119: ...KV 32XBR400 36XBR400 36XBR400H 38DRC1 38DRC1C 119 NOTES ...
Page 120: ...KV 32XBR400 36XBR400 36XBR400H 38DRC1 38DRC1C 120 NOTES ...


