– 70 –
KP-FR43M31/FR43M91
RM-GA001
Move the joystick
up.
Move the joystick
down.
Move the joystick
to the right.
Move the joystick
to the left.
Move the joystick
to the right.
Move the joystick
to the left.
Move the joystick
to the right.
Move the joystick
to the left.
Move the joystick
to the right.
Move the joystick
to the left.
Move the joystick
up.
Move the joystick
down.
Push the joystick
up.
Push the joystick
down.
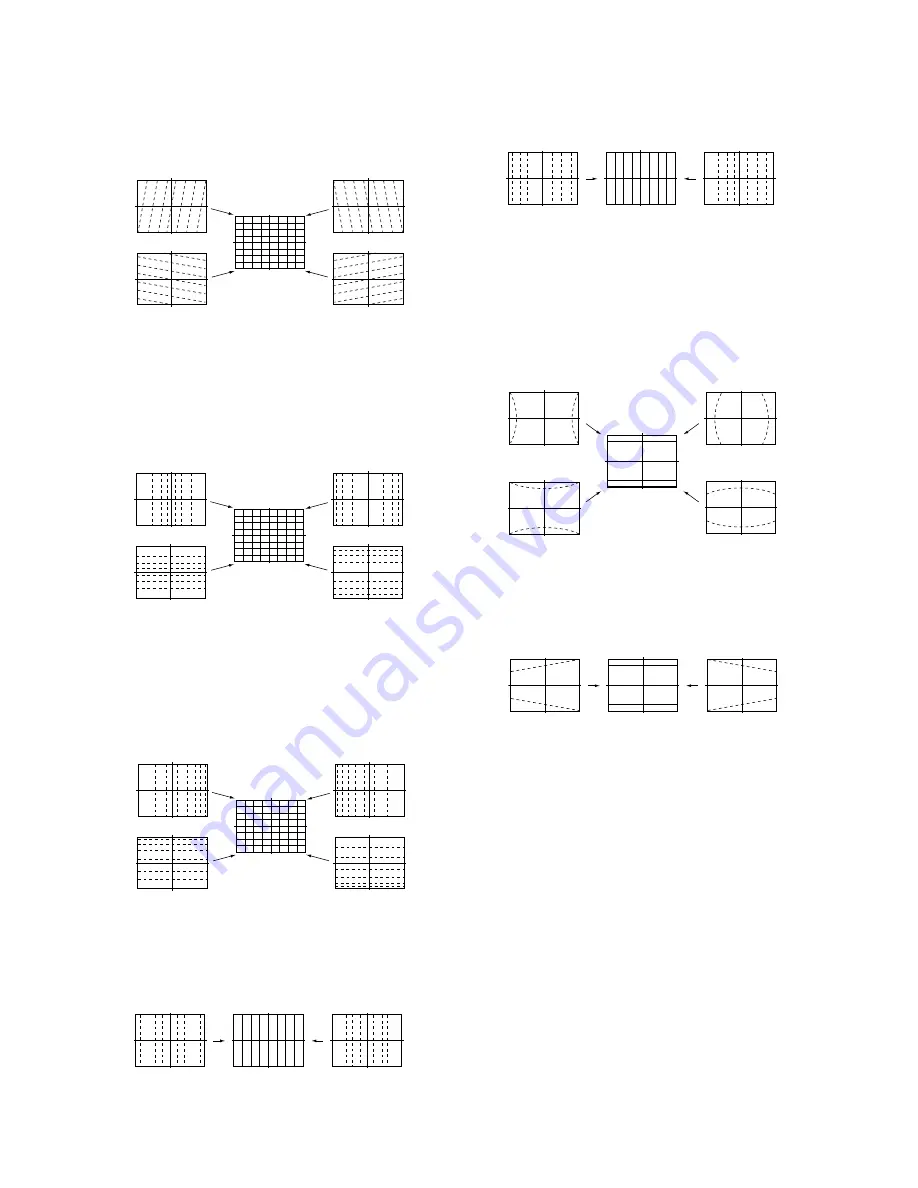
6. Select “GRN SKEW”, and correct the tilt of horizontal
lines and vertical lines.
• GRN SKEW (horizontally/vertically)
7. Select “GRN SIZE”, and adjust so that each distance from
center to left end and to right end is equal. Adjust so that
each distance from center to top and to bottom is equal.
• GRN SIZE (horizontally/vertically)
8. Select “GRN LIN”, and adjust so that each space at the right
end and at the left end of screen is equal. Adjust so that
each space at the top and at the bottom of screen is equal.
• GRN LIN (horizontally/vertically)
9. Select “GRN MSIZ”, and correct the space intervals for
the horizontal section of the screen are equal.
• GRN MSIZ (horizontally)
Move the joystick
up.
Move the joystick
down.
Move the joystick
to the right.
Move the joystick
to the left.
Move the joystick
up.
Move the joystick
down.
Move the joystick
to the right.
Move the joystick
to the left.
10. Select “GRN MLIN”, and correct the sizes of the horizontal
line at the center of the screen are symmetrical left and right.
• GRN MSIZ (horizontally)
11. Select “GRN PIN”, and adjust so that right and left
vertical lines on the screen become straight .Adjust so
that upper and lower hprizontal lines on the screen
become straight.
• GRN PIN (horizontally/vertically)
12. Select “GRN KEY”, and adjust so that upper and lower
horizontal lines on the screen become parallel.
• GRN KEY (vertically)
13. Press “
9
” button on the commander to enter the fine
adjustment mode.
14. Make fine adjustment so that horizontal lines and
vertical lines become straight.
15. Press “
9
” button on the commander to return to the
coarse adjustment mode.
2. Red Adjustment
1. Place a cap on the blue lens so that green and red
colors are displayed.
2. Press “
3
” button on the commander to select RED mode.
3. Adjust the following items so that blue lines overlap with
green lines.
• BLU CENT (horizontally/vertically)
• RED SKEW (horizontally/vertically)
• RED SIZE (horizontally/vertically)
• RED LIN (horizontally)
• RED MSIZ (horizontally)
• RED MLIN (horizontally)
• RED PIN (horizontally/vertically)
• RED KEY (/vertically)
Summary of Contents for KP-FR43M31
Page 126: ... 153 KP FR43M31 FR43M91 RM GA001 TL1431CZ AP STK394 510 n IC ...
Page 165: ...2 ...
Page 200: ...2 ...


