background image

38

HDR-HC1 2-631-458-11(1)

Camcorder

TV

Menu Setting

 : Signal flow

Cable

Type

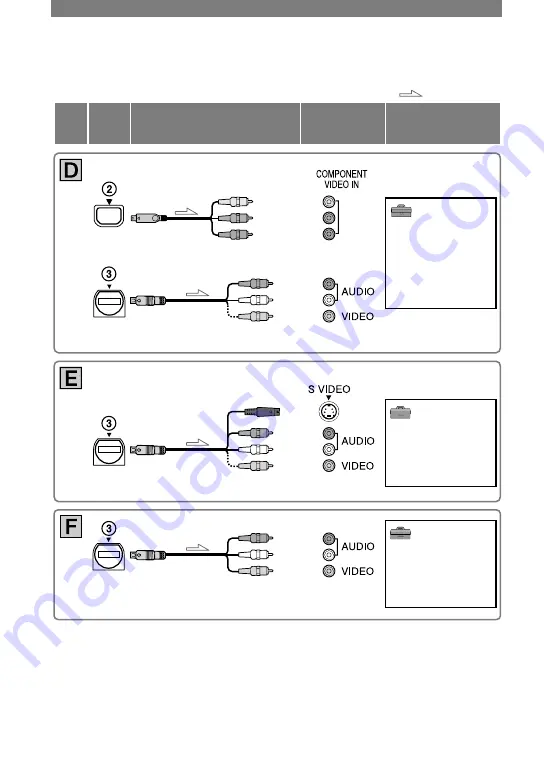
Component video cable 

(supplied)

A/V connecting cable (supplied)

Do not connect the video plug (yellow).

(Red)
(White)
(Yellow)

 (STANDARD SET)

[VCR HDV/DV]


[AUTO]


(p. 56)

[COMPONENT]


[480i]

 (p. 59)

[TV TYPE]


[16:9]

/

[4:3]

*

 (p. 59)

 (Green) Y
 (Blue) P

B

/C

B

 (Red) P

R

/C

R

A/V connecting cable with  

S VIDEO (optional)

Do not connect the video plug (yellow).

(Red)
(White)
(Yellow)

 (STANDARD SET)

[VCR HDV/DV]


[AUTO]


(p. 56)

[TV TYPE]


[16:9]

/

[4:3]

*

 (p. 59)

A/V connecting cable (supplied)

(Red)
(White)
(Yellow)

 (STANDARD SET)

[VCR HDV/DV]


[AUTO]


(p. 56)

[TV TYPE]


[16:9]

/

[4:3]

*

 (p. 59)

*

  Change the settings depending on the TV connected.

Connecting to a TV for viewing (Continued)

Summary of Contents for HDR HC1 - 2.8MP High Definition MiniDV Camcorder

Page 1: ...y Corporation Digital HD Video Camera Recorder Operating Guide HDR HC1 2 631 458 11 1 Using the Menu Dubbing Editing Using a Computer Troubleshooting Additional Information Quick Reference 40 64 73 81 100 113 1 Getting Started Recording Playback 12 24 http www sony net 10 US Enjoying pictures with high definition quality ...

Page 2: ...r environment by returning your used rechargeable batteries to the collection and recycling location nearest you For more information regarding recycling of rechargeable batteries call toll free 1 800 822 8837 or visit http www rbrc org Caution Do not handle damaged or leaking Lithium Ion batteries Memory Stick This device complies with Part 15 of the FCC Rules Operation is subject to the followin...

Page 3: ... cause harmful interference to radio communications However there is no guarantee that interference will not occur in a particular installation If this equipment does cause harmful interference to radio or television reception which can be determined by turning the equipment off and on the user is encouraged to try to correct the interference by one or more of the following measures Reorient or re...

Page 4: ...ffective use However there may be some tiny black points and or bright points white red blue or green in color that appear constantly on the LCD screen and the viewfinder These points are normal results of the manufacturing process and do not affect the recording in any way White red blue or green point Black point Exposing the LCD screen the viewfinder or the lens to direct sunlight for long period...

Page 5: ...e on screen displays in each local language are used for illustrating the operating procedures Change the screen language before using your camcorder if necessary p 19 About the Carl Zeiss lens Your camcorder is equipped with a Carl Zeiss lens which was developed jointly by Carl Zeiss in Germany and Sony Corporation and produces superior images It adopts the MTF measurement system for video camera...

Page 6: ...te and time 20 Step 7 Inserting a tape or a Memory Stick Duo 21 Recording Playback Recording 24 Playback 25 Functions used for recording playback etc 26 Recording To use zoom To fix the brightness of the picture manually exposure To record in dark places NightShot To make the subject stand out clearer TELE MACRO To use the AUTO LOCK switch To adjust the focus manually To enlarge and focus on the im...

Page 7: ...ings to adjust your camcorder to the recording conditions SPOT METER WHITE BAL STEADYSHOT etc MEMORY SET menu 49 Settings for the Memory Stick Duo BURST QUALITY IMAGE SIZE ALL ERASE NEW FOLDER etc PICT APPLI menu 52 Special effects on pictures or additional functions on recording playback SLIDE SHOW PICT EFFECT etc EDIT PLAY menu 55 Settings for editing or playing back in various modes VAR SPD PB ...

Page 8: ...a computer 73 Copying movies on a tape to the computer 76 Creating a DVD Direct Access to Click to DVD 78 Troubleshooting Troubleshooting 81 Warning indicators and messages 96 Additional Information Using your camcorder abroad 100 HDV format and recording playback 101 About the Memory Stick 103 About the InfoLITHIUM battery pack 105 About i LINK 106 Maintenance and precautions 107 Specifications 11...

Page 9: ...9 ...

Page 10: ...image bit rate of about 25 Mbps These operating instructions refer to the HDV1080i format as HDV format unless there is a need to specify 1080 effective scanning lines Why shooting in the HDV format Moving to digital video like the rest of the world will enable you to capture important moments in your life using the HDV format and the high quality images will allow you to relive them Your camcorde...

Page 11: ... definition quality for playback on a conventional TV Dubbing to other video equipment p 64 Connecting to an HDV1080i device An optional i LINK cable allows you to copy pictures in HD high definition quality Connecting to HDV1080i non compliant devices Use your camcorder to down convert HDV format video to SD standard definition quality to enable copying Connecting to a computer p 73 Copying Memory S...

Page 12: ...or 1 p 104 AC Adaptor 1 p 13 Power cord 1 p 13 Lens cap 1 Attached to your camcorder Lens hood 1 p 115 Use the lens hood to record under strong light such as under the sun Wireless Remote Commander 1 p 34 A button type lithium battery is already installed A V connecting cable 1 p 36 64 Component video cable 1 p 36 37 USB cable 1 p 73 Shoulder Strap 1 p 114 Rechargeable battery pack NP FM50 1 p 13 ...

Page 13: ...DC plug AC Adaptor To the wall outlet Power cord 1 Attach the battery pack by sliding it in the direction of the arrow until it clicks 2 Slide the POWER switch up to OFF CHG The default setting CHG charge lamp 3 Connect the AC Adaptor to the DC IN jack of your camcorder Be sure that the mark on the DC plug is facing up The mark faces up Open the DC IN jack cover Continued ...

Page 14: ... as you do when charging the battery pack The battery pack will not lose its charge in this case Charging time Approximate time min required when you fully charge a fully discharged battery pack Battery pack Charging time NP FM50 supplied 150 NP QM71D 260 NP QM91D 360 Recording time Approximate time min available when you use a fully charged battery pack Recording in the HDV format Battery pack Co...

Page 15: ...mcorder even when the power cord is disconnected from the wall outlet Use the supplied or optional Sony InfoLITHIUM battery pack M series You cannot use the battery pack NP FM30 with your camcorder When attaching an optional video light it is recommended that you use a NP QM71D or NP QM91D battery pack On the charging recording playback time Times measured with the camcorder at 25 C 77 F 10 to 30 ...

Page 16: ... switch repeatedly in the direction of the arrow to turn on the respective lamp If the POWER switch is set to OFF CHG slide it down while pressing the green button Lamps that light up CAMERA TAPE To record on a tape CAMERA MEMORY To record on a Memory Stick Duo PLAY EDIT To play or edit pictures When you slide the POWER switch from OFF CHG to CAMERA TAPE or CAMERA MEMORY the current date and time ...

Page 17: ...wer Slide the POWER switch up to OFF CHG At the time of purchase the power will be set to turn off automatically if you leave your camcorder without any operation attempted for approximately 5 minutes to save battery power A SHUT OFF p 61 ...

Page 18: ...panel facing inward To turn off the LCD backlight to make the battery last longer Press and hold DISPLAY BATT INFO for a few seconds until appears This setting is practical when you use your camcorder in bright conditions or where you want to save battery power The recorded picture will not be affected by the setting To turn on the LCD backlight press and hold DISPLAY BATT INFO for a few seconds u...

Page 19: ...ing You can change the on screen displays to show messages in a specified language Select the screen language in LANGUAGE on the TIME LANGU menu p 61 Checking the screen indicators Display guide You can easily check the meaning of each indicator that appears on the LCD screen 1 Touch MENU PRGRAM AE 1 3 0 00 00 60min SHUTTR SPEED AE SHIFT STATUS CHECK DISP GUIDE 2 Touch DISP GUIDE Select area for gu...

Page 20: ...chargeable battery and then set the date and time again p 109 POWER switch Skip to step 4 when you set the clock for the first time 1 Touch MENU OK 60min PROGRAM AE CAMERA SET SPOT METER WHITE BAL 2 Select TIME LANGU menu with then touch OK 60min CLOCK SET A SHUT OFF WORLD MENU ROTATE LANGUAGE DISP OUTPUT PROGRAM AE 3 Select CLOCK SET with then touch OK CLOCK SET DA TE 2005 Y JANM 1D 12 00 AM 4 Set...

Page 21: ...EJECT lever Lid The cassette compartment automatically comes out and opens up 2 Insert a cassette with its window facing outwards then press Push the center of the back of the cassette lightly Window The cassette compartment automatically slides back in Do not force the cassette into the compartment This may cause a malfunction 3 Close the lid To eject the cassette Open the lid following the same ...

Page 22: ...wrong direction the Memory Stick Duo the Memory Stick Duo slot or image data may be damaged To eject a Memory Stick Duo Lightly push the Memory Stick Duo in once When the access lamp is lit or flashing your camcorder is reading writing data Do not shake or knock your camcorder turn the power off eject the Memory Stick Duo or remove the battery pack Otherwise image data may be damaged Make sure that...

Page 23: ...23 Getting Started ...

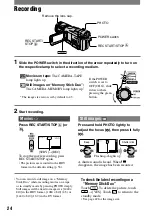
Page 24: ...tion of the arrow repeatedly to turn on the respective lamp to select a recording medium If the POWER switch is set to OFF CHG slide it down while pressing the green button Movies on tape The CAMERA TAPE lamp lights up Still images on Memory Stick Duo The CAMERA MEMORY lamp lights up The image size ratio is set by default to 4 3 2 Start recording Movies Press REC START STOP or 60min 60min REC STBY...

Page 25: ...Touch the picture you want to display in the single display mode To view pictures in other folders touch PB FOLDER select a folder with then touch p 51 Index display screen A B Previous Next 6 pictures The picture displayed before switching to the index screen 2 Start playing back Movies Touch then touch to start playback A B C Stop Play Pause toggles as you touch it Rewind Fast forward Playback a...

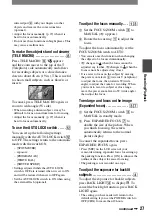
Page 26: ...XPOSURE VOL lever EXPOSURE button You can fix the brightness of a picture manually When recording indoors on a clear day for instance you can avoid backlight shadows on people next to the window by fixing the exposure to that of the wall side of the room Set the AUTO LOCK switch to OFF beforehand p 27 Press EXPOSURE Adjust the brightness by moving the EXPOSURE VOL lever up or down appears Move the l...

Page 27: ...OOM switch to MANUAL appears Rotate the focus ring to adjust the focus To adjust the focus automatically set the FOCUS ZOOM switch to AUTO You can also use this function when changing the subject to be focused intentionally changes to when the focus cannot be adjusted any farther changes to when the focus cannot be adjusted any closer It is easier to focus on the subject by moving the power zoom l...

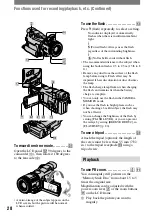
Page 28: ... or dust obscures the lamp The flash charge lamp flickers when charging the flash and remains lit when the battery charge is complete You can only use the flash in the CAMERA MEMORY mode If you use the flash in bright places such as when shooting a backlit subject the flash may not be effective You can change the brightness of the flash by setting FLASH LEVEL or you can prevent the redeye by setting REDE...

Page 29: ...selected format and battery information appear for about 7 seconds By pressing DISPLAY BATT INFO you can view the battery information for up to 20 seconds while it is displayed Remaining battery approx Recording capacity approx To turn off the operation confirmation beep See BEEP p 60 to set the operation beep To initialize the settings Press RESET to initialize all the settings including the setti...

Page 30: ...ity of the tape approx 60 END SEARCH Rec review display switch button 33 Personal Menu button 40 Recording still images 8 2 90 qa 7 qs 11 60min 11 60min FINE 1920 101 Recording folder 51 Image size 49 Quality FINE or STD 49 Memory Stick Duo indicator and the number of images that can be recorded approx Review button 24 Data code during playback The date time during recording and the camera setting...

Page 31: ...iewing still images MEMORY PLAY 2 qg 9 qh qj qk ql 7 ws wdwf wa w Data file name Picture number Total number of recorded pictures in the current playback folder Playback folder 51 Previous Next folder icon The following indicators appear when the first or last picture of the current folder is displayed and when there are multiple folders on the same Memory Stick Duo Touch to move to the previous fol...

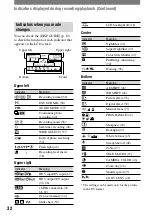
Page 32: ...r Meaning HDV input DV input 67 HDV output DV output 36 66 i LINK connection 36 66 67 Zero set memory 34 Slide show 53 LCD backlight off 18 Center Indicator Meaning NightShot 26 Super NightShot 47 Color Slow Shutter 47 PictBridge connecting 70 Warning 96 Bottom Indicator Meaning AE SHIFT 46 WB SHIFT 46 Picture effect 53 Digital effect 52 Manual focus 27 PROGRAM AE 44 Sharpness 45 Backlight 27 Whit...

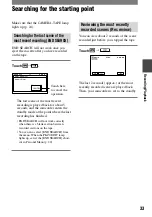
Page 33: ... seconds and the camcorder enters the standby mode at the point where the last recording has finished END SEARCH will not work correctly when there is a blank section between recorded sections on the tape You can also select END SEARCH from the menu When the PLAY EDIT lamp lights up select the END SEARCH short cut in Personal Menu p 40 Reviewing the most recently recorded scenes Rec review You can ...

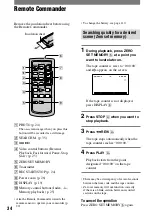
Page 34: ...page 110 Searching quickly for a desired scene Zero set memory 1 During playback press ZERO SET MEMORY at a point you want to locate later on The tape counter is reset to 0 00 00 and appears on the screen 0 00 00 60min P MENU If the tape counter is not displayed press DISPLAY 2 Press STOP when you want to stop playback 3 Press REW The tape stops automatically when the tape counter reaches 0 00 00 ...

Page 35: ...e changes 1 Slide the POWER switch down to turn on the PLAY EDIT lamp 2 Press SEARCH M 3 Press previous next to select a recording date P MENU 30min DATE 01 SEACH 60min 0 00 00 00 To cancel the operation Press STOP The Date search will not function correctly when there is a blank section between recorded sections on the tape ...

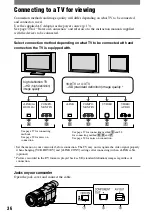
Page 36: ...INK S VIDEO VIDEO AUDIO See page 37 for connecting methods See page 39 for notes on connection See page 37 for connecting method and 38 for connecting method and See page 39 for notes on connection high definition TV HD high definition image quality 16 9 TV or 4 3 TV SD standard definition image quality Set the menu on your camcorder before connection The TV may not recognize the video signal properl...

Page 37: ... video cable supplied A V connecting cable supplied Do not connect the video plug yellow Red White Yellow STANDARD SET VCR HDV DV AUTO p 56 COMPONENT 1080i 480i p 59 Green Y Blue PB CB Red PR CR i LINKcable optional STANDARD SET VCR HDV DV AUTO p 56 i LINK CONV ON HDV DV p 59 TV TYPE 16 9 4 3 p 59 Change the settings depending on the TV connected Continued ...

Page 38: ...T 480i p 59 TV TYPE 16 9 4 3 p 59 Green Y Blue PB CB Red PR CR A V connecting cable with S VIDEO optional Do not connect the video plug yellow Red White Yellow STANDARD SET VCR HDV DV AUTO p 56 TV TYPE 16 9 4 3 p 59 A V connecting cable supplied Red White Yellow STANDARD SET VCR HDV DV AUTO p 56 TV TYPE 16 9 4 3 p 59 Change the settings depending on the TV connected Connecting to a TV for viewing ...

Page 39: ...output To output audio signals connect the white and red plugs of the A V connecting cable with an S VIDEO cable optional to the audio input jack of your TV This connection produces high resolution pictures compared with A V connecting cable Type If you connect your camcorder to your TV using more than one type of cable to output images from a jack other than the i LINK jack the order of priority ...

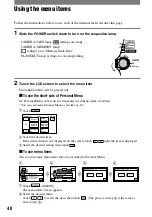
Page 40: ... menu items are added You can customize Personal Menu as you like p 62 Touch MENU PRGRAM AE 1 3 0 00 00 60min SHUTTR SPEED AE SHIFT STATUS CHECK DISP GUIDE STBY Touch the desired item If the desired item is not displayed on the screen touch until the item is displayed Select the desired setting then touch To use menu items You can customize menu items that are not added to Personal Menu OK 60min P...

Page 41: ...he desired item You can also touch the item directly to select it Customize the item After finishing the settings touch close to hide the menu screen If you decide not to change the setting touch to return to the previous screen ...

Page 42: ... NS NS LIGHT COLOR SLOW S ZEBRA HISTOGRAM SELF TIMER DIGITAL ZOOM STEADYSHOT CONV LENS MEMORY SET menu p 49 STILL SET ALL ERASE FORMAT FILE NO NEW FOLDER REC FOLDER PB FOLDER PICT APPLI menu p 52 FADER D EFFECT PICT EFFECT SLIDE SHOW INT REC STL SHOT TRANS DEMO MODE PictBridge PRINT The menu items available for the operation differ depending on where the lit lamp for the POWER switch is positioned...

Page 43: ...V SET VOLUME MULTI SOUND MIC LEVEL EXT SUR MIC LCD VF SET COMPONENT i LINK CONV TV TYPE USB SELECT DISP GUIDE STATUS CHECK GUIDEFRAME COLOR BAR DATA CODE REMAINING REMOTE CTRL REC LAMP BEEP DISP OUTPUT MENU ROTATE A SHUT OFF CALIBRATION TIME LANGU menu p 61 CLOCK SET WORLD TIME LANGUAGE Position of lamp TAPE MEMORY PLAY EDIT ...

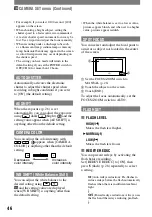
Page 44: ...beach in midsummer or on a ski slope SUNSET MOON Select to maintain the atmosphere of situations such as sunsets general night views or fireworks LANDSCAPE Select to shoot distant subjects clearly This setting also prevents your camcorder from focusing on glass or metal mesh in windows that comes in between the camcorder and the subject Items with one asterisk can be adjusted to focus on subjects o...

Page 45: ...g Keep framing a white object while is flashing quickly flashes slowly if white balance could not be set If keeps flashing even after you have touched set WHITE BAL to AUTO When you have changed the battery pack while AUTO is selected select AUTO and aim your camcorder at a nearby white object for about 10 seconds for better color balance adjustment Redo the ONE PUSH procedure if you change the PROGR...

Page 46: ... appears when CAMERA COLOR is anything other than the default setting Decreases color intensity Increases color intensity WB SHIFT White Balance Shift You can adjust the white balance to the desired setting using and the setting value are displayed when WB SHIFT is anything other than the default setting When the white balance is set to a lower value pictures appear bluish and when set to a higher...

Page 47: ... optional The maximum shooting distance using NS LIGHT is about 3 m 10 ft COLOR SLOW S Color Slow Shutter When you set COLOR SLOW S to ON you can record an image brighter in color even in dark places and COLOR SLOW SHUTTER appear on the screen To cancel COLOR SLOW S touch OFF Adjust the focus manually p 27 when it is hard to focus automatically The shutter speed of your camcorder changes depending...

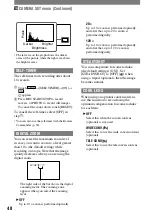
Page 48: ...he digital zoom The right side of the bar shows the digital zooming factor The zooming zone appears when you select the zooming level OFF Up to 10 zoom is performed optically 20 Up to 10 zoom is performed optically and after that up to 20 zoom is performed digitally 120 Up to 10 zoom is performed optically and after that up to 120 zoom is performed digitally STEADYSHOT You can compensate for camer...

Page 49: ...ngs are marked with The indicators in parentheses appear when the items are selected See page 40 for details on selecting menu items STILL SET BURST You can record several still images one after another by pressing PHOTO OFF Select this when not recording continuously NORMAL Records from 3 1920 1440 image size 5 1440 1080 image size to 25 640 480 image size images continuously at about 0 5 second ...

Page 50: ...Stick Duo made by Sony Corporation The number of recordable pictures varies depending on the recording environment Approximate image size of a picture kB 4 3 picture 1920 1440 1440 1080 1080 810 640 480 1380 580 800 350 450 190 150 60 16 9 picture 1920 1080 1440 810 640 360 1060 450 600 260 130 60 The table shows the approximate number of still images that can be taken for each image size FINE is ...

Page 51: ...ons Eject the Memory Stick Duo Formatting erases everything on the Memory Stick Duo including protected image data and newly created folders FILE NO SERIES Assigns file numbers in sequence even if the Memory Stick Duo is replaced with another one The file number is reset when a new folder is created or the recording folder is replaced with another RESET Resets the file number to 0001 each time the Me...

Page 52: ...s a movie while superimposing it on a previously recorded still image FLASH flash motion Records a movie with a serial still image effect strobe effect PICT APPLI menu Special effects on pictures or additional functions on recording playback SLIDE SHOW PICT EFFECT etc The default settings are marked with The indicators in parentheses appear when the items are selected See page 40 for details on sel...

Page 53: ...E Pictures appear as an illustration with strong contrast Continued PASTEL Pictures appear as a pale pastel drawing MOSAIC Pictures appear mosaic patterned Available during recording only While using the back light function you cannot select SKINTONE And when you use the back light function with PICT EFFECT set to SKINTONE the SKINTONE setting will be canceled You cannot add effects to externally ...

Page 54: ...during the demonstration The demonstration starts again in about 10 minutes When a cassette or a Memory Stick Duo is inserted When the POWER switch is set to other than CAMERA TAPE PictBridge PRINT See page 70 INT REC STL Interval photo recording You can record still images on the Memory Stick Duo at a selected interval This function is useful to observe the movement of clouds or the changes in da...

Page 55: ...smoothly in slow mode Touch To return to the normal playback mode touch Play Pause twice once from frame playback You will not hear the recorded sound You may see mosaic like images of the previously played picture Pictures in the HDV format are not output from the HDV DV Interface i LINK jack when they are paused or played back in other than normal playback mode Pictures in the HDV format may app...

Page 56: ...ten properly between the scenes STANDARD SET menu Settings while recording on a tape or other basic settings REC MODE MULTI SOUND LCD VF SET DISP OUTPUT etc The default settings are marked with The indicators in parentheses appear when the items are selected See page 40 for details on selecting menu items VCR HDV DV Select the playback signal Normally select AUTO When the camcorder is connected to...

Page 57: ...n the HDV format sound is automatically recorded in 16BIT mode Continued AUDIO MIX You can monitor the sound recorded on the tape using another device with audio dubbing during playback AUDIO MIX 0 00 00 00 60min Touch to adjust the balance of the original sound ST1 and the sound recorded afterwards ST2 then touch The original sound ST1 is output at the default setting The adjusted audio balance r...

Page 58: ... You can adjust the recording sound level manually AUTO Select to adjust the recording sound level automatically MANUAL Touch to adjust the recording sound level during recording or standby The recording sound level adjustment bars appear on the screen The recording sound level increases as the bar goes to the right The recording level meter appears when the default setting is changed Use headphon...

Page 59: ...ional before setting i LINK CONV Otherwise the connected video device may not be able to recognize the video signal from this camcorder TV TYPE You need to convert the signal depending on the TV connected when playing back the picture The recorded pictures are played back as following illustrations Continued 16 9 Select to view your pictures on a 16 9 wide TV DV format pictures HDV format pictures...

Page 60: ...Recording lamp The camera recording lamp will not light up during recording when you set this to OFF The default setting is ON BEEP ON A melody sounds when you start stop recording or operate the touch panel OFF Cancels the melody TV TYPE p 59 VCR HDV DV when setting the POWER switch to PLAY EDIT p 56 GUIDEFRAME You can display the frame and check that the subject is horizontal or vertical by sett...

Page 61: ...ALIBRATION See page 109 TIME LANGU menu CLOCK SET WORLD TIME LANGUAGE See page 40 for details on selecting menu items CLOCK SET See page 20 WORLD TIME When using your camcorder abroad you can set the time difference by touching the clock will be adjusted in accordance with the time difference If you set the time difference to 0 the clock returns to the originally set time LANGUAGE You can select t...

Page 62: ...CAMERA SET PICT APPLI EDIT PLAY ST ANDARD SET TIME LANGU STBY 2 Touch to select a menu category then touch OK END 0 00 00 60min Select the item PROGRAM AE SPOT METER WHITE BAL SHARPNESS SHUTTR SPEED STBY 3 Touch to select a menu item then touch YES The menu item is added to the end of list Deleting a menu item 1 Touch P MENU SET UP DELETE If the desired menu item is not displayed touch Select butt...

Page 63: ...m is not displayed touch 2 Touch the menu item you want to move 3 Touch to move the menu item to the desired place 4 Touch To sort more items repeat steps 2 to 4 5 Touch END You cannot move P MENU SET UP Initializing the Personal Menu settings Reset Touch P MENU SET UP RESET YES YES If the desired menu item is not displayed touch ...

Page 64: ...tional A V connecting cable with S VIDEO optional A V connecting cable supplied Red White Yellow Red White Yellow Do not connect the video plug yellow HDV1080i compatible device HD quality 1 AV device with i LINK jack SD quality 1 AV device with S VIDEO jack SD quality 1 AV device with audio video jacks 2 SD quality 1 1 Pictures recorded in the DV format is played back as SD standard definition ima...

Page 65: ...ly portions recorded in HDV format HDV HDV 3 HDV OFF DV 2 3 Copy only portions recorded in DV format HDV 2 2 DV OFF DV DV DV 1 Equipment compliant with the HDV1080i specification 2 Results in a copy without an image video nor sound is copied 3 Picture is not recognized no recording is made When VCR HDV DV is set to AUTO and the signal switches between HDV and DV the picture and sound disappear temp...

Page 66: ...cing high quality pictures When i LINK cable optional is connected the format of the output signal or will be indicated on the LCD screen of your camcorder Dubbing to another device 1 Connect your VCR to your camcorder as a recording device See page 64 for connection details Set DISP OUTPUT to LCD PANEL default setting when connecting with an A V connecting cable supplied p 61 2 Prepare your VCR f...

Page 67: ...wn to turn on the PLAY EDIT lamp 2 Set the input signal of your camcorder Set VCR HDV DV to AUTO when recording from an HDV format compatible device Set VCR HDV DV to DV or AUTO when recording from a DV format compatible device p 56 3 Connect your VCR as a player to your camcorder When i LINK cable optional is connected the format of the input signal or will be indicated on the LCD screen of your ...

Page 68: ... 16 9 or 640 480 4 3 when playing back in the DV format 9 Touch You cannot record TV programs from the HDV DV Interface i LINK jack You can record pictures from DV devices only in the DV format Note the following when connecting with an i LINK cable optional The recorded picture becomes rough when a picture is paused on your camcorder while recording to a VCR You cannot record the picture and soun...

Page 69: ...deleted when a Memory Stick Duo with the write protect tab is set to the write protect position p 103 or when the selected picture is protected p 69 Marking images on the Memory Stick Duo with specific information Image protection Print mark When you are using a Memory Stick Duo with the write protect tab make sure the write protect tab on the Memory Stick Duo is not set to the write protect positi...

Page 70: ...n using the other device Printing recorded images PictBridge compliant printer You can print out pictures using a PictBridge compliant printer without connecting the camcorder to a computer Connect your camcorder to the AC Adaptor to supply power from the wall outlet Insert the Memory Stick Duo on which still images are stored into your camcorder and turn on the power of the printer Connect your c...

Page 71: ...roperly Operating the POWER switch Disconnect the USB cable supplied from the printer Removing the Memory Stick Duo from your camcorder If the printer stops working disconnect the USB cable supplied turn the printer off and on again and restart the operation from the beginning If you print a still image recorded with a 16 9 ratio left and right ends of the image may be cut off Some printer models ...

Page 72: ... faster You cannot use an external flash optional and the built in flash at the same time When an external microphone optional is connected it takes precedence over the internal microphone p 29 headphones jack green When you use headphones the speaker on your camcorder is silent MIC PLUG IN POWER jack red This jack works as an input jack for an external microphone as well as a power supply jack for ...

Page 73: ...n i LINK cable optional Remove the USB cable according to the correct procedure when disconnecting it from the computer p 75 Copying still images to a computer System requirements For Windows users OS Windows 2000 Professional Windows Millennium Edition Windows XP Home Edition Windows XP Professional Standard installation is required Operation is not assured if the above OS has been upgraded CPU M...

Page 74: ...Prepare the power source for your camcorder Use the supplied AC Adaptor as the power source p 13 4 Slide the POWER switch down to turn on the PLAY EDIT lamp 5 Touch MENU STANDARD SET USB SELECT MEMORY STICK 6 Connect the USB cable supplied to the USB jack on your camcorder 7 Connect the other end of the USB cable to the USB jack on your computer USB CONNECT appears on the LCD screen of your camcor...

Page 75: ...ick the drive icon then drag and drop the desired picture file onto the hard disk of your computer Disconnecting the USB cable supplied For Windows users If USB CONNECT appears on the LCD screen follow the procedure below to disconnect the USB cable Click the Unplug or eject hardware icon on the task tray Click this icon task tray Click Safely remove USB Mass Storage Device Drive Click here Click O...

Page 76: ...B jack on a keyboard or USB hub Make sure to connect the cable to the USB jack on the computer Operation is not guaranteed on all the recommended environments Copying movies on a tape to the computer Connect your camcorder to the computer with an i LINK cable optional The computer needs to be provided with an i LINK connector and be installed with editing software that can copy HDV signals The sof...

Page 77: ...ur camcorder while connecting with an i LINK cable optional When setting up your camcorder The menu settings required depend on the format of the recorded pictures and the format for copying Copied format to the computer Menu setting 1 Recorded format HDV VCR HDV DV HDV i LINK CONV OFF HDV DV VCR HDV DV HDV i LINK CONV ON HDV DV HDV DV VCR HDV DV DV i LINK CONV OFF DV 1 See page 56 for VCR HDV DV ...

Page 78: ...or later installed i LINK cable optional to i LINK IEEE1394 connector to HDV DV Interface i LINK jack Signal flow Images recorded in HDV format are down converted to SD standard definition quality when copying to DVDs They are not copied in the HD high definition quality You can only use an i LINK cable optional for this operation You cannot use a USB cable supplied Using the Direct Access to Click t...

Page 79: ...tarts up and the on screen instructions appear on your computer 8 Place a writable DVD in the disc drive of the computer 9 Touch EXEC on the screen of your camcorder The status of the operation on your computer is displayed on the LCD screen of your camcorder CAPTURING The picture recorded on the tape is being copied to the computer CONVERTING The picture is being converted to the MPEG2 format WRI...

Page 80: ...D creation will continue on your computer When any of the following occurs copying of the picture is canceled A DVD containing the data up to the point the operation was canceled is created Refer to the help files of Click to DVD Automatic Mode Launcher for details When there is a blank portion of 10 seconds or longer on the tape When the data of the tape contains a date before the recording date o...

Page 81: ...s DEMO MODE does not start Eject the cassette and Memory Stick Duo from your camcorder p 21 22 The camcorder gets warm The camcorder may get warmer while you use it This is not a malfunction Batteries Power sources The power abruptly turns off When approximately 5 minutes have elapsed while you do not operate your camcorder the camcorder is automatically turned off A SHUT OFF Change the setting of...

Page 82: ... pack is quickly discharged The temperature of the environment is too high or low or the battery pack has not been charged enough This is not a malfunction Fully charge the battery again If the problem persists replace the battery pack with a new one It may be damaged p 13 105 A problem occurs when the camcorder is connected to the AC Adaptor Turn off the power and disconnect the AC Adaptor from t...

Page 83: ...en when the cassette lid is open Moisture condensation is starting in your camcorder p 108 The Cassette Memory indicator or title display does not appear while using a cassette with Cassette Memory This camcorder does not support Cassette Memory so the indicator does not appear The remaining tape indicator is not displayed Set REMAINING to ON to always display the remaining tape indicator p 60 The...

Page 84: ... the index screen p 69 You cannot mark pictures for print Release the lock on the write protect tab of the Memory Stick Duo p 103 Perform the operation again on the index screen p 70 The maximum number of pictures you can mark for print is 999 The data file name is not indicated correctly Only the file name is displayed if the directory structure does not conform to the universal standard The file is...

Page 85: ... images on the Memory Stick Duo with PICT EFFECT D EFFECT COLOR SLOW S SUPER NS When SHUTTR SPEED is set to less than 1 30 While executing FADER COLOR BAR The recording angle differs depending on the POWER switch setting position The recording angle when the POWER switch is set to CAMERA MEMORY is wider than when it is set to CAMERA TAPE You cannot record a smooth transition on a tape from the las...

Page 86: ...sette is new and has nothing recorded END SEARCH does not work correctly There is a blank section in the beginning or middle of the tape This is not a malfunction Adjusting the image during recording Refer also to Menu p 90 You cannot adjust the exposure manually You cannot adjust the exposure manually with NightShot COLOR SLOW S CINEMA EFECT of D EFFECT COLOR BAR When the AUTO LOCK switch is set ...

Page 87: ...on The subjects passing by the frame might appear crooked This is called the focal plane phenomenon This is not a malfunction Because of the way the image device CMOS sensor reads out image signals the subjects passing by the frame rapidly might crooked depending on the recording conditions The color of the picture is not correctly displayed Deactivate the NightShot function p 26 The picture appea...

Page 88: ...Memory Stick Duo are not played back in the actual size or aspect ratio Pictures recorded on other devices may not appear in the actual size This is not a malfunction Image data stored on a Memory Stick Duo cannot be played back You cannot see movies recorded with other camcorder on the Memory Stick Duo Image data cannot be played back if you have modified files or folders or have edited the data on...

Page 89: ...data code on a tape with a scratch or noise cannot be read Noises appear and or is displayed on the screen The tape was recorded in a TV color system other than that of your camcorder NTSC This is not a malfunction p 100 Date Search does not work correctly If one day s recording is less than 2 minutes your camcorder may not accurately find the point where the recording date changes There is a blank...

Page 90: ...h microphone recording standard Remote Commander The supplied Remote Commander does not function Set REMOTE CTRL to ON p 60 Remove any obstructions between the Remote Commander and the remote sensor Point the remote sensor away from strong light sources such as direct sunlight or overhead lighting Otherwise the Remote Commander may not function properly Insert a new battery Insert a battery into t...

Page 91: ... You cannot adjust SHARPNESS with COLOR BAR CINEMA EFECT of D EFFECT SHUTTR SPEED cannot be adjusted manually You cannot adjust SHUTTR SPEED with NightShot PROGRAM AE COLOR BAR COLOR SLOW S OLD MOVIE or CINEMA EFECT of D EFFECT SPOT METER When the exposure is anything other than the automatic mode When the POWER switch is set to CAMERA MEMORY When the AUTO LOCK switch is set to ON p 27 When PROGRA...

Page 92: ...ator appears and HISTOGRAM is not displayed in the following While using DIGITAL ZOOM While using D EFFECT While using COLOR BAR You cannot use FADER You cannot use FADER together with SELF TIMER COLOR SLOW S D EFFECT COLOR BAR SUPER NS You cannot use D EFFECT You cannot use D EFFECT together with COLOR SLOW S FADER When SHUTTR SPEED is set to less than 1 30 COLOR BAR SUPER NS You cannot use OLD M...

Page 93: ...DISP OUTPUT is set to V OUT PANEL p 61 Pictures from connected devices cannot be zoomed You cannot zoom the pictures from connected devices on your camcorder p 28 Time code and other information appear on the display of the connected device Set DISP OUTPUT to LCD PANEL while connected with an A V connecting cable p 61 You cannot dub correctly using the A V connecting cable You cannot input externa...

Page 94: ... Disconnect the cable from the computer and camcorder restart the computer then connect them again correctly You cannot monitor video that the camcorder is capturing Disconnect the cable from the computer turn on the camcorder then connect it again You cannot view the video recorded on a tape on the computer Disconnect the cable from the computer then connect it again Connect the i LINK cable opti...

Page 95: ...or editing Finish camcorder operations before connecting the camcorder to the computer You cannot copy video and still images to the computer Display pictures recorded on a Memory Stick Duo with the following procedures for the Windows computer 1 Double click My Computer 2 Double click the icon for the newly recognized drive Removable Disk It may take some time until the drive is recognized 3 Doub...

Page 96: ...and operate your camcorder again Change the cassette Press RESET p 29 and operate your camcorder again E 61 E 62 E 91 Contact your Sony dealer or local authorized Sony service facility Inform them of the 5 digit code which starts from E 101 1001 Warning indicator pertaining to files The file is damaged The file is unreadable p 103 Battery level warning The battery pack is nearly used up Depending on ...

Page 97: ...ndicator pertaining to camera shake warning The amount of lights is not sufficient so camera shake easily occurs Use the flash The camcorder is unsteady so camera shake easily occurs Hold the camcorder steady with both hands and shoot the image However note that the camera shake warning indicator does not disappear You hear a melody when the warning indicators appear on the screen p 60 Description o...

Page 98: ...cked Check the tab p 103 Cannot playback Reinsert the Memory Stick p 22 Cannot record Reinsert the Memory Stick p 22 No file No file is recorded or there is no readable file on the Memory Stick Duo Memory Stick folders are full You cannot create folders exceeding 999MSDCF You cannot delete created folders using your camcorder You will have to format the Memory Stick Duo p 51 or delete them using your...

Page 99: ...ot use flash Others Cannot record due to copyright protection p 101 Change to correct tape format The pictures cannot be played back because of an incompatible format No output image in VCR HDV DV Change format Stop the playback or signal input or change the VCR HDV DV setting p 56 Dirty video head Use a cleaning cassette p 108 Invalid in AUTO LOCK mode p 27 ...

Page 100: ...the U S A Venezuela etc PAL Australia Austria Belgium China Czech Republic Denmark Finland Germany Holland Hong Kong Hungary Italy Kuwait Malaysia New Zealand Norway Poland Portugal Singapore Slovak Republic Spain Sweden Switzerland Thailand United Kingdom etc PAL M Brazil PAL N Argentina Paraguay Uruguay SECAM Bulgaria France Guiana Iran Iraq Monaco Russia Ukraine etc Viewing HDV format pictures ...

Page 101: ...0p format but cannot output it from the HDV DV Interface i LINK jack To prevent a blank section from being made on the tape Go to the end of the recorded section using END SEARCH p 33 before you begin the next recording when you have played back the tape Copyright signal When you play back If the cassette you play back on your camcorder contains copyright signals you cannot copy it to a tape in an...

Page 102: ...620 KF 42WE620 KDS 70Q006 KDS R60A10 KDS R50A10 KDF E60A20 KDF E55A20 KDF E50A10 KDF E42A10 KD 34XBR960 KD 34XS955 KD 30XS955 KD 36XS955 KV 34HS420 KV 30HS420 KV 36HS420 KV 32HS420 KV 27HS420 KD 32XS945 KDP 57WS655 KDP 51WS655 KP 57WS520 KP 51WS520 KP 46WT520 KDL32XBR950 KLV L32MRX1 KLV 32M1 KE MX42N1 KE MX42K1 KE MX42S1 KE MX42A1 KE MX42M1 KE MX32N1 KE MX32K1 KE MX32S1 KE MX32A1 KE MX32M1 KE P42M...

Page 103: ...compatibility with your camcorder Data read write speed may vary depending on the combination of the Memory Stick and Memory Stick compliant product you use On a Memory Stick Duo with a write protect tab You can prevent accidental erasure of images when you slide the write protect tab on the Memory Stick Duo with a small tapered object to the write protect position The Memory Stick Duo supplied wi...

Page 104: ...o the Memory Stick Duo slot Doing so may cause a malfunction Do not insert a Memory Stick Duo adaptor without a Memory Stick Duo attached Doing so may result in malfunctions of the unit On a Memory Stick PRO Duo The maximum memory capacity of a Memory Stick PRO Duo that can be used on your camcorder is 2 GB This unit does not support high speed data transfer On image data compatibility Image data ...

Page 105: ...nal Frequent use of the LCD screen or a frequent playback fast forward or rewind operation wears out the battery pack faster We recommend using a large capacity battery pack NP QM71D QM91D optional Be sure to set the POWER switch to OFF CHG when not recording or playing back on your camcorder The battery pack is also consumed when your camcorder is in recording standby or playback pause Have spare...

Page 106: ...K compatible devices are connected to this unit in a daisy chain operations and data transactions are possible with not only the device that this unit is connected to but also with other devices via the directly connected device Note however that the method of operation sometimes varies according to the characteristics and specifications of the device to be connected Also operations and data transa...

Page 107: ... the following locations Anywhere extremely hot or cold Never leave them exposed to temperatures above 60 C 140 F such as under direct sunlight near heaters or in a car parked in the sun They may malfunction or become deformed Near strong magnetic fields or mechanical vibration The camcorder may malfunction Near strong radio waves or radiation The camcorder may not be able to record properly Near A...

Page 108: ... not ejected for 10 seconds after the cassette lid is opened This is not a malfunction Do not close the cassette lid until the cassette is ejected Note on moisture condensation Moisture may condense when you bring your camcorder from a cold place into a warm place or vice versa or when you use your camcorder in a humid place as shown below When you bring your camcorder from a ski slope into a plac...

Page 109: ...o cancel The position of the changes If you did not press the right spot start from step again You cannot calibrate the LCD screen if it is rotated On handling the casing If the casing is soiled clean the camcorder body with a soft cloth lightly moistened with water and then wipe the casing with a dry soft cloth Avoid the following to avoid damage to the finish Using chemicals such as thinner benzi...

Page 110: ...m battery Use of another battery may present a risk of fire or explosion Specifications System Video recording system HDV Video recording system DV 2 rotary heads Helical scanning system 2 rotary heads Helical scanning system Still image recording system Exif Ver 2 2 1 Audio recording system HDV Rotary heads MPEG 1 Audio Layer 2 Quantization 16 bits Fs 48 kHz stereo transfer rate 384 kbps Audio reco...

Page 111: ...ut 10 pin connector Video signal 1 Vp p 75 Ω ohms unbalanced Luminance signal 1 Vp p 75 Ω ohms unbalanced Chrominance signal 0 286 Vp p 75 Ω ohms unbalanced Audio signal 327 mV at output impedance more than 47 kΩ kilohms Output impedance with less than 2 2 kΩ kilohms COMPONENT OUT jack Y 1 Vp p 75 Ω ohms unbalanced PB PR CB CR 350 mVp p Headphones jack Stereo minijack Ø 3 5 Input Output connectors...

Page 112: ...DC 8 4 V Operating temperature 0 C to 40 C 32 F to 104 F Storage temperature 20 C to 60 C 4 F to 140 F Dimensions approx 56 31 100 mm 2 1 4 1 1 4 4 in w h d excluding the projecting parts Mass approx 190 g 6 7 oz main unit only See the label on the AC Adaptor for other specifications Rechargeable battery pack NP FM50 Maximum output voltage DC 8 4 V Output voltage DC 7 2 V Capacity 8 5 Wh 1 180 mAh ...

Page 113: ...oom lever 26 PHOTO button 24 CAMERA TAPE CAMERA MEMORY PLAY EDIT mode lamps 16 POWER switch 16 Memory Stick Duo slot 22 Access lamp 22 103 Active Interface Shoe 72 Flash flash button 28 NIGHTSHOT switch 26 MIC PLUG IN POWER jack 72 headphones jack 72 Continued ...

Page 114: ...COMPONENT OUT jack 72 A V OUT jack 72 RESET button 29 Eyecup Viewfinder 18 Viewfinder lens adjustment lever 18 LANC jack 72 CHG charge lamp 13 Speaker 29 AUTO LOCK switch 27 Battery pack 13 DC IN jack 72 Attaching the shoulder strap Attach the shoulder strap supplied with your camcorder to the hooks for the shoulder strap Identifying parts and controls Continued ...

Page 115: ... for the shoulder strap 114 BATT battery release lever 14 Grip belt 16 Cassette compartment lid 21 OPEN EJECT lever 21 Tripod receptacle 28 Attaching the lens hood Insert the hooks on the lens hood into the holes on the camcorder then turn the lens hood fixing screw in the direction of the arrow To remove the lens hood Loosen the lens hood fixing screw by turning it in the opposite direction of the ...

Page 116: ...NEMA EFECT Cinematic effect 52 Click to DVD 78 CLOCK SET 20 COLOR BAR 60 COLOR SLOW S Color Slow Shutter 47 92 COMPONENT 59 COMPONENT OUT jack 36 72 Component video cable 37 38 Connect computer 73 TV 36 VCR equipment 64 CONV LENS 48 D DATA CODE 60 Date search 35 DATE TIME 60 DC IN jack 13 DC plug 13 Delete pictures 69 DEMO MODE 54 81 DIGITAL ZOOM 48 87 DISPLAY BATT INFO button 19 29 Display indica...

Page 117: ...LANC jack 72 LANDSCAPE 44 LANGUAGE 61 LCD VF SET 58 LCD backlight 18 LCD BL LEVEL LCD back light 58 LCD BRIGHT 58 LCD COLOR 58 LCD PANEL 61 LCD panel 18 LCD BL LEVEL 58 LCD BRIGHT 58 LCD COLOR 58 LCD screen 4 Lens cap 12 Lens hood 115 Lid 21 LP Long Play 56 M Macintosh 73 75 76 Maintenance 107 Main sound 57 Manual focus 27 MEMORY SET menu 49 Memory Stick 103 Memory Stick Duo 21 FORMAT 51 Insert Ej...

Page 118: ...mp 29 REC MODE Recording mode 56 Rec review 33 REC START STOP 24 REDEYE REDUC 46 REMAINING 60 Remaining battery 30 Remote Commander 34 REMOTE CTRL Remote control 60 Remote sensor 29 RESET button 29 Reversal Playback 55 Review button 30 S SD standard definition image quality 36 Searching for the starting point 33 Self diagnosis display 96 SELF TIMER 48 SEPIA 53 Setting the date and time 20 SHARPNESS...

Page 119: ...ewfinder brightness 58 Video head 108 Video operation buttons 31 Viewfinder 18 Brightness 58 Viewfinder lens adjustment lever 18 VOLUME 57 Volume 25 V OUT PANEL 61 W Warning indicators 96 Warning messages 96 WB SHIFT White Balance Shift 46 WHITE BAL White balance 45 White Balance Shift 46 WHITE FADER 52 Wide angle 26 WIDE SELECT 57 WIDE STEREO 58 Windows 73 74 WORLD TIME 61 Write protect tab 101 103 ...

Page 120: ......

Page 121: ......

Page 122: ......

Page 123: ...dia are trademarks or registered trademarks of U S Microsoft Corporation in the U S and other countries Macintosh and Mac OS are trademarks of Apple Computer Inc in the U S and other countries HDV and the HDV logo are trademarks of Sony Corporation and Victor Company of Japan Ltd Pentium is a trademark or registered trademark of Intel Corporation All other product names mentioned herein may be the...

Reviews: