background image

14

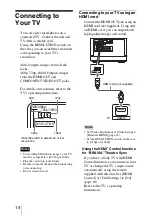
Connecting to 
Your TV

You can view stored photos on a 
connected TV. Connect the unit and 
TV with a suitable cord.
Using the RESOLUTION switch on 
the rear, you can switch the resolution 
corresponding to your TV’s 
resolution.

480i: Outputs images from all the 
jacks.
480p, 720p, 1080i: Outputs images 
from the HDMI OUT and 
COMPONENT VIDEO OUT jacks.

For details on resolution, refer to the 
TV’s operating instructions.

Notes

To view High Definition images, your TV 
must be compatible with 720p or 1080i.

Plug the cords into jacks firmly.

Be sure to turn off the unit when connecting 
or reconnecting.

Do not tread on cord.

480i/480p/

          720p/1080i

RESOLUTION

480i

720p

480p

1080i

Slide the switch to select one of four 
resolutions.

Connecting to your TV using an 
HDMI cord

Connect the HDMI OUT jack using an 
HDMI cord (not supplied). Using only 
an HDMI cord, you can output both 
high quality images and sound.

Hints

Set [Video Resolution] of [Video Setup] to 
[Prioritize HDMI] (page 61).

Set the RESOLUTION switch on the rear 
to [720p] or [1080i].

Using the HDMI

*

 Control function 

for “BRAVIA” Theatre Sync

If you have a Sony TV with HDMI 
Control function, you can turn on your 
TV or change the TV’s input source 
automatically using the remote 
supplied with this unit. Set [HDMI 
Control] of [Unit Settings] to [On] 
(page 60).
Refer to the TV’s operating 
instructions.

480i/480p/

          720p/1080i

RESOLUTION

OUT

S-VIDEO

VIDEO

L

R

AUDIO OUT

VIDEO OUT

COMPONENT VIDEO OUT

Y

LAN(10/100)

DC IN

        16V

P

B

P

R

HDMI IN

OUT

HDMI cord (not supplied)

TV

Summary of Contents for HDMS-S1D - 80GB Digital Photo Album

Page 1: ... to prepare your unit for use Before operating the unit please read this document thoroughly and retain it for future reference Importing Photos Enjoying Photos Editing Photos Exporting Photos Printing Photos Connecting to a Computer Setting Up the Unit Additional Information Printed in Japan 3 274 542 12 1 Printed on 70 or more recycled paper using VOC Volatile Organic Compound free vegetable oil...

Page 2: ...y with the limits for a Class B digital device pursuant to Part 15 of the FCC Rules These limits are designed to provide reasonable protection against harmful interference in a residential installation This equipment generates uses and can radiate radio frequency energy and if not installed and used in accordance with the instructions may cause harmful interference to radio communications However ...

Page 3: ...apparatus combination to avoid injury from tip over 13 Unplug this apparatus during lightning storms or when unused for long periods of time 14 Refer all servicing to qualified service personnel Servicing is required when the apparatus has been damaged in any way such as power supply cord or plug is damaged liquid has been spilled or objects have fallen into the apparatus the apparatus has been ex...

Page 4: ...n a confined space such as a bookshelf or similar unit To prevent fire or shock hazard do not place objects filled with liquids such as vases on the apparatus Turn off the unit before carrying it Do not touch the memory card whilecopying Do not place any objects on the unit Do not place the remote control on the floor etc as buttons may be pressed by mistake Do not place the unit upright Watch the...

Page 5: ...ts of the hard disk Sony Corporation does not accept any liability for any data loss About repairing the hard disk drive The contents of the hard disk drive may be checked in case of repair or inspection during a malfunction or modification However the contents will not be backed up or saved by Sony If the hard disk needs to be formatted or replaced it will be done at the discretion of Sony All co...

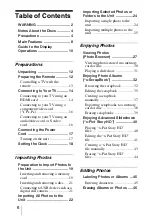
Page 6: ...g to USB device such as a digital still camera 21 Importing All Photos to the Unit 22 Importing Selected Photos or Folders to the Unit 24 Importing a single photo to the unit 24 Importing multiple photos to the unit 25 Enjoying Photos Viewing Photos Photo Browser 27 Viewing photos stored in a memory card or disc 30 Playing a slideshow 31 Enjoying Photo Albums x ScrapBook 32 Browsing the scrapbook ...

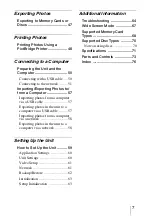
Page 7: ...le 57 Exporting photos in the unit to a computer via a USB cable 57 Importing photos from a computer via a network 58 Exporting photos in the unit to a computer via a network 58 Setting Up the Unit How to Set Up the Unit 59 Application Settings 60 Unit Settings 60 Video Setup 61 Network 61 Backup Restore 62 Initialization 63 Setup Initialization 63 Additional Information Troubleshooting 64 Wide Sc...

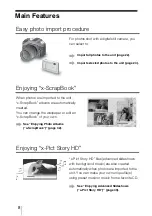
Page 8: ...t to Enjoying x ScrapBook When photos are imported to the unit x ScrapBook albums are automatically created You can change the wallpaper or edit an x ScrapBook of your own Enjoying x Pict Story HD x Pict Story HD files advanced slideshows with background music are also created automatically when photos are imported to the unit You can make your own unique file s using preset music or music from a ...

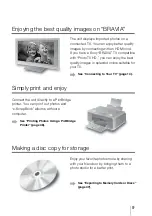
Page 9: ... images by connecting with an HDMI cord If you have a Sony BRAVIA TV compatible with PhotoTV HD you can enjoy the best quality images in splendid colors suitable for your TV Simply print and enjoy Connect the unit directly to a PictBridge printer You can print out photos and x ScrapBook albums without a computer Making a disc copy for storage Enjoy your favorite photos more by sharing with your fr...

Page 10: ...00516 Sat 11 3 2007 9 33 06 PM Photo Browser Fri 11 2 2007 Album0001 Sat 11 3 2007 Album0002 By Date recent first HDD dsc00516 Sat 11 3 2007 9 33 06 PM Photo Browser Fri 11 2 2007 Album0001 Sat 11 3 2007 Album0002 By Date recent first HDD dsc00618 17 25 Sat 11 3 2007 10 15 46AM Press HOME and select an image or menu item using To return to the previous display press RETURN Types of displays Home m...

Page 11: ...ag Print Title dsc06058 Shooting Time Sun 7 1 2007 9 33 06 AM Resolution 2592 1944 Size 2 1 MB File Format Camera Manufacturer SONY Model DSC T50 ISO Rating 125 Shutter Speed 1 40 second s Aperture F3 5 Exposure Value 0 0 EV Focal Length 6 3mm Photo Information Close JPG Press to enter the item To use various functions press OPTIONS Displayed items differ depending on the screen To close the OPTIO...

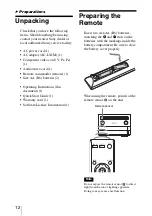
Page 12: ...ions this document 1 Quick Start Guide 1 Warranty card 1 Software License Information 1 Preparing the Remote Insert two size AA R6 batteries matching the e and E ends on the batteries with the markings inside the battery compartment Be sure to close the battery cover properly When using the remote point it at the remote sensor on the unit Note Do not expose the remote sensor to direct light from t...

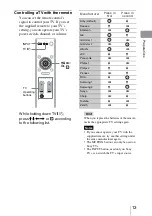
Page 13: ...rating buttons Hint When you replace the batteries of the remote make the appropriate TV setting again Notes If you cannot operate your TV with the supplied remote try another setting under the same manufacturer again The MUTING button can only be used on Sony TVs The INPUT button used only on Sony TVs can switch the TV s input source Manufacturer Press in first Press in second Sony default m Daew...

Page 14: ...ON 480i 720p 480p 1080i Slide the switch to select one of four resolutions Connecting to your TV using an HDMI cord Connect the HDMI OUT jack using an HDMI cord not supplied Using only an HDMI cord you can output both high quality images and sound Hints Set Video Resolution of Video Setup to Prioritize HDMI page 61 Set the RESOLUTION switch on the rear to 720p or 1080i Using the HDMI Control funct...

Page 15: ...ld of photos can be enjoyed in breathtaking Full HD quality For instance the delicate texture of the human skin flowers sands and waves can now be expressed on the large screen in beautiful photo like quality When connecting to the HDMI OUT jack Improper handling may damage the HDMI OUT jack and the connector Make sure the connector is not upside down or tilted Insert the HDMI connector straight i...

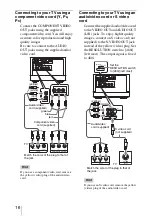
Page 16: ... video cord supplied Component video cord supplied TV Connecting to your TV using an audio video cord or S video cord Connect the supplied audio video cord to the VIDEO OUT and AUDIO OUT L R jacks To enjoy higher quality images connect an S video cord not supplied to the S VIDEO OUT jack instead of the yellow video plug Set the RESOLUTION switch to 480i left most The output signal is fixed to 480i...

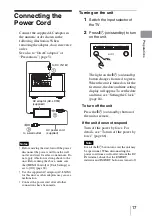
Page 17: ...IDEO VIDEO L R AUDIO OUT VIDEO OUT COMPONENT VIDEO OUT Y LAN 10 100 DC IN 16V PB PR AC power cord supplied AC adaptor AC LX1M supplied to a wall outlet to DC IN 16V Turning on the unit 1 Switch the input selector of the TV 2 Press 1 on standby to turn on the unit The light on the 1 on standby button changes from red to green When the unit is turned on for the first time the date and time setting d...

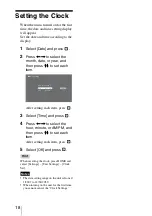
Page 18: ...ach item press 3 Select Time and press 4 Press to select the hour minute or AM PM and then press Mm to set each item After setting each item press 5 Select OK and press Hint When resetting the clock press HOME and select Settings Unit Settings Clock Set Notes The date setting range on the unit is from 1 1 2007 to 12 31 2030 When turning on the unit for the first time you cannot cancel the Clock Se...

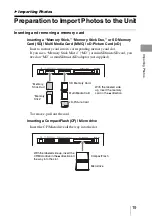
Page 19: ...Micro M2 or miniSD microSD card you need an M2 or miniSD microSD adaptor not supplied To remove pull out the card Inserting a CompactFlash CF Microdrive Insert the CF Microdrive all the way into the slot CF Microdrive EXPORT Memory Stick Memory Stick Duo SD Memory Card Multi Media Card xD Picture Card With the labeled side up insert the memory card in the v direction CF Microdrive EXPORT With the ...

Page 20: ...rted correctly Insert the memory card straight If you push the memory card by force this will cause damage to both the memory card and the unit Do not remove the memory card while importing as damage to data may occur If you attempt to insert a Memory Stick Micro or miniSD microSD without an M2 or SD adaptor respectively it may become jammed Memory cards should be kept away from small children to ...

Page 21: ...gital still camera Connect a digital still camera to the USB jack on the front panel using a USB cable not supplied Hints Turn on the digital still camera before connecting If the message Incompatible Device appears when connected as above change the USB connection settings of the digital still camera For details refer to the operating instructions supplied with the digital still camera Playback r...

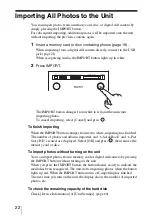
Page 22: ...hen the IMPORT button changes from red to white importing has finished The number of photos and albums imported and x ScrapBook and x Pict Story HD created are displayed Select OK and press then remove the memory card or disc To import photos without turning on the unit You can import photos from a memory card or digital still camera by pressing the IMPORT button without turning on the unit When y...

Page 23: ...ity When Auto Creation x ScrapBook x Pict Story is set to On page 60 x ScrapBook album s or x Pict Story HD file s will automatically be created when importing has completed Notes The data read write speed differs depending on the memory card disc and usage environment Coded data such as data protected by MagicGate cannot be imported to the unit If you stop importing while importing photos importi...

Page 24: ...ge 21 2 Press HOME 3 Select Photo Browser and press 4 Select a media or device and press 5 Select a photo to import and press OPTIONS 6 Select Import Photo and press 7 Select YES and press INPUT INFO RETURN HOME TV VOL CH DISPLAY OPTIONS TV M m OPTIONS HOME 101msdcf DSC00516 Sat 11 3 2007 9 33 06 PM DVD Photo Browser Multi Album Operations Multi Photo Operations View Slideshow Album Operations Imp...

Page 25: ... After step 5 on page 24 select Multi Photo Operations and press 2 Select Multi Import and press 3 Select a photo to import and press Select all photos to import by repeating step 3 Select All Selects all photos in the list Clear All Cancels all the selections you have made 4 Select OK and press Importing the photo s To cancel select Cancel Remaining 6 minute s Cancel Photo Importing Number of Pho...

Page 26: ...m select New Album and press Importing starts Hint When selecting Multi Album Operations on step 1 you can select multiple albums folders to import Note When selecting albums folders or photos and importing them all the selected photos will be imported including photos previously imported ...

Page 27: ...he DCF image file format Design rule for Camera File system Image standards for digital cameras regulated by JEITA Japan Electronics and Information Technology Industries Association Some functions may not work correctly for JPEG images that does not conform to DCF format still images edited with a computer etc dsc00516 Sat 11 3 2007 9 33 06 PM Photo Browser Fri 11 2 2007 Album0001 Sat 11 3 2007 A...

Page 28: ...lockwise by 90 degrees Rotate left Rotates the photo counterclockwise by 90 degrees Rename Changes photo names page 45 Set Tag Assigns a tag of character strings to the photo Print Prints the photo page 48 Export Exports the photo to a memory card or disc page 47 View Info Displays photo information Hide Show Hides shows the photo on the screen You cannot view hidden photos Items Details Sort Sort...

Page 29: ...the album that the selected photo is included into two Combine Combines the album in which the selected photo is contained with the other album Rename Changes an album name page 45 Set Icon Sets an icon to the album Print Prints the album that the selected photo is included page 48 Export Exports the album to a memory card or disc page 47 View Info Displays album information Photo Operations Copy ...

Page 30: ...to you want to view and press Available OPTIONS for the thumbnail list Available options differ depending on the situation Hint The unit displays up to 50 000 photos and 16 levels of a root directory on a media Items Details Multi Album Operations Imports multiple albums folders page 25 Multi Photo Operations Imports multiple photos page 25 View Shows the photo Slideshow Plays photos in the media ...

Page 31: ...e select Slideshow from OPTIONS menu and press To change the slideshow pace 1 Press OPTIONS 2 Select Slideshow Speed and press 3 Select Fast Standard or Slow and press Hints While viewing a photo page 27 you can start a slideshow by pressing To pause press again To return to the thumbnail list press RETURN If you press OPTIONS while playing the slideshow the OPTIONS menu appears and the slideshow ...

Page 32: ...owsing the scrapbook 1 Press HOME 2 Select x ScrapBook and press 3 Select the scrapbook you want to view and press The cover page or the last viewed page appears When you view from the cover page press OPTIONS during playback and select Cover then press To stop viewing the scrapbook Press RETURN Hints To display the scrapbook title press DISPLAY during playback To display the scrapbook information...

Page 33: ...e right most photo and press or To show a photo in full screen press Mm and then To return to the scrapbook press RETURN Hints When you view the photo in full screen you can export or print the photo see Viewing Photos Photo Browser on page 27 To rotate a scrapbook photo display the photo in full screen in Cursor mode then select Rotate right left in the OPTIONS menu Notes Even if you add erase ph...

Page 34: ...the design theme page 35 Music Settings Adds background music to the scrapbook page 36 Stop Stops playback and returns to the thumbnail screen Cover Plays the scrapbook from the beginning Page Mode Switches to Page mode View Shows the selected photo in full screen Adjust Capture Adjusts the photo position manually Erase Photo Erases a photo from the scrapbook page and rearranges the layout It will...

Page 35: ... Erase Erases scrapbook page 39 Rename Changes scrapbook title name page 45 Change Theme Changes the design theme page 35 Set Icon Sets an icon to scrapbook 23 icons are available Print Prints all pages of scrapbook page 48 Export Exports all pages of scrapbook to a memory card of disc page 38 View Info Displays x ScrapBook information Items Details Album0001 Sat 11 3 2007 Album0001 Sat 11 3 2007 ...

Page 36: ...d press 3 Select Select Music and press To stop playing music select No Music 4 Select the track you want to use and press The display lists the original tracks and up to the last 5 tracks imported from music CDs To import tracks from music CDs After inserting a CD into the unit select Import From CD and press Select tracks from the list and press Cursor Mode Cover Stop Music Settings Edit Export ...

Page 37: ...created scrapbook plays You can select the created scrapbook from the thumbnail screen any time you want to view To create a new scrapbook by collecting favorite photos 1 Perform steps 1 to 9 of To create a new album by collecting your favorite photos page 29 to create a new album 2 Perform steps 4 to 6 above to create a new scrapbook dsc00516 Sat 11 3 2007 9 33 06 PM Photo Browser Fri 11 2 2007 A...

Page 38: ...dia to export to and press 7 Insert the memory card or disc into the unit 8 Select all the scrapbooks you want to export Select All Selects all scrapbooks in the list Clear All Cancels all selections you have made 9 Select OK and press Album0001 Sat 11 3 2007 Album0001 Sat 11 3 2007 Sort Jump Multi File Operations Play Operations View Info Album0005 Sat 10 6 2007 0004 7MB Select x ScrapBooks to ex...

Page 39: ...in the same way as in this unit For future uses the memory card or disc will include control data files in addition to the actual x ScrapBook files Erasing scrapbooks You can erase unwanted scrapbooks Even when you erase a scrapbook the original album remains in the unit 1 Press HOME 2 Select x ScrapBook and press 3 Select the scrapbook you want to erase and press OPTIONS 4 Select Multi File Opera...

Page 40: ...usic Up to 3 000 x Pict Story HD files can be stored in the unit Hint You can also set not to create x Pict Story HD files automatically page 60 Notes You cannot export x Pict Story HD files to a memory card or disc For x Pict Story HD files created from photos imported with the Image Analysis function set to Off page 60 the function recognizing the location of faces does not work Playing x Pict S...

Page 41: ...By Title A to Z By Title Z to A By Icon or By Creation Date Jump Jumps to the desired x Pict Story HD file according to the date title or icon order Multi File Operations Multi Erase Erases multiple x Pict Story HD files page 44 Play Plays the x Pict Story HD file Repeat Play Plays the x Pict Story HD file repeatedly Operations Erase Erases the x Pict Story HD file page 44 Rotate Photo Rotates the...

Page 42: ...ginal track for BGM the design theme is set according to the music automatically Go to step 4 3 Select a design theme to match the music Items Details Random Adjusts the length of the audio track and number of photos used automatically default setting Use Entire Track Plays the entire audio track Use All Photos Plays all photo files Select music when importing from CD insert a disc Select Music Ca...

Page 43: ...display If you want to use another track import it again Creating a x Pict Story HD file manually When you have edited an album or created a new album by selecting favorite photos you can create a new x Pict Story HD file manually 1 Press HOME 2 Select Photo Browser and press 3 Select HDD and press 4 Select any photo in the album to make a x Pict Story HD file from and press OPTIONS 5 Select Creat...

Page 44: ...Pict Story HD and press 3 Select the x Pict Story HD file you want to erase and press OPTIONS 4 Select Multi File Operations and press 5 Select Multi Erase and press 6 Select all the x Pict Story HD files you want to erase 7 Select OK and press 8 Select YES and press Hint When you select Operations Erase in steps 4 and 5 above you can erase a single x Pict Story HD file ...

Page 45: ...splay F Setting buttons Album 0 Alphabet Symbol Enter Cancel Space Clear All Back Space B A C D E G F H I J L K M N O Q P R S T V U W X Y Z 2 1 3 4 5 b a c d e g f h i j l k m n o q p r s t v u w x y z _ 7 6 8 9 0 1 Select the character you want to enter and press The character appears in the entry field If necessary select the following items and press 2 Repeat step 1 to complete the entry 3 Sele...

Page 46: ... 5 you can erase multiple photos To erase scrapbooks or x Pict Story HD files see page 39 and 44 You cannot erase the sample albums or sample photos To hide the samples set Sample in Application Settings to Off page 60 Photo Browser DSC00516 Sat 11 3 2007 9 33 06 PM Photo Browser Fri 11 2 2007 Album0001 Sat 11 3 2007 Album0002 By Date recent first HDD Search By Date Multi Album Operations Multi Ph...

Page 47: ... and press 7 Select Export and press 8 Select the media to export to and press 9 Select YES and press Hints When you select Multi Photo Operations or Multi Album Operations Multi Export in steps 6 and 7 you can export multiple photos or albums When you select Album Operations Export in steps 6 and 7 you can export an album You can export x ScrapBook albums to a memory card or a disc page 38 Notes ...

Page 48: ... the unit and turn it on 7 Select the setting items you want to set and press 8 After you complete the settings select Print and press Hints Some printers support printing the shooting date on a photo To print the date set Print With Date to Yes in step 7 When you select Multi Photo Operations Multi Print in step 5 you can print multiple photos When you print a scrapbook select x ScrapBook in step...

Page 49: ...may show a message such as Unsupported USB device is detected but printing will still be performed If you encounter a further problem disconnect and connect the USB cable and reset the printer in step 6 When you print a scrapbook page some printers may not print the entire image ...

Page 50: ...ble not supplied to the USB port on the rear of the unit 2 Connect the other end of the USB cable to your computer The unit enters connecting status For further operations see page 57 Hint When connected for the first time the unit automatically installs necessary programs on the computer Windows Media Player 11 or later must be installed for Windows XP Notes Connect the unit directly to the compu...

Page 51: ... make sure it is turned on 2 Turn on the computer 480i 480p 720p 1080i RESOLUTION OUT S VIDEO VIDEO L R AUDIO OUT VIDEO OUT COMPONENT VIDEO OUT Y LAN 10 100 DC IN 16V PB PR LAN 10 100 to the LAN port Network cable not supplied to the LAN port of the hub router with hub or your computer 3 Turn on the TV and switch the input selector on your TV so that the signal from the unit appears on your TV scr...

Page 52: ...ment Connection A ADSL modem with router etc When LAN ports are available on ADSL modem with router etc Connect LAN port of unit to that of ADSL modem etc using network cable B ADSL modem with router etc When LAN ports are full on ADSL modem with router etc x Hub is necessary Example 2 When connecting using a hub page 55 C ADSL modem without router etc When ADSL modem etc without router x Router w...

Page 53: ... to check if your modem is equipped with a router Connection Environment Connection E When connecting to Internet using built in modem Examples 3 When network connection of the computer is available page 56 F When not connecting to Internet G When connecting to multiple computerswith connection E or F x Router with hub or hub is necessary Example 1 When connecting using a router with hub G on page...

Page 54: ...ernet ADSL modem cable modem etc with a router 1 commercial item When using a router with hub in connection G do not use the WAN port Router with hub 2 commercial item Network cable 3 not supplied to LAN port Computer 1 Network cable 3 not supplied to LAN port Unit Network cable 3 not supplied to LAN port Computer 2 1 Depending on the connecting environment the configuration may vary For details c...

Page 55: ... a router 1 commercial item Hub 2 commercial item Network cable 3 not supplied to LAN port Computer 1 Networkcable 3 not supplied to LAN port Unit Network cable 3 not supplied to LAN port Computer 2 1 Depending on the connecting environment the configuration may vary For details consult your contracted or contracting connection service center 2 Use a hub compatible with 10BASE T 100BASE T 3 Use a ...

Page 56: ...above the following settings are necessary Set the IP address of the computer to Use a fixed IP address Set the IP address on the unit page 61 480i 480p 720p 1080i RESOLUTION OUT S VIDEO VIDEO L R AUDIO OUT VIDEO OUT COMPONENT VIDEO OUT Y LAN 10 100 DC IN 16V PB PR Straight or crossover cable not supplied to LAN port Computer to LAN port Unit ...

Page 57: ...he ExportFolder Importing photos from a computer via a USB cable You can import photos stored in the computer to the unit via a USB cable 1 Turn on the computer and open My Computer 2 Double click HDMS S1D the unit 3 Import the photos in the computer to ImportFolder by dragging and dropping 4 After importing is finished disconnect the USB cable 5 Turn off the unit and then turn it on again The imp...

Page 58: ...e server of the unit by the procedure in Connecting to the network page 51 2 Turn on the computer and open My Network 3 Click the Workgroup icon in Microsoft Windows Network of Whole Network 4 Double click HDMS S1D the unit 5 Export photos in Export Folder to a folder on the computer by dragging and dropping 6 When exporting is completed select Finish in the display of this unit and press The serv...

Page 59: ... Demo Mode On Off Clock Set Software Update Device Information Setting List You can set up the following options Options Application Settings page 60 Allows you to create x ScrapBook and x Pict Story HD automatically and set the other playback options Unit Settings page 60 Allows you to set the date and time update firmware in the unit confirm the hard disk capacity and set the demo mode etc Video...

Page 60: ...e etc momentarily while playing a photo or an x ScrapBook On Off Sample Selects whether to display samples in Photo Browser or the thumbnail list On Off Unit Settings The default setting is underlined HDMI Control Sets whether to link with the operation of the connected HDMI device e g turning on the power for both the unit and TV On Off Demo Mode Sets whether to start the demo automatically after...

Page 61: ...ts the type of video signals output from the HDMI OUT jack Notes Even if you select RGB or Y Cb Cr if your TV is not compatible or its video settings are not appropriate the unit will output a signal acceptable with your TV When connected to a TV compatible with PhotoTV HD by an HDMI cord you can enjoy higher quality images by selecting Auto Black Level Selects the black level Setup level for 480i...

Page 62: ...M used for x Pict Story HD to DVD Album Backup Exports all the photos stored in the album to DVD Note Should trouble occur with the hard disk consult your nearest Sony dealer or local authorized Sony service facility 1 Press Z open close and insert the blank disc for backup 2 press HOME 3 Select Settings and press 4 Select Backup Restore and press 5 Select the item and press 6 Select the contents ...

Page 63: ...d when selecting Initialize HDD in step 4 When you delete all data from a memory card you may not be able to record with a digital still camera In this case initialize the memory card with the digital still camera again Do not initialize the hard disk of the unit with a computer Even if the hard disk is initialized the samples will not be deleted You cannot initialize a DVD R DVD R CD R already re...

Page 64: ...n When connected VIDEO OUT S VIDEO OUT jacks Slide the RESOLUTION switch to 480i page 16 Check the connection of the audio video cord If the HDMI cord is also connected the HDMI connection may have priority In this case disconnect the cord after switching the RESOLUTION switch to 480i The photo does not fill the screen c Set the image size to fit the aspect ratio of your TV page 67 HDMI Control fu...

Page 65: ... playback page 28 The rotated status of a photo differs when displayed in the thumbnail screen or full screen c If a photo is edited by rotating by the computer s application the rotated status may differ in the thumbnail screen or full screen Free space of the unit s hard disk does not increase even if you erase photos or albums c Erase the x ScrapBook or x Pict Story HD created from the photos a...

Page 66: ...ng is made correctly page 13 Some buttons cannot be used depending on the TV c Make the TV setting again if you have replaced the batteries page 13 Others EXPORT or IMPORT indicator flashes in red c Turn on the unit and check the error message To turn off the power by force If the problem is still unresolved after checking the troubleshooting guide turn off the power by force Hold down the 1 on st...

Page 67: ...tting as follows Above is an example when playing a photo shot in 4 3 horizon aspect in normal 16 9 mode of this unit By setting TV Type to 4 3 a 4 3 photo displays in full screen on a 4 3 TV screen TV screen Settings Black bands are seen in the right and left of the screen and the image is enlarged vertically Set TV Type to 4 3 on the unit page 61 Black bands are seen around the image ...

Page 68: ... same as Memory Stick PRO Duo 7 MMCplus and MMCmobile are not supported Note Do not insert any media or devices into the unit other than those listed above What is MagicGate MagicGate is a copyright protection technology developed by Sony Type of Memory Card Maximum size guaranteed Memory Stick w o MagicGate 128 MB MagicGate Memory Stick 2 128 MB Memory Stick with MagicGate 2 3 128 MB Memory Stick...

Page 69: ...ick under an unfavorable condition as below Extremely hot place such as in a parked car with windows closed in summer or a spot under direct sunlight Humid place Place near corrosive substances If you format a Memory Stick in which data has been already written all the data and software will be erased Be careful not to mistakenly erase any important data Label area Terminal Write protect switch No...

Page 70: ...o the recording quality or physical condition of the disc or its authoring software The disc will not play if it has not been correctly finalized If you perform a disc operation eg import export photos etc the disc s rotation will increase and make a high speed rotating sound to reduce processing time Type of Disc Importing Exporting DVD ROM a DVD R Ver2 0 2 1 16x speed max a a DVD RW Ver1 1 1 2 6...

Page 71: ...DEO OUT 480i 1 S VIDEO OUT 480i 1 AUDIO OUT L R 1 each DC IN 1 Power requirements 120V AC 60 Hz the unit DC 16V Power consumption 38 W maximum Ambient conditions Operating temperature 5 C to 35 C 41 F to 95 F temperature gradient less than 10 C hour 50 F hour Operating humidity 20 to 80 non condensing Dimensions Approx 171 115 195 mm 6 3 4 4 5 8 7 3 4 in W H D without protruding parts Mass Approx ...

Page 72: ...ows logo Windows Vista and Windows Media Player are registered trademarks or trademarks of Microsoft Corporation in the United States of America and or other countries Other system and product names used herein are registered trademarks or trademarks of their respective manufacturers and marks may not be written in this manual The raster process of TrueType fonts is based on the FreeType Team soft...

Page 73: ...7 B Remote sensor 12 C Memory Stick slot 19 D SD MMC xD Picture Card slot 19 E CompactFlash Microdrive slot 19 F CompactFlash Microdrive eject button 19 G EXPORT indicator 47 H Z open close button 21 I USB jack for connecting digital still camera USB keyboard 21 45 J IMPORT button indicator 22 K Disc tray 21 CF Microdrive EXPORT IMPORT ...

Page 74: ...necting printer or computer 48 50 E DC IN 16V AC adaptor input jack 17 F COMPONENT VIDEO OUT Y PB PR jacks 16 G VIDEO OUT jack 16 H S VIDEO OUT jack 16 I AUDIO OUT L R jacks 16 480i 480p 720p 1080i RESOLUTION OUT S VIDEO VIDEO L R AUDIO OUT VIDEO OUT COMPONENT VIDEO OUT Y LAN 10 100 DC IN 16V PB PR ...

Page 75: ...1 on standby button 17 F DISPLAY button 10 G M m enter buttons 10 H OPTIONS button 10 I HOME button 10 J TV operation buttons 13 VOL volume buttons CH channel buttons MUTING button The CH button has a tactile dot Use the tactile dot as a reference when operating the unit INPUT INFO RETURN HOME TV MUTING VOL CH DISPLAY OPTIONS TV ...

Page 76: ...g albums or photos 46 x Pict Story HD 44 x ScrapBook 39 Export Page 39 Exporting 47 to a computer via a network 58 to a computer via a USB cable 57 x ScrapBook 38 F Front panel 73 Full Screen 28 H HDMI Control 14 60 HDMI OUT 14 HDMI Settings 61 HOME 10 I Image Analysis 60 IMPORT 22 Import From CD 36 42 Importing all photos to the unit 22 from a computer via a network 58 from a computer via a USB c...

Page 77: ...42 x ScrapBook 35 Troubleshooting 64 Turning off the power by force 66 Turning on the unit 17 TV 1 13 TV operating buttons 13 TV Type 61 U Unit Settings 60 USB keyboard 45 Use All Photos 42 Use Entire Track 42 V VIDEO OUT 16 Video Resolution 61 Video Setup 61 Viewing photos 27 x Pict Story HD 40 x ScrapBook 32 X xD Picture Card xD 19 x Pict Story Backup 62 x Pict Story Date Display 60 x Pict Story...

Page 78: ......

Page 79: ......

Reviews: