background image

Using the Printer Driver

12

Windows Me

4

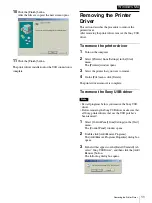
Click the [OK] button.
When the removal procedure finishes, the 
following dialog box opens.

Note

If another printer is using the Sony USB driver, the 
following dialog box appears.
Click the [OK] button. This stops the removal 
procedure.

5

Click the [OK] button.
The computer restarts.

The Sony USB driver removal is complete.

Using the Printer Driver

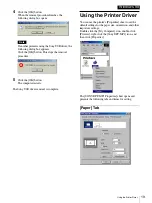
You can use the printer's [Properties] sheet to set the 
default settings for the paper size, orientation, and other 
important settings.
Double-click the [My Computer] icon, double-click 
[Printers], right-click the [Sony DPP-MP1] icon, and 
then click [Properties].

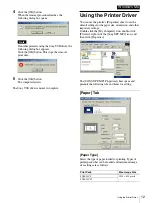
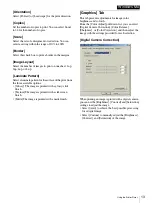
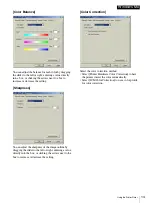
The [SONY DPP-MP1 Properties] sheet opens and 
presents the following tabs and items for setting.

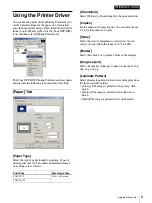
[Paper] Tab

[Paper Type]

Select the type of paper loaded for printing. Types of 
printer packs that can be loaded and maximum image 
size settings are as follows,

Print Pack

Max. Image Size

SVM-24CS 1010 

×

 628 pixels

SVM-24CW 

Summary of Contents for DPP-MP1

Page 1: ...allation and use of the Printer Drivers for Windows 2000 Windows Me Windows 98 and Macintosh Before using the printer driver be sure to read the ReadMe file located in the same folder of the printer driver on the CD ROM Before Using this Software 2001 Sony Corporation DPP MP1 ...

Page 2: ...ter Driver Installing the Printer Driver 16 Removing the Printer Driver 18 To remove the printer driver 18 To remove the Sony USB driver 18 Using the Printer Driver 19 Paper Tab 19 Graphics Tab 20 Macintosh Printer Driver Installing the Printer Driver 23 Removing the Printer Driver 23 Making Printer Settings 24 Select the DPP MP1 with the Chooser 24 Selecting the Paper Type 24 Making Print Setting...

Page 3: ...DPP MP1 Windows 2000 Printer Driver ...

Page 4: ...l double click Add Printer and then follow the instructions to install the printer driver 4 Click the Next button The next screen opens 5 Make sure that the Search for a suitable driver option is selected and then click the Next button The next screen opens 6 Insert the provided digital photo printer for DPP MP1 CD ROM into the CD ROM drive 7 Click the Specify a location check box on and then clic...

Page 5: ...e printer that you want to remove 4 On the File menu click Delete The printer driver removal is complete To delete the INF file Delete the DPP MP1 INF file located in C WinNT Inf Note Depending on your Windows settings the Inf folder may not be displayed To display the folder open My Computer and click Folder Options on the Tools menu In the Folder Options dialog box click the View tab then select...

Page 6: ...ze settings are as follows Orientation Select Portrait or Landscape for the print direction Copies Set the number of copies to print You can select from 1 to 24 for the number of copies Scale Select the rate of enlargement or reduction You an select a setting within the range of 10 to 400 Border Select this check box to print a border in the margins Image Layout Select the number of images to prin...

Page 7: ...t and Saturation settings to adjust the image Select Auto to achieve the best possible processing for a digital image Select Custom to manually adjust the Brightness Contrast and Saturation of the image Color Balance You can adjust the balance for each color by dragging the slider to the left or right entering a value directly into a box or clicking the arrows next to a box to increase or decrease...

Page 8: ...Windows 2000 Color Correction Select the color correction method Select Printer Hardware Color Correction to have the printer correct the color automatically Select ICM Color Correction to use a color profile for color correction ...

Page 9: ...DPP MP1 Windows Me Printer Driver ...

Page 10: ...rovided digital photo printer for DPP MP1 CD ROM into the CD ROM drive 5 Click the Next button After the files are copied the next screen appears 6 Click the Finish button A dialog box opens 7 Click Yes tore startyourcomputer Ifthe System Settings Change dialog box does not open after the desktop screen appears re start the computer 8 After the computer re starts the next screen appears If the Add...

Page 11: ...nu The Printers window opens 3 Select the printer that you want to remove 4 On the File menu click Delete The printer driver removal is complete To remove the Sony USB driver Note Exit all programs before you remove the Sony USB driver Before removing the Sony USB driver make sure that all Sony printer drivers that use the USB port have been removed 1 Select Control Panel from Settings in the Star...

Page 12: ...ter Driver You can use the printer s Properties sheet to set the default settings for the paper size orientation and other important settings Double click the My Computer icon double click Printers right click the Sony DPP MP1 icon and then click Properties The SONY DPP MP1 Properties sheet opens and presents the following tabs and items for setting Paper Tab Paper Type Select the type of paper lo...

Page 13: ...ons Glossy The image is printed with a glossy slick finish Texture The image is printed with a silk screen finish Matte The image is printed with a matte finish Graphics Tab This tab presents adjustments for image color brightness and so forth From the Color Adjust pull down list you can select Digital Camera Correction Color Balance Sharpness or Color Correction and then adjust the image with the...

Page 14: ... setting Sharpness You an adjust the sharpness of the image outline by dragging the slider to the left or right entering a value directly into the box or clicking the arrows next to the box to increase or decrease the setting Color Correction Select the color correction method Select Printer Hardware Color Correction to have the printer correct the color automatically Select ICM Color Correction t...

Page 15: ...DPP MP1 Windows 98 Printer Driver ...

Page 16: ...er and double click Add Printer Followthe instructions displayed to install the printer driver 4 Click the Next button The next screen opens 5 Make sure the first item Search for the best driver is selected and then click the Next button The next screen opens 6 Insert the provided digital photo printer DPP MP1 CD ROM into the CD ROM drive 7 Click the Specify a location check box on click the Brows...

Page 17: ... Computer icon Then double click the Control Panel folder double click the Printers folder and double click Add Printer Followthe instructions displayed to install the printer driver 12 Click the Next button The next screen opens 13 Make sure the first item Search for the best driver is selected and then click the Next button The next screen opens 14 Click the Specify a location check box on click...

Page 18: ...nu The Printers window opens 3 Select the printer that you want to remove 4 On the File menu click Delete The printer driver removal is complete To remove the Sony USB driver Note Exit all programs before you remove the Sony USB driver Before removing the Sony USB driver make sure that all Sony printer drivers that use the USB port have been removed 1 Select Control Panel from Settings in the Star...

Page 19: ...dure 5 Click the OK button The computer restarts The Sony USB driver removal is complete Using the Printer Driver You can use the printer s Properties sheet to set the default settings for the paper size orientation and other important settings Double click the My Computer icon double click Printers right click the Sony DPP MP1 icon and then click Properties The SONY DPP MP1 Properties sheet opens...

Page 20: ...inish Texture The image is printed with a silk screen finish Matte The image is printed with a matte finish About Clicktodisplaythenumberoftheinstalledprinterdriver and other information Restore Defaults Restores the default selections for these settings Graphics Tab This tab presents adjustments for image color brightness and so forth From the Color Adjust pull down list you can select Digital Ca...

Page 21: ... setting Sharpness You an adjust the sharpness of the image outline by dragging the slider to the left or right entering a value directly into the box or clicking the arrows next to the box to increase or decrease the setting Color Correction Select the color correction method Select Printer Hardware Color Correction to have the printer correct the color automatically Select ICM Color Correction t...

Page 22: ... 2001 Sony Corporation DPP MP1 Macintosh Printer Driver ...

Page 23: ... procedure Note Before beginning this procedure turn off the DPP MP1 or disconnect it from the Macintosh 1 When there is a desktop a desktop printer present delete the icon Note If spool files remain when you delete the desktop printer icon a confirmation dialog box opens Wait until all the data is printed or delete it before continuing the procedure 2 In System Folder open the Extensions folder 3...

Page 24: ...e to make these settings before printing To display the Page Setup dialog box select Page Setup onthe File menu Optionsavailableinthe Page Setup dialog box are as follows s Paper Type You can print using either SVM 24CS or SVM 24CW s Scale Select the rate of enlargement or reduction You can select a setting within the range of 10 to 400 s Orientation Select the print direction s Image Layout Selec...

Page 25: ... the following appears to show the expected appearance of the printed image on the Macintosh s screen If you click the Print button in this window the image is printed If you click the Cancel button printing is canceled When previewing a multi page document you can view the following or preceding pages by clicking the Next and Previous buttons These setting are described below Color Adjust Setting...

Page 26: ...king Restore Defaults restores the sharpness setting to its default s Color Sync When Use ColorSync is selected you can select the following options In the Profile pull down list you can specify the DPP MP1 profile In the Intent pull down list you can select any of the following color reproduction mapping Perceptual Images Saturation Graphics Relative Colorimetric Absolute Colormetric In the Quali...

Reviews: