background image

Ta
ble
 of
 

co
nte
n

ts

Op
e

rat

io

S

ear

ch

HO

M

E

/MENU 

Se
ar

ch

In

de
x

68

GB

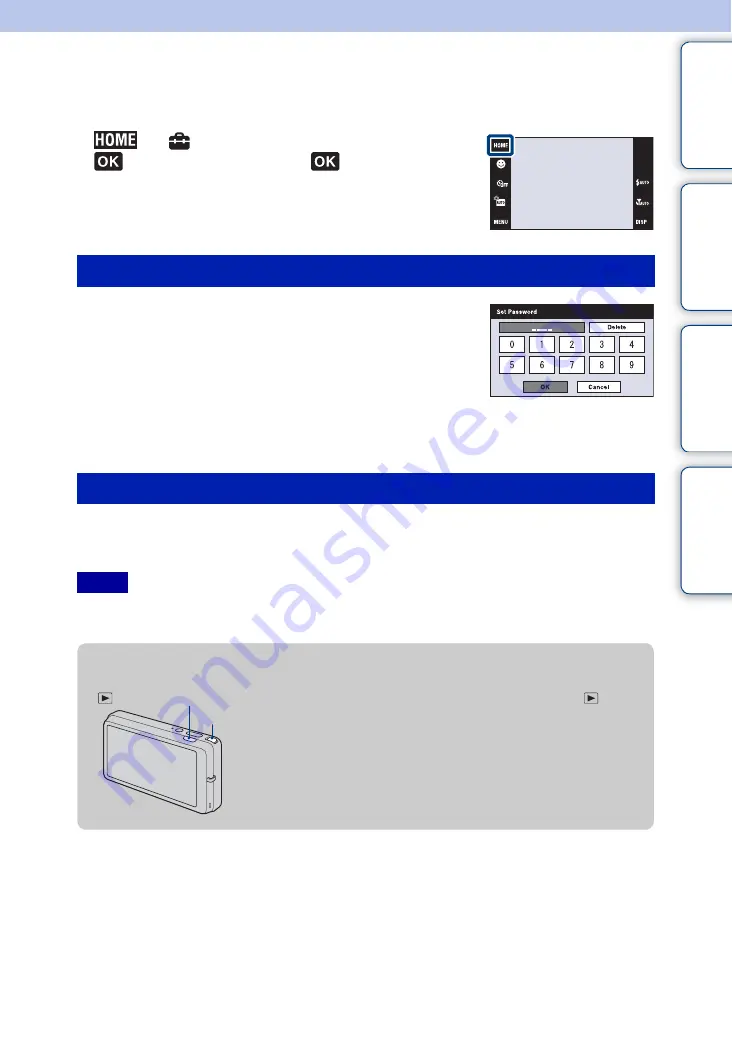
Password Lock (DSC-T700 only)

You can set a password to prevent the playback of images in the internal memory.

1


t


(Settings) 

t

 [Main Settings] 

t


t

 [Password Lock] 

t


1

The password setting screen appears 

t

 Input 

the 4-digit number of your choice 

t

 [OK]

2

The password re-input screen appears 

t

 Input 

the same 4-digit number again 

t

 [OK] 

t

 [OK]

If you enter the incorrect number, a message window appears. 
Touch the message window and input the correct password 
number again.

1

The password input screen appears 

t

 Input the password number which 

you originally set 

t

 [OK]

• You cannot set the password for “Memory Stick Duo” images.
• The password lock is not released even by initializing the settings.

Setting the password lock

Entering the password and playing back images

Notes

OK

Cancel

Delete

z

What to do when you have forgotten the password

1 First turn off the camera’s power. Then press 


(Playback) button while moving the zoom (W/T) lever 
to the W side.

2 The power is now turned on, and the password release 

screen appears 

t

 touch [OK]

3 Enter the password release number (page 171) 

t


touch [OK] 

t

 [OK]

 (Playback) button

Zoom (W/T) lever

Summary of Contents for Cyber-shot DSC-T77

Page 1: ... 2008 Sony Corporation 4 000 946 11 1 GB Cyber shot Handbook DSC T77 T700 Table of contents Operation Search HOME MENU Search Index ...

Page 2: ...ch for information by keyword Marks and notations used in this handbook Table of contents Operation Search HOME MENU Search Index In this handbook the sequence of operations is shown by arrows t You should touch the items on the screen in the order indicated Marks are shown as they appear in the camera s default setting The default setting is indicated by Indicates cautions and limitations relevan...

Page 3: ... has been produced under a quality assurance system certified by Carl Zeiss in accordance with the quality standards of Carl Zeiss in Germany Notes on the LCD screen and lens The LCD screen is manufactured using extremely high precision technology so over 99 99 of the pixels are operational for effective use However some tiny black and or bright dots white red blue or green may appear on the LCD s...

Page 4: ...7 HOME MENU Search 9 Using the touch panel 14 Changing the DISP screen display setting 15 Album Photo Library Function DSC T700 only 17 Using the internal memory DSC T77 only 18 Shooting Auto Adjustment 19 Scene Selection 20 Smile Shutter 22 Easy Shooting 23 Program Auto 24 Movie Mode 25 Zoom 26 Self Timer 27 Macro Close focus 28 Flash 29 Focus 30 Metering Mode 32 ISO 33 EV 34 ...

Page 5: ... Viewing still images 36 Image Index 37 Slideshow 38 Delete 41 Wide Zoom 42 Temporarily Rotated Display 43 Viewing movies 44 Scrapbook DSC T700 only 45 HOME HOME items 9 MENU Shooting MENU items Shooting 11 MENU Viewing MENU items Viewing 12 TV Viewing images on a TV 119 ...

Page 6: ...on your computer DSC T77 132 Using the Music Transfer supplied 136 Using your Macintosh computer 137 Viewing Cyber shot Step up Guide 140 Printing Printing still images 141 Printing images directly using a PictBridge compliant printer 142 Printing at a shop 144 Troubleshooting Troubleshooting 145 Warning indicators and messages 155 Others Using the camera abroad Power sources 160 On the Memory Sti...

Page 7: ...utter 22 Face Detection 82 Anti Blink 93 Red Eye Reduction 94 Shooting food arrangements Gourmet 20 Shooting close to objects Macro 28 Close focus enabled 28 Shooting moving objects Hi Speed Shutter 21 Burst 85 Shooting without blur High Sensitivity 20 Hi Speed Shutter 21 2 second delay self timer 27 ISO 33 Shooting with backlight Forced Flash 29 Scene Recognition 79 Shooting in dark places High S...

Page 8: ...ming 108 Displaying full screen images DISP Screen Display 15 Wide Zoom 16 42 Temporarily Rotated Display 43 Image Size 77 Editing images Scrapbook DSC T700 only 45 Retouch 108 Paint 110 Multi Purpose Resize 111 Playing back a series of images in order Slideshow 38 Initializing settings Initialize 59 Printing images Print 141 Viewing on TVs Viewing images on a TV 119 Information about optional acc...

Page 9: ...ess the shutter button halfway down to return to shooting mode Click on an item under Items in the table below to jump to the corresponding page Shooting View Images 1 DSC T700 View Images DSC T77 These items are displayed only when Memory Stick Duo is inserted into the camera DSC T77 only View Images 2 DSC T700 Slideshow DSC T77 HOME items Items Shooting Items Date View Event View Favorites Folde...

Page 10: ...opy DSC T77 only Memory Tool Internal Memory Tool Format Create REC Folder DSC T700 only Change REC Folder DSC T700 only Items Main Settings Main Settings 1 Beep Function Guide Initialize Calibration Housing Demo Mode Main Settings Main Settings 2 USB Connect LUN Settings DSC T700 only COMPONENT Video Out TV TYPE Password Lock DSC T700 only Shooting Settings Shooting Settings 1 AF Illuminator Grid...

Page 11: ...e below indicates a function is available and that it is unavailable The icons below Scene Selection indicate the available Scene Selection modes Click on an item under Menu items to jump to the corresponding page Only the available items are displayed on the screen MENU items Shooting REC Mode Menu items Scene Selection Image Size Scene Recognition Flash Face Detection Smile Detection Sensitivity...

Page 12: ...function is available and that it is unavailable Click on an item under Menu items to jump to the corresponding page DSC T700 The DPOF setting is unavailable when using the internal memory Only the available items are displayed on the screen MENU items Viewing View Mode Menu items Memory Stick Duo Internal Memory Date View Event View Favorites Folder View Date List Event List Select Folder View Mo...

Page 13: ...yed on the screen View Mode Menu items Memory Stick Duo Internal Memory Date View Event View Favorites Folder View Folder View Date List Event List Select Folder View Mode Filter by Faces Slideshow Add Remove Favorites Retouch Paint Multi Purpose Resize Delete Protect DPOF Print Rotate Volume Settings Note ...

Page 14: ...ays a frame and then pressing the shutter button halfway down brings the frame into focus If there is a face in the frame in addition to the focus the brightness and hue are also automatically optimized You cannot use this function when using the digital zoom shooting in Close focus enabled mode or in Easy Shooting mode You cannot use this function when Landscape Twilight Gourmet Fireworks Underwa...

Page 15: ... Note Display Setup Normal The operation buttons and the icons are displayed Simple Only the operation buttons are displayed Image Only The operation buttons and the icons are not displayed zUsing Image Only playback Select an image by touching the left and right sides of the screen When you touch the center of the screen the buttons and icons are displayed temporarily Touch on the upper right cor...

Page 16: ...oes not appear while recording movies playing back movies viewing vertical orientation images rotating still images using Temporarily Rotated Display or using Wide Zoom 4 3 3 2 A large difference in the histogram displayed during shooting and playback may occur when The flash strobes The shutter speed is slow or fast The histogram may not appear for images recorded using other cameras This sets th...

Page 17: ...table see the PMB Portable help When a Memory Stick Duo is inserted in the camera images are recorded on the Memory Stick Duo Note that the camera cannot copy or transfer images directly between the internal memory and a Memory Stick Duo Use the PMB When measuring media capacity 1GB equals 1 billion bytes a portion of which is used for system management and or application files The capacity that a...

Page 18: ...city then perform the procedure explained in Copy page 56 You cannot import image data on a Memory Stick Duo to the internal memory By making a USB connection between the camera and a computer with a cable for multi use terminal you can import data stored in the internal memory to a computer However you cannot export data on a computer to the internal memory When a Memory Stick Duo is inserted Rec...

Page 19: ...he lens Shoot in the Close focus mode when you shoot a subject closer than the shooting distance When the camera cannot focus on the subject automatically the AE AF lock indicator changes to flash slowly and the beep does not sound Either recompose the shot or change the focus setting page 30 Focusing may be difficult in the following situations It is dark and the subject is distant The contrast b...

Page 20: ... etc Soft Snap Allows you to shoot images with a softer atmosphere for portraits and flowers etc Twilight Portrait Allows you to shoot sharp images of people with the night view in the background without compromising the atmosphere Twilight Allows you to shoot night scenes at far distance without losing the dark atmosphere of the surroundings Gourmet Shifts to Macro mode allowing you to shoot food...

Page 21: ...vailable Some functions are not available depending on the Scene Selection mode 1 Flash for White Balance cannot be selected 2 When touched for Face Detection cannot be selected 3 You can use Underwater White Balance instead of White Balance Fireworks Allows you to record fireworks in all their splendor Underwater Allows you to shoot underwater in natural colors in housing Hi Speed Shutter Allows ...

Page 22: ...ction frame Shooting using the Smile Shutter ends automatically when either the Memory Stick Duo or internal memory becomes full Smiles may not be detected correctly depending on the conditions You cannot use the Digital Zoom function Notes zHints for better capturing of smiles The shutter operates when any person whose face is being detected smiles You can select the subject that has priority for...

Page 23: ...The text size increases and indicators become easier to see 1 Lower the lens cover to switch to shooting mode 2 REC Mode t Easy Shooting t The battery charge is used up more quickly because the screen brightness increases automatically Note zChanging Image Size Flash and Self Timer Image Size t Select Large or Small in Image Size Flash t Select Auto or Off in Flash Self Timer t Select Self Timer 1...

Page 24: ...e exposure adjusted automatically both the shutter speed and the aperture value The setting buttons for Focus Metering Mode ISO and EV will appear on the bottom of the screen Also you can select various settings using the menu 1 Lower the lens cover to switch to shooting mode 2 REC Mode t Program Auto t ...

Page 25: ...U Search Index 25GB Movie Mode Allows you to record movies with audio 1 Lower the lens cover to switch to shooting mode 2 REC Mode t Movie Mode t 3 Press the shutter button fully down 4 To stop recording press the shutter button fully down again ...

Page 26: ...era s optical zoom function can enlarge images up to 4 1 Lower the lens cover to switch to shooting mode 2 Move the zoom W T lever Move the zoom W T lever to the T side to zoom and move to the W side to return When the zoom scale exceeds 4 see page 72 The camera zooms slowly while shooting a movie Note T side W side ...

Page 27: ...c Setting the 10 second delay self timer When you press the shutter button the self timer lamp flashes and a beep sounds until the shutter operates To cancel touch Self Timer 2sec Setting the 2 second delay self timer Note zReducing blurring with the two second self timer Use the 2 second delay self timer to prevent blur of an image The shutter is released 2 seconds after you press the shutter but...

Page 28: ... points when using the Close focus mode You cannot use the Burst Bracket or Face Detection functions This mode is cancelled if you turn off the power or switch the shooting mode to another one Auto The camera adjusts the focus automatically from distant subjects to close up Normally put the camera in this mode Macro On The camera adjusts the focus with priority on close up subjects Set Macro On wh...

Page 29: ...s The shutter speed is slow in a dark place to clearly shoot the background that is out of flash light Flash Off Flash does not operate Notes zWhen the White circular spots appears in flash photos This is caused by particles dust pollen etc floating close to the lens When they are accentuated by the camera s flash they appear as white circular spots How can the White circular spots be reduced Ligh...

Page 30: ... AF Focuses on a subject in the center of the finder frame automatically Using the AF lock function together you can compose the image the way you want Spot AF Focuses on an extremely small subject or a narrow area automatically Using the AF lock function together you can compose the image the way you want Hold the camera steady so as not to misalign the subject and the AF range finder frame 1 0 m...

Page 31: ...the AF range finder frame is disabled and appears in a dotted line In this case the camera works to focus on the subjects at the center of the screen Note zQuickly choosing the priority subject Touching the screen displays a frame and then pressing the shutter button halfway down brings the frame into focus ...

Page 32: ...you touch the screen to select the point to bring into focus Multi Divides into multiple regions and measures each region The camera determines a well balanced exposure Multi pattern metering When Face Detection is set to other than When touched the setting is fixed to Multi Center Measures the center of the image and determines the exposure based on the brightness of the subject there Center weig...

Page 33: ...nsitivity automatically You can reduce image blurring in dark locations or moving subjects by increasing ISO sensitivity select a larger number Notes zAdjusting ISO Sensitivity Recommended Exposure Index ISO sensitivity is a speed rating for recording media that incorporates an image sensor that receives light Even when the exposure is the same images differ depending on the ISO sensitivity High I...

Page 34: ... The following steps are used in Program Auto mode For details on other shooting modes see page 86 1 Lower the lens cover to switch to shooting mode 2 REC Mode t Program Auto t 3 EV t desired number t If you shoot a subject in extremely bright or dark conditions or when you use the flash the exposure adjustment may not be effective Note Continued r ...

Page 35: ... the amount of light that the camera will receive when you release the shutter Shutter speed Length of time the camera receives light Aperture Size of the opening allowing light to pass through ISO sensitivity Recommended Exposure Index Recording sensitivity Overexposure too much light Whitish image Lower EV setting Correct exposure Higher EV setting Underexposure too little light Darker image Exp...

Page 36: ... Folder View from View Images 1 or View Images to play back these images Viewing an enlarged image playback zoom Button Action Adjusts the position Changes the zoom scale Turns on off Cancels playback zoom Note Shows the displayed area of the whole image zTo save enlarged images You can save an enlarged image by using the trimming function For details see page 108 zPlayback in Image Only mode Sele...

Page 37: ... playback mode 2 Image Index t touch to turn the pages zChanging the display format Touch View Mode to change the way images are displayed View Mode However you can change the view mode only when Memory Stick Duo is inserted into the camera DSC T77 only If you touch in index mode you can set the number of images displayed in the index screen to 12 or 20 images Date View t page 47 Event View t page...

Page 38: ...ff when the view mode is set to Folder View You may not be able to use the Filter by Faces function with images shot using other cameras Sometimes other than the intended images may be specified for display non display Notes Image All Plays a slideshow of all the still images in order This Date Plays a slideshow of still images with the currently selected date range when the view mode is Date View...

Page 39: ...or various scenes that makes the most of images that include faces Faces in still images are zoomed and multiple images are displayed together Face 2 Nostalgic A slow moody slideshow that makes the most of images that include faces Faces in still images are zoomed and multiple images are displayed together Face 3 Stylish A lively high tempo slideshow that makes the most of images that include face...

Page 40: ... back the slideshow ends zSelecting background music You can transfer a desired music file from your CDs or MP3 files to the camera to play back during slideshow To transfer music install the Music Transfer software supplied to your computer For details see pages 136 and 139 You can record up to eight pieces of music on the camera The eight preset pieces Music1 Music8 can be replaced with the ones...

Page 41: ... Delete t touch the image you want to delete t t OK Touch an image with mark to release the mark Deleting images in single image mode Deleting images in index mode zYou can switch between index and single image mode when selecting images Touch on the index screen to return to the single image screen and touch on the single image screen to return to index screen You can also switch between index an...

Page 42: ...at a 4 3 and 3 2 aspect ratio are played at a 16 9 aspect ratio In this case the top and bottom of the image will be slightly cropped 1 Press the Playback button to switch to playback mode 2 Touch Wide Zoom 3 To cancel Wide Zoom touch Wide Zoom again Wide Zoom is not available for movies and 16 9 images Note ...

Page 43: ...nd enlarge it on the screen 1 Press the Playback button to switch to playback mode 2 Select the vertical orientation image t touch Temporarily Rotated Display 3 To cancel the display touch Temporarily Rotated Display again Temporarily rotated display is not available for movies or horizontal orientation images Touching cancels temporarily rotated display Notes ...

Page 44: ...r View Images to play back these images Button Action Volume control B Normal playback x Stop M m Fast forward fast rewind Notes zPlayback in Image Only mode Select an image by touching the left and right sides of the screen When you touch the center of the screen the buttons and icons are displayed temporarily When Display Setup is set to Image Only touch the right left side of the screen during ...

Page 45: ...k display is not available when the view mode is set to Folder View You cannot use the Scrapbook function with movies Images may appear to have a bluish tint This is not a malfunction Button Action 1 Save Saves the image in 3M format in the internal memory or on a Memory Stick Duo 2 Background Select Selects the desired background with 3 Auto playback Starts auto playback Touch the screen to stop ...

Page 46: ...k images by the following methods Save This Page Saves the page you are currently viewing Select pages and save Selects and saves multiple images 1Touch to display the image then touch the image to save 2Repeat step 1 to select more images 3Touch t OK Save All Pages in Scrapbook Saves all images in the scrapbook ...

Page 47: ... View Images t Date View t 2 Select the date you want to display with This item is not displayed when the internal memory is used to record images DSC T77 only When images recorded with other cameras cannot be played back on this camera view the images in Folder View Notes zTo select the playback image by the calendar Touch Date List in index mode and you can select from the date view the date on ...

Page 48: ...d when the internal memory is used to record images DSC T77 only When images recorded with other cameras cannot be played back on this camera view the images in Folder View Notes zTo select the playback image by the event list Touch Event List in index mode and you can select the event group containing the image you want to play back from the Event List You can enter a desired event name for each ...

Page 49: ...t Favorites t DSC T77 t View Images t Favorites t 2 Touch the Favorites number you want to display This item is not displayed when the internal memory is used to record images DSC T77 only When images recorded with other cameras cannot be played back on this camera view the images in Folder View Notes Number of images registered as Favorites Display images having the most recently date ...

Page 50: ...a stores images in a specified folder of a Memory Stick Duo or the internal memory The 101MSDCF or 101_SONY folder exists initially when the camera is new and all images are recorded in it zTo select the playback folder Touch Select Folder in index mode and you can select the playback folder containing the image you want to play back from the folder When there is only one folder create a recording...

Page 51: ...sic Transfer in the CD ROM supplied to add or change background music tracks 1 DSC T700 t View Images 2 t Music Tool t t Download Music t DSC T77 t Slideshow t Music Tool t t Download Music t 2 Make a USB connection between the camera and a computer and add or change music files pages 136 139 ...

Page 52: ...ackground music files stored in the camera It can be used in cases such as when the background music files are damaged and cannot be played 1 DSC T700 t View Images 2 t Music Tool t t Format Music t t OK DSC T77 t Slideshow t Music Tool t t Format Music t t OK 2 Restore the music preset at the factory to the camera using Music Transfer page 136 ...

Page 53: ...mats the Memory Stick Duo or the internal memory A commercially available Memory Stick Duo is already formatted and can be used immediately 1 t Manage Memory t Memory Tool t t Format t t OK Note that formatting permanently erases all data including even protected images Note ...

Page 54: ...Tool t t Create REC Folder t t OK This item is not displayed when the internal memory is used to record images DSC T77 only You cannot delete a folder with the camera To delete a folder use your computer etc Up to 4 000 images can be stored in one folder When the folder capacity is exceeded a new folder is automatically created Notes zOn the folders After a new folder is created you can change the...

Page 55: ...rding images 1 t Manage Memory t Memory Tool t t Change REC Folder t 2 Select the folder you want to record t Touch OK This item is not displayed when the internal memory is used to record images DSC T77 only You cannot select the 100MSDCF folder as a recording folder You cannot move recorded images to another folder Notes ...

Page 56: ... or possibly corrupting the data You cannot select images to copy The original images in the internal memory are retained even after copying To delete the contents of the internal memory remove the Memory Stick Duo after copying then format the internal memory Format in Memory Tool page 53 A new folder is created on the Memory Stick Duo and all the data will be copied to it You cannot choose a spe...

Page 57: ...oduced when you operate the camera 1 t Settings t Main Settings t t Beep t t desired mode t Shutter Turns on the shutter sound when you press the shutter button On Turns on the beep shutter sound when you operate the touch panel press the shutter button Off Turns off the beep shutter sound ...

Page 58: ... select whether or not function guide is displayed when you operate the camera 1 t Settings t Main Settings t t Function Guide t t desired mode t The guide is displayed during playback even if this is set to Off On Displays the function guide Off Does not display the function guide Note ...

Page 59: ...the setting to the default setting Even if you execute this function the images are retained 1 t Settings t Main Settings t t Initialize t t OK The Password Lock is not released even if you initialize the settings DSC T700 only Be sure not to turn off the camera while initializing Notes ...

Page 60: ... points where you touch 1 t Settings t Main Settings t t Calibration t 2 Using the paint pen touch the center of the mark displayed on the screen in order To stop the calibration process mid way touch Cancel The adjustments made up to that point are not effected If you fail to touch the right spot the calibration is not performed Touch the center of the mark again Notes ...

Page 61: ... also to the operating instructions supplied with the Housing 1 t Settings t Main Settings t t Housing t t desired mode t Objects cannot be brought into focus by touching the screen screen display is fixed to Normal There are limitations on some functions and some buttons are not displayed on the screen On Changes the function of the buttons Off Does not change any functions Notes ...

Page 62: ...n the shutter button is pressed the image is recorded Smile Shutter Touch Smile icon The camera automatically operates the shutter when a smiling face is detected but no image is recorded When Smile icon is touched again operation returns to the demonstration of Scene Recognition Auto review is fixed to On When screen display is set to Normal some of the icons are not displayed on the LCD screen W...

Page 63: ...camera to a computer or a USB device with the Auto setting select Mass Storage Auto The camera recognizes automatically and sets up communication with a computer or PictBridge compliant printer pages 126 132 and 142 PictBridge Connects the camera to a PictBridge compliant printer page 142 PTP MTP When you connect the camera to a computer the AutoPlay Wizard appears and the images in the recording ...

Page 64: ...uploading images to a media service using PMB Portable Multi The images both on the Memory Stick Duo and in the internal memory are displayed Select this setting when you connect the camera to a computer Single When the Memory Stick Duo is inserted into the camera the images on the Memory Stick Duo are displayed when it is not inserted the images in the internal memory are displayed Select this se...

Page 65: ...esired mode t You cannot view movies output in HD 1080i signal format Set COMPONENT to SD when viewing movies When viewing Scrapbook images during output in HD 1080i signal format COMPONENT is automatically set to SD DSC T700 only HD 1080i Select this item to connect the camera to a 1080i capable High Definition TV SD Select this item to connect the camera to a TV that is not compatible with an HD...

Page 66: ...quipment The TV color systems differ depending on the country and region To view images on a TV screen check the TV color system of the country or region of use page 121 1 t Settings t Main Settings t t Video Out t t desired mode t NTSC Sets the video output signal to NTSC mode e g for the USA Japan PAL Sets the video output signal to PAL mode e g for Europe ...

Page 67: ...Set to the aspect ratio of television to be connected for playback 1 t Settings t Main Settings t t TV TYPE t t desired mode t 16 9 Selects this item to play back the images on a wide screen television 4 3 Selects this item to play back the images on a 4 3 ratio television ...

Page 68: ...input the correct password number again 1 The password input screen appears t Input the password number which you originally set t OK You cannot set the password for Memory Stick Duo images The password lock is not released even by initializing the settings Setting the password lock Entering the password and playing back images Notes OK Cancel Delete zWhat to do when you have forgotten the passwor...

Page 69: ...regardless of whether light fails to reach the center of the subject You cannot use the AF illuminator when Focus is set to Semi manual mode Landscape mode Twilight mode Fireworks mode or Hi Speed Shutter mode is selected in the Scene Selection mode Housing is set to On When you use AF illuminator the normal AF range finder frame is disabled and a new AF range finder frame is displayed by a dotted...

Page 70: ...rid Line With reference to the grid lines you can easily set a subject in a horizontal vertical position 1 t Settings t Shooting Settings t t Grid Line t t desired mode t On Displays the grid lines The grid lines are not recorded Off Does not display the grid lines ...

Page 71: ... invalid when The Scene Recognition is set to other than Off The Face Detection function is activated When Focus is set to Semi manual mode Single is automatically selected Single Automatically adjusts the focus when you press and hold the shutter button halfway down This mode is useful for shooting stationary subjects Monitor Automatically adjusts the focus before you press and hold the shutter b...

Page 72: ...s not available when the image size is set to 10M 3 2 8M or 16 9 7M The supported zoom ratio differs depending on the image size Smart Enlarges the image digitally within the range where the image will not be distorted according to the image size Precision Enlarges all image sizes by the total zoom scale of approximately 8 including the optical zoom 4 However note that the picture quality deterior...

Page 73: ...ing on the shooting angle of the camera the orientation of the image may not be recorded correctly You cannot use Auto Orientation when Underwater is selected in the Scene Selection Sometimes Auto Orientation cannot be performed when using the AC Adaptor not supplied and the USB AV DC IN cable for multi use terminal not supplied On Records the image with the correct orientation Off Does not use Au...

Page 74: ...y after shooting a still image 1 t Settings t Shooting Settings t t Auto Review t t desired mode t On Uses the Auto Review Off Does not use Auto Review zShooting another image without delay When you press the shutter button halfway down the display of the recorded image disappears and you can shoot another image immediately even if Auto Review is set to On ...

Page 75: ...ck Settings t t Clock Settings t 2 Desired date display format t t touch each item and set its numeric value t OK Midnight is indicated as 12 00 AM and noon as 12 00 PM The camera does not have a feature for superimposing dates on images By using PMB in the CD ROM supplied you can print or save images with the date Note ...

Page 76: ...ntents Operation Search HOME MENU Search Index 76GB Language Setting Selects the language to be used in the menu items warnings and messages 1 t Settings t Language Setting t t Language Setting t t desired mode t ...

Page 77: ...g mode 2 t Image Size t desired mode t When you print images recorded with 16 9 aspect ratio both edges may be cut off When shooting still images Image size Usage guidelines LCD screen 10M 3648 2736 For prints up to A3 size Images are displayed in 4 3 or 3 2 aspect ratio 5M 2592 1944 For prints up to A4 size 3M 2048 1536 For prints up to L 2L size VGA 640 480 For e mail attachments 3 2 8M 3648 243...

Page 78: ...For viewing on a TV screen standard picture quality 320 320 240 Approx 8 For sending as an e mail attachment Notes zOn image quality and image size A digital image is made up of a collection of small dots called pixels If it contains a large number of pixels the image becomes large it takes up more memory and the image is displayed in fine detail Image size is shown by the number of pixels Althoug...

Page 79: ...es to the optimal settings and shoots the image In addition when the camera recognizes Twilight Twilight Portrait Twilight using a tripod Backlight or Backlight Portrait it automatically shoots another image When the camera recognizes Portrait the Anti Blink function operates Current setting icon Scene Recognition icon The camera recognizes the following types of scenes When the camera determines ...

Page 80: ...uring shooting The Scene Recognition icon appears regardless of screen display settings These scenes may not be recognized depending on the situation The Anti Blink function does not work when Scene Recognition is set to Auto Notes zWhat is the Anti Blink function When Scene Recognition is set to Advanced and the subject closes their eyes while shooting this function operates so that the camera au...

Page 81: ...sh Easy Shooting Selects the flash setting from in Easy Shooting mode 1 Lower the lens cover to switch to shooting mode 2 REC Mode t Easy Shooting t 3 t Flash t desired mode t Auto Flash strobes when there is insufficient light or backlight Off Does not use the flash ...

Page 82: ... Selection mode Adults and children may not be recognized correctly depending on the conditions During Smile Shutter shooting Face Detection is automatically set to Auto even if it is set to When touched When touched Detects the face when an area with a face is touched on the screen Auto Selects the face the camera is to automatically focus on Child Priority Detects and shoots with priority on chi...

Page 83: ...ation Search HOME MENU Search Index 83GB zMaking faces easier to detect Use an appropriate lighting level Make sure the subjects faces are not hidden by hats masks sunglasses etc Make sure the subjects are facing the camera ...

Page 84: ...Shutter function for detecting smiles 1 Lower the lens cover to switch to shooting mode 2 REC Mode t Auto Adjustment t or 3 t Smile Detection Sensitivity t desired mode t Smiles may not be detected correctly depending on the conditions Low Detects a big smile Medium Detects a normal smile High Detects even a slight smile Note ...

Page 85: ...ted for the first image and these settings are also used for the other images BRK 0 3EV BRK 0 7EV BRK 1 0EV Records a series of three images with the exposure values automatically shifted Exposure Bracket When you cannot decide the correct exposure shoot in the Exposure Bracket mode shifting the exposure value You can select the image with the best exposure afterward The larger the bracket step va...

Page 86: ... 2 0 EV to 2 0 EV For details on EV setting in Program Auto mode see page 34 1 Lower the lens cover to switch to shooting mode 2 t EV t desired number t EV is not available in Easy Shooting mode If you shoot a subject in extremely bright or dark conditions or when you use the flash the exposure adjustment may not be effective Notes ...

Page 87: ...es in Program Auto mode see page 32 1 Lower the lens cover to switch to shooting mode 2 REC Mode t Movie t 3 t Metering Mode t desired mode t Multi Divides into multiple regions and measures each region The camera determines a well balanced exposure Multi pattern metering Center Measures the center of the image and determines the exposure based on the brightness of the subject there Center weighte...

Page 88: ... Movie t 3 t Focus t desired mode t Multi AF Focuses on a subject in all ranges of the finder frame automatically This mode is useful when the subject is not in the center of the frame unlimited distance Sets the focus to unlimited distance Use this setting to focus on all objects within the frame This mode is useful when repeatedly shooting a subject at the same distance Use Semi manual when it i...

Page 89: ...ven though you select Fluorescent Light 1 Fluorescent Light 2 or Fluorescent Light 3 When shooting with a flash in other than Flash mode White Balance is set to Auto Auto Adjusts the white balance automatically so that the colors appear natural Daylight Adjusts for outdoors conditions on a fine day evening views night scenes neon signs fireworks etc Cloudy Adjusts for a cloudy sky or a shady locat...

Page 90: ...he subject is affected by the lighting conditions The color tones are adjusted automatically in the Auto Adjustment mode but you can adjust color tones manually using the White Balance function Weather lighting Daylight Cloudy Fluorescent Incandescent Characteristics of light White standard Bluish Green tinged Reddish ...

Page 91: ... the color of the water the Underwater White Balance may not work correctly even though you select Underwater 1 or Underwater 2 When shooting with a flash in other than Flash mode Underwater White Balance is set to Auto Auto The camera automatically adjusts color tones underwater so they appear natural Underwater 1 Adjusts for underwater conditions where blue is strong Underwater 2 Adjusts for und...

Page 92: ...mount of flash light 1 Lower the lens cover to switch to shooting mode 2 REC Mode t Program Auto t 3 t Flash Level t desired mode t Sometimes effects do not show up when the subject being shot is too bright or too dark Makes the flash level lower Standard Makes the flash level higher Note ...

Page 93: ...sh During burst or bracket shooting When Face Detection function does not work Sometimes Anti Blink function does not work depending on the situation When Anti Blink is set to Auto and only images with the subject s eyes closed are recorded the message Blinked eye detected appears on the LCD screen Shoot again as necessary Auto When the Face Detection function is active the camera switches to the ...

Page 94: ...ons such as distance to the subject or if the subject looked away from the pre strobe If you do not use the Face Detection function Red Eye Reduction does not work even when you select Auto Auto When the Face Detection function is activated the flash strobes automatically to reduce the red eye phenomenon On The flash always strobes to reduce the red eye phenomenon Off Does not use Red Eye Reductio...

Page 95: ...REC Mode t Program Auto t 3 t DRO standard t desired mode t Depending on shooting conditions it may not be possible to obtain correction effects Note the following points when DRO plus is set Time is required for image processing Only AUTO or values from 80 to 400 can be set for the ISO value When Burst or Bracket mode is selected DRO plus is canceled and DRO standard is set Off Does not adjust DR...

Page 96: ...switch to shooting mode 2 t Color Mode t desired mode t You cannot select Color Mode in Auto Adjustment Scene Selection or Easy Shooting mode You can select only Normal Sepia or B W when shooting movies Normal Sets the image to standard color Vivid Sets the image to bright and deep color Sepia Sets the image to sepia color B W Sets the image to black and white Notes ...

Page 97: ...ot is set to Shooting For movies you can set Continuous or Off only The default setting is set to Continuous The battery charge is used up more quickly in Continuous mode than in Shooting mode Shooting Activates the anti blur function when pressing the shutter button halfway down Continuous Always activates the anti blur function You can stabilize images even when zooming up a far subject Off Does...

Page 98: ...Portrait or Twilight mode In that case shoot with the above tips in mind Cause Your hands or body shake while you hold the camera and press the shutter button and the entire screen is blurred What you can do to reduce the blurring Use a tripod or place the camera on a flat surface to hold the camera steady Shoot with a 2 second delay self timer and stabilize the camera by holding your arms firmly ...

Page 99: ...yed back when using Date View Step 2 is unnecessary when Date View is already set 1 Press the Playback button to switch to playback mode 2 t View Mode t Date View t 3 t Date List t 4 Select the date you want to display from the calendar This item is not displayed when the internal memory is used DSC T77 only Note ...

Page 100: ...or each group using the PMB software supplied For details on entering the event name see the PMB Guide Step 2 is unnecessary when Event View is already set 1 Press the Playback button to switch to playback mode 2 t View Mode t Event View t 3 t Event List t 4 Select the event group you want to display This item is not displayed when the internal memory is used DSC T77 only Note Event name ...

Page 101: ...playback mode 2 t View Mode t Folder View t 3 t Select Folder t t select the folder with t OK This item is not displayed when the internal memory is used DSC T77 only Note zViewing images across multiple folders When multiple folders are created and the first or last image in the folder is displayed the following indicators appear Moves to the previous folder Moves to the next folder Moves to eith...

Page 102: ... on this camera view the images in Folder View Date View Displays images by the date Touch Date List to select a specific date with a calendar display Event View Analyzes the dates shots and frequency automatically organizes the images into groups and displays them Touch Event List to select the event group to view Favorites Displays images registered as Favorites Touch the number of the Favorites...

Page 103: ...not displayed when the internal memory is used to record images DSC T77 only When the view mode is set to Folder View you cannot use the Filter by Faces function Sometimes images are mistakenly displayed or hidden Sometimes filtering cannot be performed with images shot using other cameras Off Images are not filtered All people Images are filtered according to specified conditions and then display...

Page 104: ...move Favorites t This Image t t touch the Favorites number to which you want to add the image t OK 1 Press the Playback button to switch to playback mode 2 t Add Remove Favorites t Multiple Images t t touch the Favorites number to which you want to add the image 3 Select images In single image mode 1 Touch to display the image then touch the image you want to add as Favorites 2 Repeat step 1 In in...

Page 105: ...ton to switch to playback mode 2 t View Mode t Date View or Event View t 3 Touch to select a date or event for remove 4 t Add Remove Favorites t Remove All in Date Range or Remove All in Event t t touch the Favorites number from which you want to remove the image t OK 1 Press the Playback button to switch to playback mode 2 t View Mode t Favorites t 3 Select Favorites number for remove 4 t Add Rem...

Page 106: ...t to add as Sharemark t t Add Remove Sharemark t This Image t t touch the Sharemark number to which you want to add the image t OK 1 Press the Playback button to switch to playback mode 2 t Add Remove Sharemark t Multiple Images t t touch the Sharemark number to which you want to add the image 3 Select images In single image mode 1 Touch to display the image then touch the image you want to add as...

Page 107: ...View or Event View t 3 Touch to select a date or event for remove 4 t Add Remove Sharemark t Remove All in Date Range or Remove All in Event t t touch the Sharemark number from which you want to remove the image t OK 1 Press the Playback button to switch to playback mode 2 t View Mode t Favorites t 3 Select Favorites for add remove 4 t Add Remove Sharemark t Add All in Favorites or Remove All in F...

Page 108: ... by flash After red eye correction is completed touch OK You may not be able to correct the red eye phenomenon depending on the image Unsharp masking Sharpens the image within a chosen frame Touch the area frame of the desired image to retouch t t OK Depending on the image sufficient correction may not be applied and the image quality may deteriorate Soft Focus Blurs the periphery around a chosen ...

Page 109: ... in the still image Touch the center point of the desired image to retouch t t adjust the desired range to retouch with t t OK Retro Softens the image by blurring the focus and lowering the surrounding light so that it appears as if it was taken by an old camera Adjust the desired range to retouch with t t select the level of retouch with t t OK Happy Faces This feature puts a smile on a person s ...

Page 110: ...put stamps on movies When connecting the camera to a TV you cannot paint the images Button Action 1 Save Saves the image in VGA or 3M format in the internal memory or on a Memory Stick Duo 2 Pen Paint characters or graphics 3 Eraser Make corrections 4 Stamp Apply a stamp to the image 5 Thickness Stamps select Select the pen or eraser thickness or the stamp 6 Color select Select the color 7 Exit Ex...

Page 111: ...e for blog or e mail attachments 1 Press the Playback button to switch to playback mode 2 t Multi Purpose Resize t desired mode t 3 Touch to specify the area you want to trim t t OK You cannot resize movies You cannot resize the images from VGA to HDTV Enlarging the image and multi resizing can reduce the image quality HDTV Changes the aspect ratio from 4 3 3 2 to 16 9 and saves as 2M size Blog E ...

Page 112: ...lect images In single image mode 1 Touch to display the image then touch the image you want to delete 2 Repeat step 1 In index mode 1 Touch to turn the pages then touch the images you want to delete 2 Repeat step 1 to delete more images 4 t OK Touch an image with mark to release the mark 1 Press the Playback button to switch to playback mode 2 t View Mode t Date View Event View or Folder View t 3 ...

Page 113: ...e you want to protect t t Protect t This Image t 1 Press the Playback button to switch to playback mode 2 t Protect t Multiple Images t 3 Select images In single image mode 1 Touch to display the image then touch the image you want to protect 2 Repeat step 1 In index mode 1 Touch to turn the pages then touch the images you want to protect 2 Repeat step 1 to protect more images 4 t OK Touch an imag...

Page 114: ...2 t View Mode t Date View Event View or Folder View t 3 Touch to select the date event or folder you want to unlock 4 t Protect t Remove All in Date Range Remove All in Event or Remove All in This Folder t t OK 1 Press the Playback button to switch to playback mode 2 t View Mode t Favorites t 3 Select Favorites to set unlock the protection 4 t Protect t Set All in This Group or Remove All in Favor...

Page 115: ...y 1 Press the Playback button to switch to playback mode 2 Display the image you want to order print t t t This Image t 1 Press the Playback button to switch to playback mode 2 t t Multiple Images t 3 Select images In single image mode 1 Touch to display the image then touch the image you want to order print 2 Repeat step 1 In index mode 1 Touch to turn the pages then touch the images you want to ...

Page 116: ... View Mode t Date View Event View or Folder View t 3 Touch to select the date event or folder you want to cancel 4 t t Remove All in Date Range Remove All in Event or Remove All in This Folder t t OK 1 Press the Playback button to switch to playback mode 2 t View Mode t Favorites t 3 Select Favorites to set cancel print order 4 t t Set All in This Group or Remove All in Favorites t t OK Order prin...

Page 117: ...utton to switch to playback mode 2 Display the image to be rotated 3 t Rotate t 4 t OK You cannot rotate movies or protected still images You may not be able to rotate images shot with other cameras When viewing images on a computer the image rotation information may not be reflected depending on the software Notes ...

Page 118: ...s t 3 Adjust the volume by touching t Exit zAdjusting the volume during playback of a movie or slideshow Movie playback Touch to display the volume control screen then touch the buttons to adjust the volume Touch Exit to turn off the volume control screen Slideshow Touch the screen to display the volume control screen then touch the buttons to adjust the volume Touch to turn off the volume control...

Page 119: ...and set the input 3 Press Playback button to turn on the camera Images shot with the camera appear on the TV Touch to select the desired image If your TV has stereo input jacks connect the audio plug black of the cable for multi use terminal to the left audio jack Icons and other indicators do not appear on the TV screen When using the camera abroad it may be necessary to switch the video signal o...

Page 120: ...ize cannot be played back in HD format You cannot view movies output in HD 1080i signal format Set COMPONENT to SD when viewing movies When viewing Scrapbook images during output in HD 1080i signal format COMPONENT is automatically set to SD DSC T700 only When using the camera abroad it may be necessary to switch the video signal output to match that of your TV system page 66 Viewing an image by c...

Page 121: ...rk Finland Germany Holland Hong Kong Hungary Italy Kuwait Malaysia New Zealand Norway Poland Portugal Singapore Slovak Republic Spain Sweden Switzerland Thailand United Kingdom etc PAL M system Brazil PAL N system Argentina Paraguay Uruguay SECAM system Bulgaria France Guiana Iran Iraq Monaco Russia Ukraine etc On TV color systems zOn PhotoTV HD This camera is compatible with the PhotoTV HD standa...

Page 122: ...era Editing images Displaying the shooting locations of still images on maps online this requires an Internet connection Creating a disc with the images shot requires CD or DVD disc writing drive Printing or saving still images with the date Uploading images to a media service this requires an Internet connection Adding changing Music for slideshow using Music Transfer Install the software supplie...

Page 123: ... Starter Edition are not supported The computer environment must also satisfy the operating requirements of the OS Operations are not guaranteed for all the recommended computer environments mentioned above If you connect two or more USB devices to a single computer at the same time some devices including the camera may not operate depending on the types of USB devices you are using Operations are...

Page 124: ...desired language then click Next The License Agreement screen appears 4 Read the agreement carefully If you accept the terms of the agreement click the radio button next to I accept the terms of the license agreement and then click Next 5 Follow the instructions on the screen to complete the installation When the restarting confirmation message appears restart the computer following the instructio...

Page 125: ... the positions where you shot the images on a map This requires an Internet connection You can print or save the still images with the date You can create a data disc using a CD burner drive or DVD burner drive You can upload the image to a media service This requires an Internet connection Double click the PMB Guide icon on the desktop To access PMB Guide from the Start menu click Start t All Pro...

Page 126: ...camera to your computer Connecting appears on the screen of the camera When a USB connection is established for the first time your computer automatically runs a program to recognize the camera Wait for a while When you import export images to your computer using a battery pack with little remaining charge transferring may fail or image data may become corrupted if the battery pack shuts down too ...

Page 127: ... that is named with the event name of Event List 3 View images on your computer When importing is complete the PMB starts Thumbnails of the imported images are displayed The Pictures in Windows XP 2000 My Pictures folder is set as the default folder in Viewed folders Organize images on the computer on a calendar by shooting date to view them For details on PMB see the PMB Guide Importing images to...

Page 128: ...exported images on this camera the mark is displayed on the LCD screen You cannot play back some images depending on the image size No guarantees are made for playing back on this camera files containing images which were processed on a computer or images which were shot using other cameras When printing images at a shop export the images to a Memory Stick Duo Perform the procedures from step 1 to...

Page 129: ...era When no new folders are created only 101MSDCF folder is displayed You cannot record any images to the 100MSDCF folder The images in this folder are available only for viewing This folder is displayed only when Memory Stick Duo is inserted into the camera You cannot record play back any images to the MISC folder Image files are named as follows Still image files DSC0ssss JPG Movie files MOV0sss...

Page 130: ... the camera and a computer When you connect the camera and your computer AutoPlay Wizard appears Click to close the AutoPlay Wizard for any unnecessary drives If the desired AutoPlay Wizard does not appear click Computer in Windows XP 2000 My Computer t PMBPORTABLE then double click PMB_P exe 2 Click PMB Portable in Windows XP PMB Portable t OK The User Agreement screen appears 3 Read the agreemen...

Page 131: ...the convenience of the website operators Sony will not be held responsible for any trouble occurring between the users and third parties or any inconvenience caused to users relating to the utilization of the services inclusive of the termination of or changes to such services To view a website you will be redirected to it by the Sony server There may be times when you cannot access the website be...

Page 132: ...k button 4 Connect the camera to your computer Connecting appears on the screen of the camera When a USB connection is established for the first time your computer automatically runs a program to recognize the camera Wait for a while When you import export images to your computer using a battery pack with little remaining charge transferring may fail or image data may become corrupted if the batte...

Page 133: ...hat is named with the event name of Event List 3 View images on your computer When importing is complete the PMB starts Thumbnails of the imported images are displayed The Pictures in Windows XP 2000 My Pictures folder is set as the default folder in Viewed folders Organize images on the computer on a calendar by shooting date to view them For details on the PMB see the PMB Guide Importing images ...

Page 134: ...ting starts When you play back exported images on this camera the mark is displayed on the LCD screen You cannot play back some images depending on the image size No guarantees are made for playing back on this camera files containing images which were processed on a computer or images which were shot using other cameras Perform the procedures from step 1 to 3 below before Disconnecting the cable ...

Page 135: ... Stick Duo 101MSDCF only Internal memory 101_SONY only You cannot record any images to the 100MSDCF folder The images in this folder are available only for viewing This folder is displayed only when Memory Stick Duo is inserted into the camera You cannot record play back any images to the MISC folder Image files are named as follows Still image files DSC0ssss JPG Movie files MOV0ssss MPG Index ima...

Page 136: ...t t Download Music t DSC T77 t Slideshow t Music Tool t t Download Music t The message Connect to PC appears 2 Make a USB connection between the camera and your computer 3 Start Music Transfer 4 Follow the instructions on the screen to add change Music files Adding Changing Music using Music Transfer zTo restore the music preset at the factory to the camera 1Perform Format Music page 52 2Execute R...

Page 137: ...two or more USB devices to a single computer at the same time some devices including the camera may not operate depending on the types of USB devices you are using Operations are not guaranteed when using a USB hub Connecting the camera using a USB interface that is compatible with Hi Speed USB USB 2 0 compliant allows advanced transfer high speed transfer as the camera is compatible with Hi Speed...

Page 138: ...on of the images and file names see pages 129 135 4 View images on the computer Double click the hard disk icon t the desired image file in the folder containing the copied files to open that image file Drag and drop the drive icon or the icon of the Memory Stick Duo to the Trash icon beforehand when you perform the procedures listed below or the camera is disconnected from the computer Disconnect...

Page 139: ...usic on CDs Preset music saved on the camera To install Music Transfer Shut down all other application software before you install Music Transfer For installation you need to log on as Administrator 1 Turn on your Macintosh computer and insert the CD ROM supplied into the CD ROM drive 2 Double click SONYPICTUTIL 3 Double click the MusicTransfer pkg file in Mac folder The installation of the softwa...

Page 140: ...tep up Guide 1 Copy the stepupguide folder in the stepupguide folder to your computer 2 Select stepupguide language and then GB folder stored in the CD ROM supplied and copy all the files in the GB folder to the img folder in the stepupguide folder that you copied to your computer in step 1 Overwrite the files in the img folder with the files from the GB folder 3 After copying is complete double c...

Page 141: ...o a computer using the supplied PMB software and print the images You can insert the date on the image and print it For details see the PMB Guide You can take a Memory Stick Duo containing images shot with the camera to a photo printing service shop You can make a Print order mark on the images which you want to print out in advance When you print images shot in 16 9 mode both edges may be cut off...

Page 142: ...set to Auto the camera will automatically recognize certain printers when connected Skip Stage 1 if this is the case 1 Insert the sufficiently charged battery pack into the camera 2 t Settings t Main Settings t t USB Connect t t PictBridge t The USB mode is set 1 Connect the camera to the printer 2 Turn on the printer An image and the screen for selecting the images to be printed appear If the ind...

Page 143: ...m then touch OK 2 Touch the desired setting item to make the print settings Quantity Selects the number of copies of the specified image to be printed The designated number of images may not all fit onto a single sheet depending on the quantity of images Layout Selects the number of images you want to print side by side on a sheet Size Selects the size of the printing sheet Date Selects Day Time o...

Page 144: ...our photo printing service shop copy the images you want to print out to another medium such as a CD R and take it to the shop The Memory Stick Duo Adaptor not supplied may be necessary Consult your photo printing service shop Before you take image data to a shop always copy back up your data to a disk You cannot set the number of prints When you want to superimpose dates on images consult your ph...

Page 145: ...minute re insert the battery pack then turn on the power 3 Initialize the settings page 59 4 Consult your Sony dealer or local authorized Sony service facility Additional information on this product and answers to frequently asked questions can be found at our Customer Support Website http www sony net Battery pack and power 146 Shooting still images movies 146 Viewing images 149 Deleting 150 Comp...

Page 146: ...ash and zoom frequently When you repeatedly turn the power on and off When Brightness of the screen display is set to Bright A discrepancy arose between the remaining charge indicator and the actual remaining battery charge Fully discharge the battery pack once then charge it to correct the indication The battery pack is discharged Insert a charged battery pack The battery pack is dead page 163 Re...

Page 147: ...s W 50 cm 19 3 4 inches T from the lens Or set to Close focus enabled mode and shoot about 1 to 20 cm 13 32 to 7 7 8 inches from the W side distance page 28 Twilight mode or Landscape mode or Fireworks mode is selected in the Scene Selection when shooting still images The Semi manual function is selected Select the auto focus mode page 30 Zoom does not work You cannot use the Optical zoom in Close...

Page 148: ... incorrect Correct the exposure pages 34 86 The LCD screen is too dark or too bright Adjust the brightness of the backlight page 16 The image is too dark You are shooting a subject with a light source behind the subject Select the metering mode pages 32 87 or adjust the exposure pages 34 86 The image is too bright Adjust the exposure pages 34 86 The image colors are not correct Set Color Mode to N...

Page 149: ...ages in Folder View page 50 This is caused by copying images on your computer to the Memory Stick Duo without using the PMB Play such images in Folder View page 50 The date and time are not displayed Display Setup is set to Simple or Image Only Touch to set Display Setup to Normal page 15 The image appears rough right after playback starts This may happen due to image processing This is not a malf...

Page 150: ...upported connect the camera to the computer pages 126 132 and 138 The computer recognizes the Memory Stick PRO Duo Your computer does not recognize the camera Turn on the camera When the battery level is low insert the charged battery pack or use the AC adaptor not supplied pages 126 132 Set USB Connect to Auto or Mass Storage page 63 Use the cable for multi use terminal supplied Disconnect the ca...

Page 151: ...vie from the hard disk pages 126 132 Cannot print an image Refer to the operation manual of the printer Images once exported to a computer cannot be viewed on the camera Export them to a folder recognized by the camera such as 101MSDCF pages 129 135 Follow the correct procedures pages 128 134 When using software other than PMB the information may not be updated correctly so images may turn blue or...

Page 152: ...h the image size set to 16 9 the lateral end of the image may be cut off When printing images using your printer cancel the trimming or borderless settings Consult the printer manufacturer as to whether the printer provides these functions or not When having images printed at a digital print shop ask the shop whether they can print the images without cutting off both edges Cannot print images with...

Page 153: ... index mode The printer does not provide these functions Consult the printer manufacturer as to whether the printer provides these functions or not The date may not be inserted in the index mode depending on the printer Consult the printer manufacturer is printed on the date inserted part of the image The image does not have the recording data so the date cannot be inserted Set Date to Off and pri...

Page 154: ...he lens gets fogged Moisture condensation has occurred Turn off the camera and leave it for about an hour before using it The camera becomes warm when you use it for a long time This is not a malfunction The Clock Set screen appears when you turn on the camera Set the date and time again page 75 The internal rechargeable backup battery has discharged Insert a charged battery and set aside for 24 h...

Page 155: ...times The internal memory has experienced a format error or an unformatted Memory Stick Duo is inserted Format the internal memory or the Memory Stick Duo page 53 The inserted Memory Stick Duo cannot be used with the camera or the data is damaged Insert a new Memory Stick Duo E 61 ss E 62 ss E 91 ss A camera malfunction has occurred Initialize the camera page 59 then turn the power on again If the...

Page 156: ...Stick Delete unnecessary images or files page 41 Read only memory The camera cannot record or delete images on this Memory Stick Duo No images No images that can be played back have been recorded in the internal memory No images that can be played back have been recorded in this folder of the Memory Stick Duo When images recorded with other cameras cannot be played back on this camera view the ima...

Page 157: ...Vibration warning indicator Camera shake may occur due to insufficient light Use the flash turn on the anti blur function or mount the camera on a tripod to secure the camera 640 Fine is not available 640 Fine size movies can be recorded only using a Memory Stick PRO Duo Insert a Memory Stick PRO Duo or set the image size to a size other than 640 Fine Zoom disabled Digital Zoom is set to Off when ...

Page 158: ... Music files Error Formatting Music Execute Format Music Operation cannot be executed during HD 1080i output Some functions are restricted while the camera is connected to a High Definition TV Operation cannot be executed during TV output Some functions are restricted while the camera is connected to a TV Operation cannot be executed for movie files You have selected a function that is not availab...

Page 159: ...management by the camera is possible Delete images from the Date View or Event View Image management file error Import all of the images to the computer with PMB and format the Memory Stick Duo or the internal memory page 53 When you cannot import all of the images to the computer with PMB import all of the images to the computer without using PMB pages 127 133 To view the images again with the ca...

Page 160: ...oad Power sources You can use the camera the battery charger supplied and the AC LS5K AC Adaptor not supplied in any country or region where the power supply is within 100 V to 240 V AC 50 60 Hz Do not use an electronic transformer travel converter as this may cause a malfunction Note ...

Page 161: ...corrupted in the following cases When the Memory Stick Duo is removed or the camera is turned off during a read or write operation When the Memory Stick Duo is used in locations subject to static electricity or electrical noise We recommend backing up important data Do not press down hard when you write down on the memo area Do not attach a label on the Memory Stick Duo itself nor on a Memory Stic...

Page 162: ...a Memory Stick compliant device make sure that the Memory Stick Duo Adaptor is inserted facing the correct direction Note that improper use may damage the equipment Do not insert a Memory Stick Duo Adaptor into a Memory Stick compliant device without a Memory Stick Duo attached Doing so may result in malfunction of the unit Notes on using Memory Stick PRO Duo not supplied Memory Stick PRO Duo with...

Page 163: ...remely hot places such as in a car or under direct sunlight How to store the battery pack Fully discharge the battery pack before storing and store it in a cool dry place To maintain the battery pack s function fully charge the battery pack and then fully discharge it on the camera at least once a year while storing To use the battery pack up leave the camera in slideshow page 38 playback mode unt...

Page 164: ...pack from the battery charger If you leave the charged battery pack in the charger battery life may be shortened When the CHARGE lamp flashes remove the battery pack being charged and then inserting the same battery pack into the battery charger again until it clicks When the CHARGE lamp flashes again this may indicate a battery error or that a battery pack other than the specified type has been i...

Page 165: ...ra In order to mount the camera on the CSS HD2 the supplied station plate G DSC T700 or station plate F DSC T77 must be attached to the camera For details refer to the operating instructions supplied with the Cyber shot Station 1 Set the station plate with the Sony logo in front and slide it into place You will hear a click when the station plate is correctly mounted 2 Mount the camera on the Cybe...

Page 166: ...e Cyber shot Station Button Action 1 Slideshow Displays the setting screen of the slideshow page 38 Although the screen differs when button on the camera is touched setting items do not change 2 MENU This button is invalid 3 b B Displays the previous next image in single image mode Moves the cursor in index mode x Switches to the single image mode in index mode 4 v Changes the screen display in si...

Page 167: ...9 Color Mode 96 COMPONENT 65 Computer 122 Importing images 127 133 138 Macintosh 137 Windows 122 Connecting Computer 126 132 Printer 142 TV 119 Copy 56 Create REC Folder 54 Cross Filter 109 D Date 75 143 Date List 99 Date View 47 Daylight 89 Delete 41 112 Demo mode 62 Digital Zoom 72 DirectX 124 DISP 15 Download Music 51 DPOF 115 DRO 95 Dynamic Range Optimizer 95 E Easy Shooting 23 Electronic tran...

Page 168: ...g 76 LCD Screen 15 LUN Settings 64 M Macintosh computer 137 Macro 28 Main Settings 1 10 Main Settings 2 10 Manage Memory 10 Mass Storage 63 Memory Stick Duo 161 MENU 11 12 Menu screen 11 12 Metering Mode 32 87 Movie Mode 44 25 MPG 129 135 MTP 63 Multi AF 30 88 Multi connector 119 126 132 138 142 Multi pattern metering 32 87 Multi Purpose Resize 111 Music Tool 9 136 Music Transfer 136 139 N NTSC 66...

Page 169: ... Synchro 29 Smart zoom 72 Smile Detection Sensitivity 84 Smile Shutter 22 Snow 20 Soft Focus 108 Soft Snap 20 Software 124 125 136 Spot AF 30 Spot metering 32 Spot metering cross hairs 32 SteadyShot 97 T Temporarily Rotated Display 43 Touch panel 14 Trimming 108 Troubleshooting 145 TV 119 TV TYPE 67 Twilight Portrait 20 Twilight 20 U Underwater 21 Underwater White Balance 91 Unsharp masking 108 US...

Page 170: ...le for the following GNU General Public License hereinafter referred to as GPL or GNU Lesser General Public License hereinafter referred to as LGPL are included in the camera This informs you that you have a right to have access to modify and redistribute source code for these software programs under the conditions of the supplied GPL LGPL Source code is provided on the web Use the following URL t...

Page 171: ...nts Operation Search HOME MENU Search Index 171GB Password release number DSC T700 only For details on the Password Lock function see page 68 To release the password lock of the camera enter the following number 7669 ...

Reviews: